Deploy a Container
Learn how to deploy Docker containers with complete configuration - from simple web servers to complex databases.
Prerequisites
Before deploying containers, ensure:
✅ Container runtime image is available:
- Check: Registry page → Images → Look for “container-runtime”
- If missing, run:
sudo ./scripts/build-container-runtime-v2.sh
✅ At least one host is online:
- Check: Dashboard → Hosts → Status should be “Online”
✅ Network bridge is configured:
- Default bridge:
fcbr0 - Setup:
sudo ./scripts/fc-bridge-setup.sh fcbr0 <uplink-interface>
Step 1: Open Deployment Page
Navigate to the container deployment page:
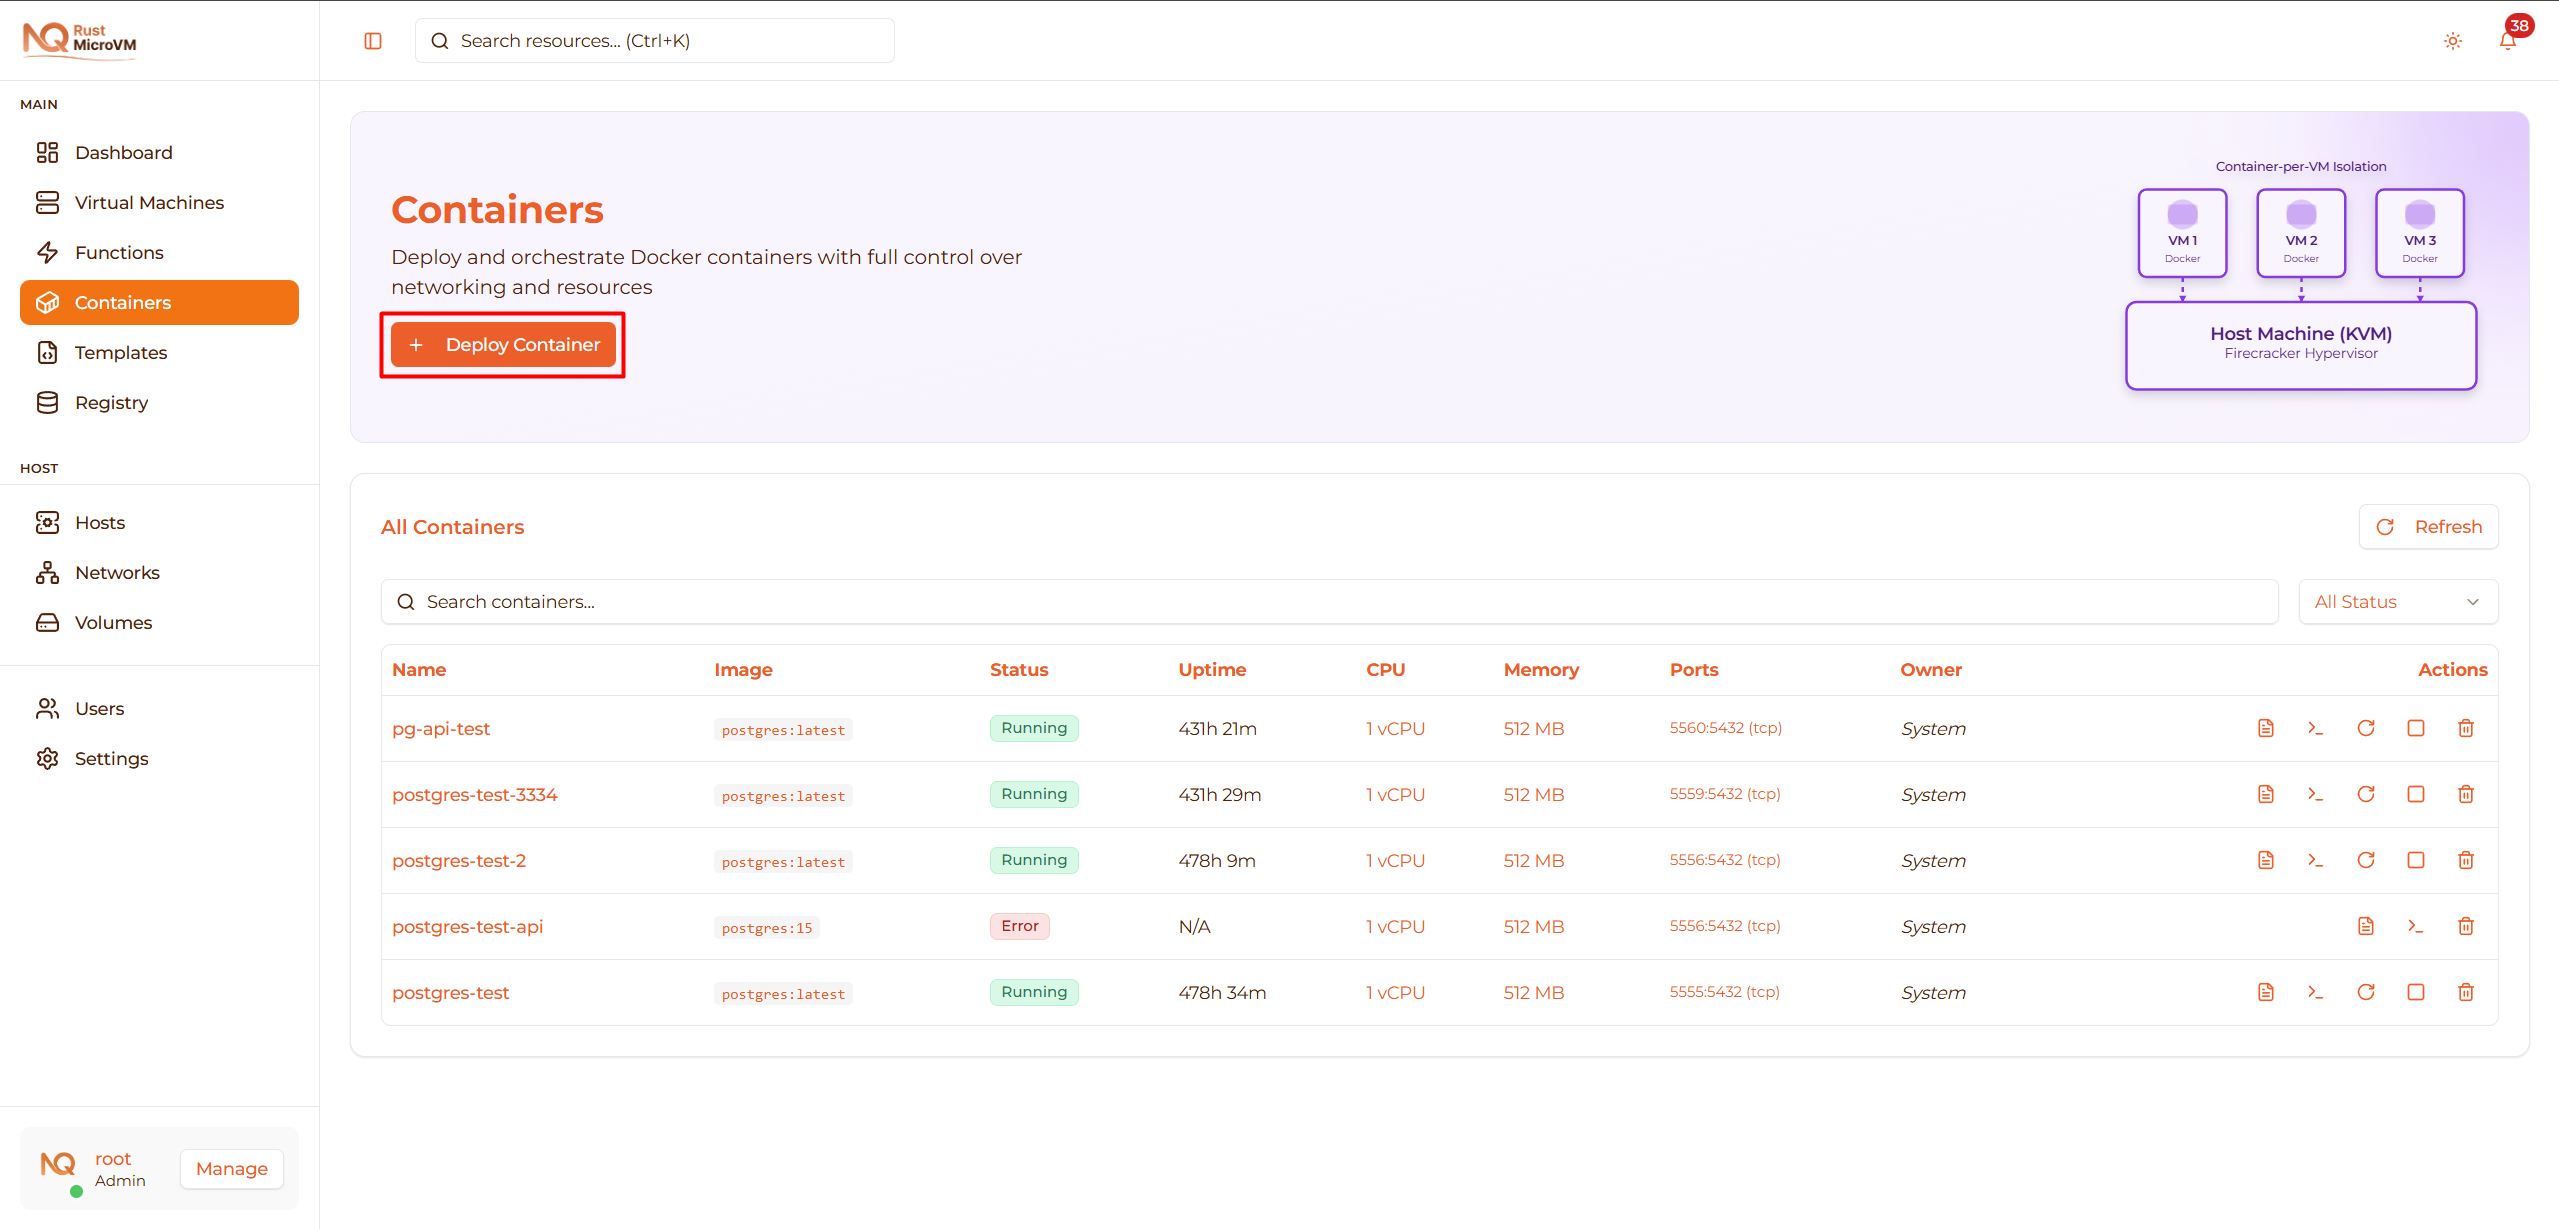
- Click “Containers” in the sidebar
- Click “Deploy Container” button
You’ll see the deployment form:
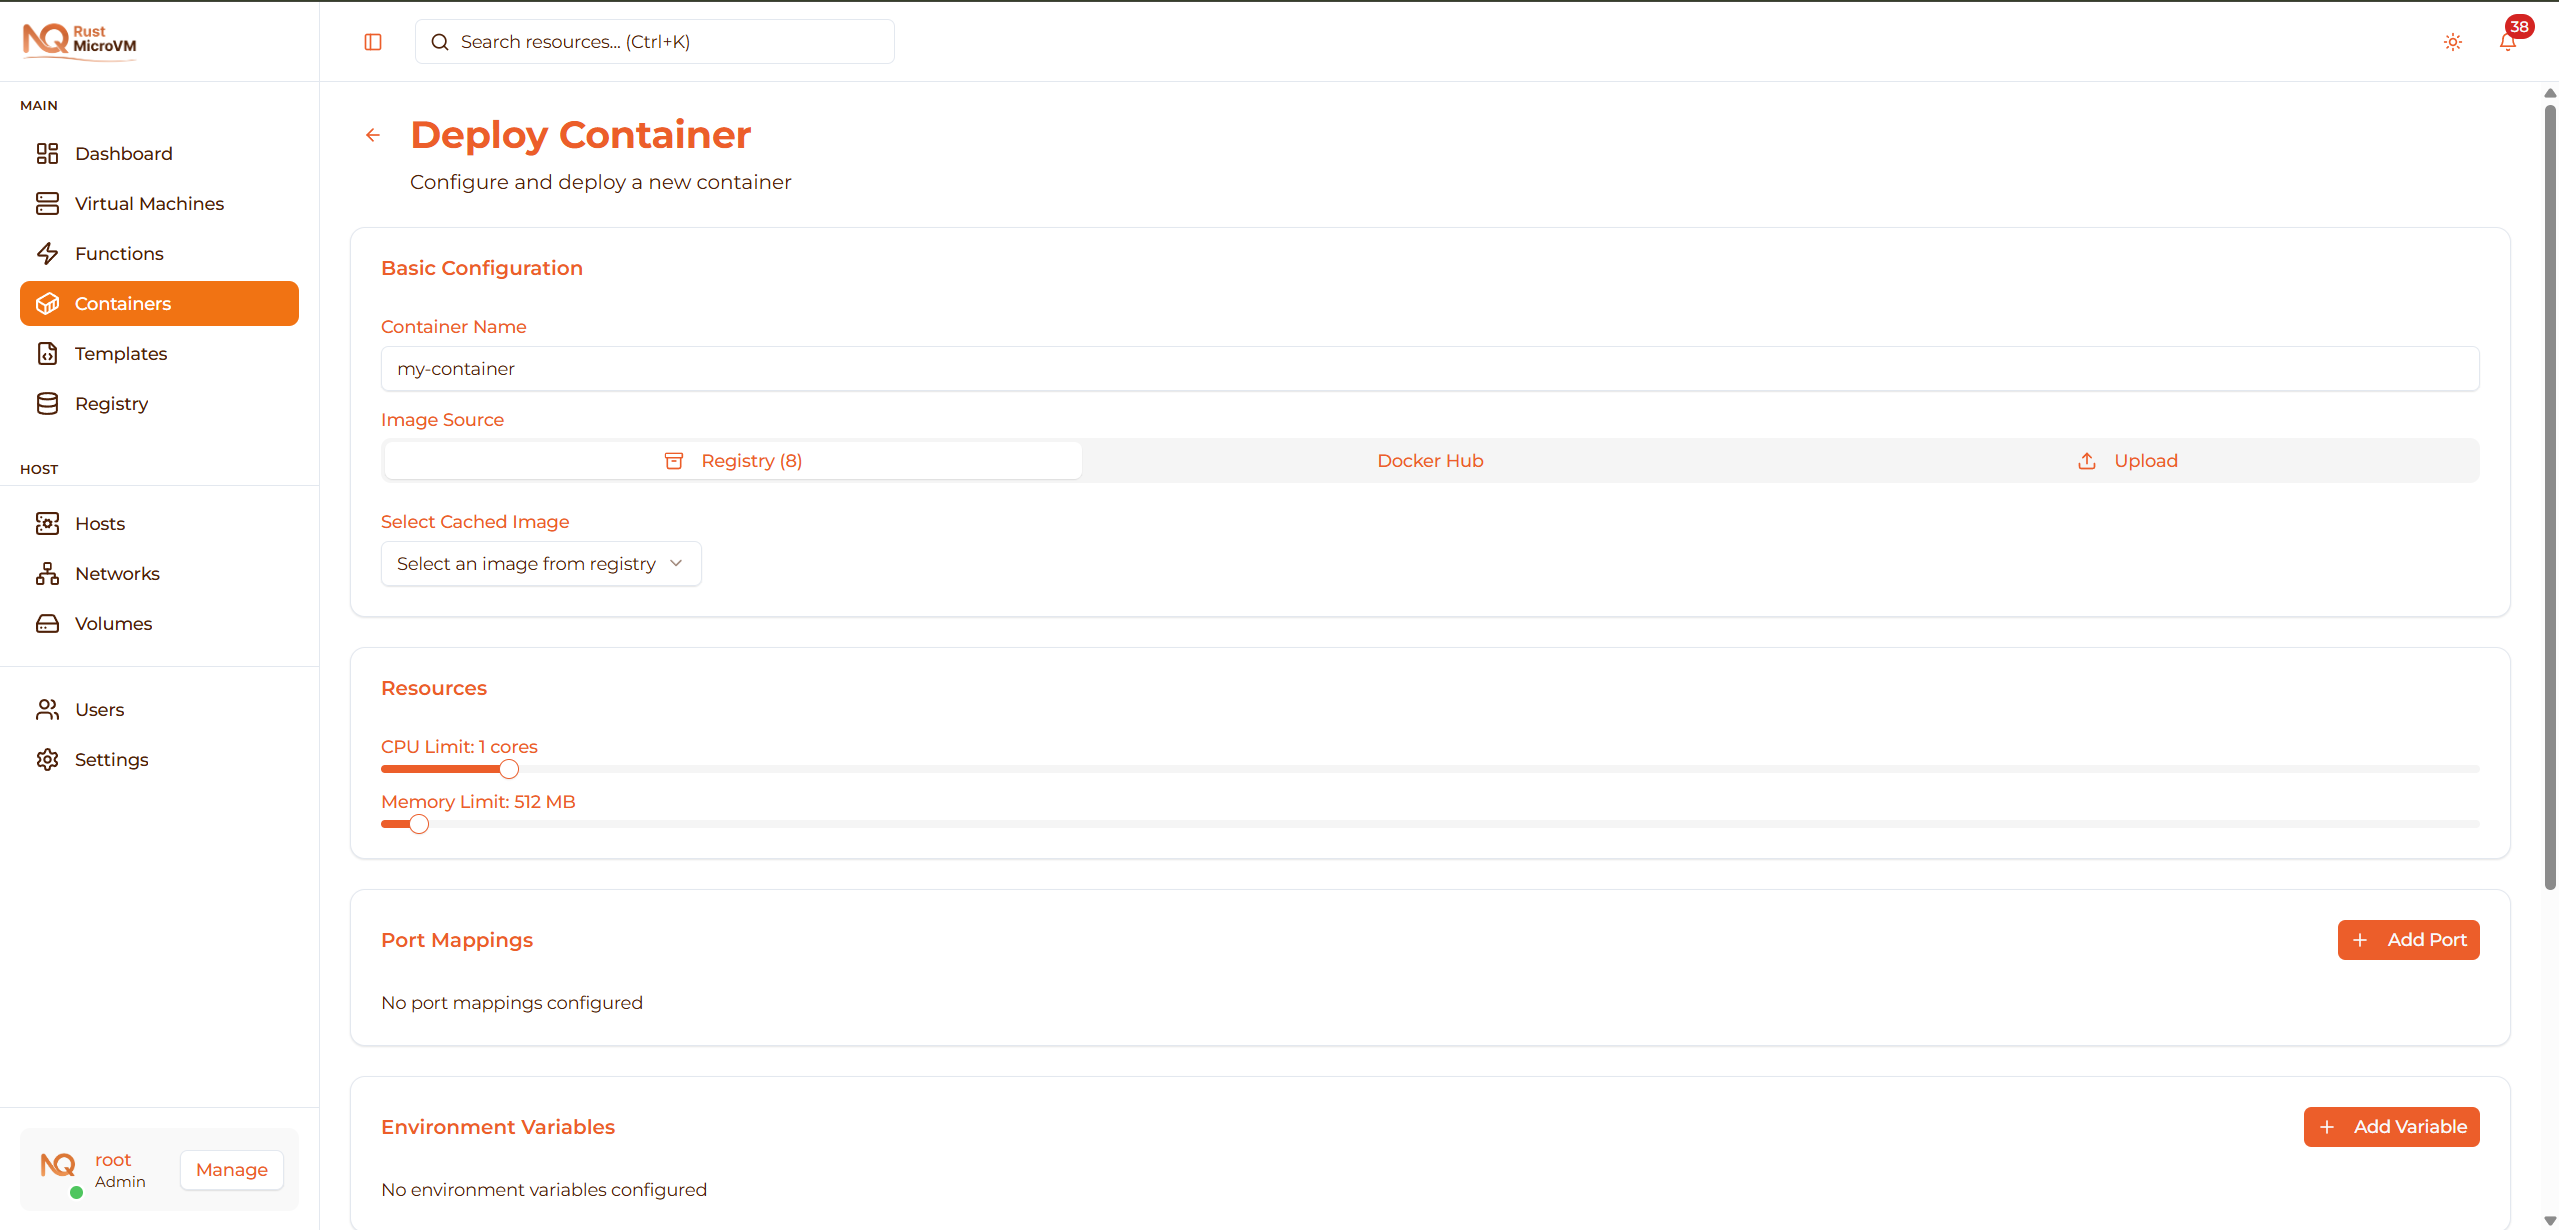
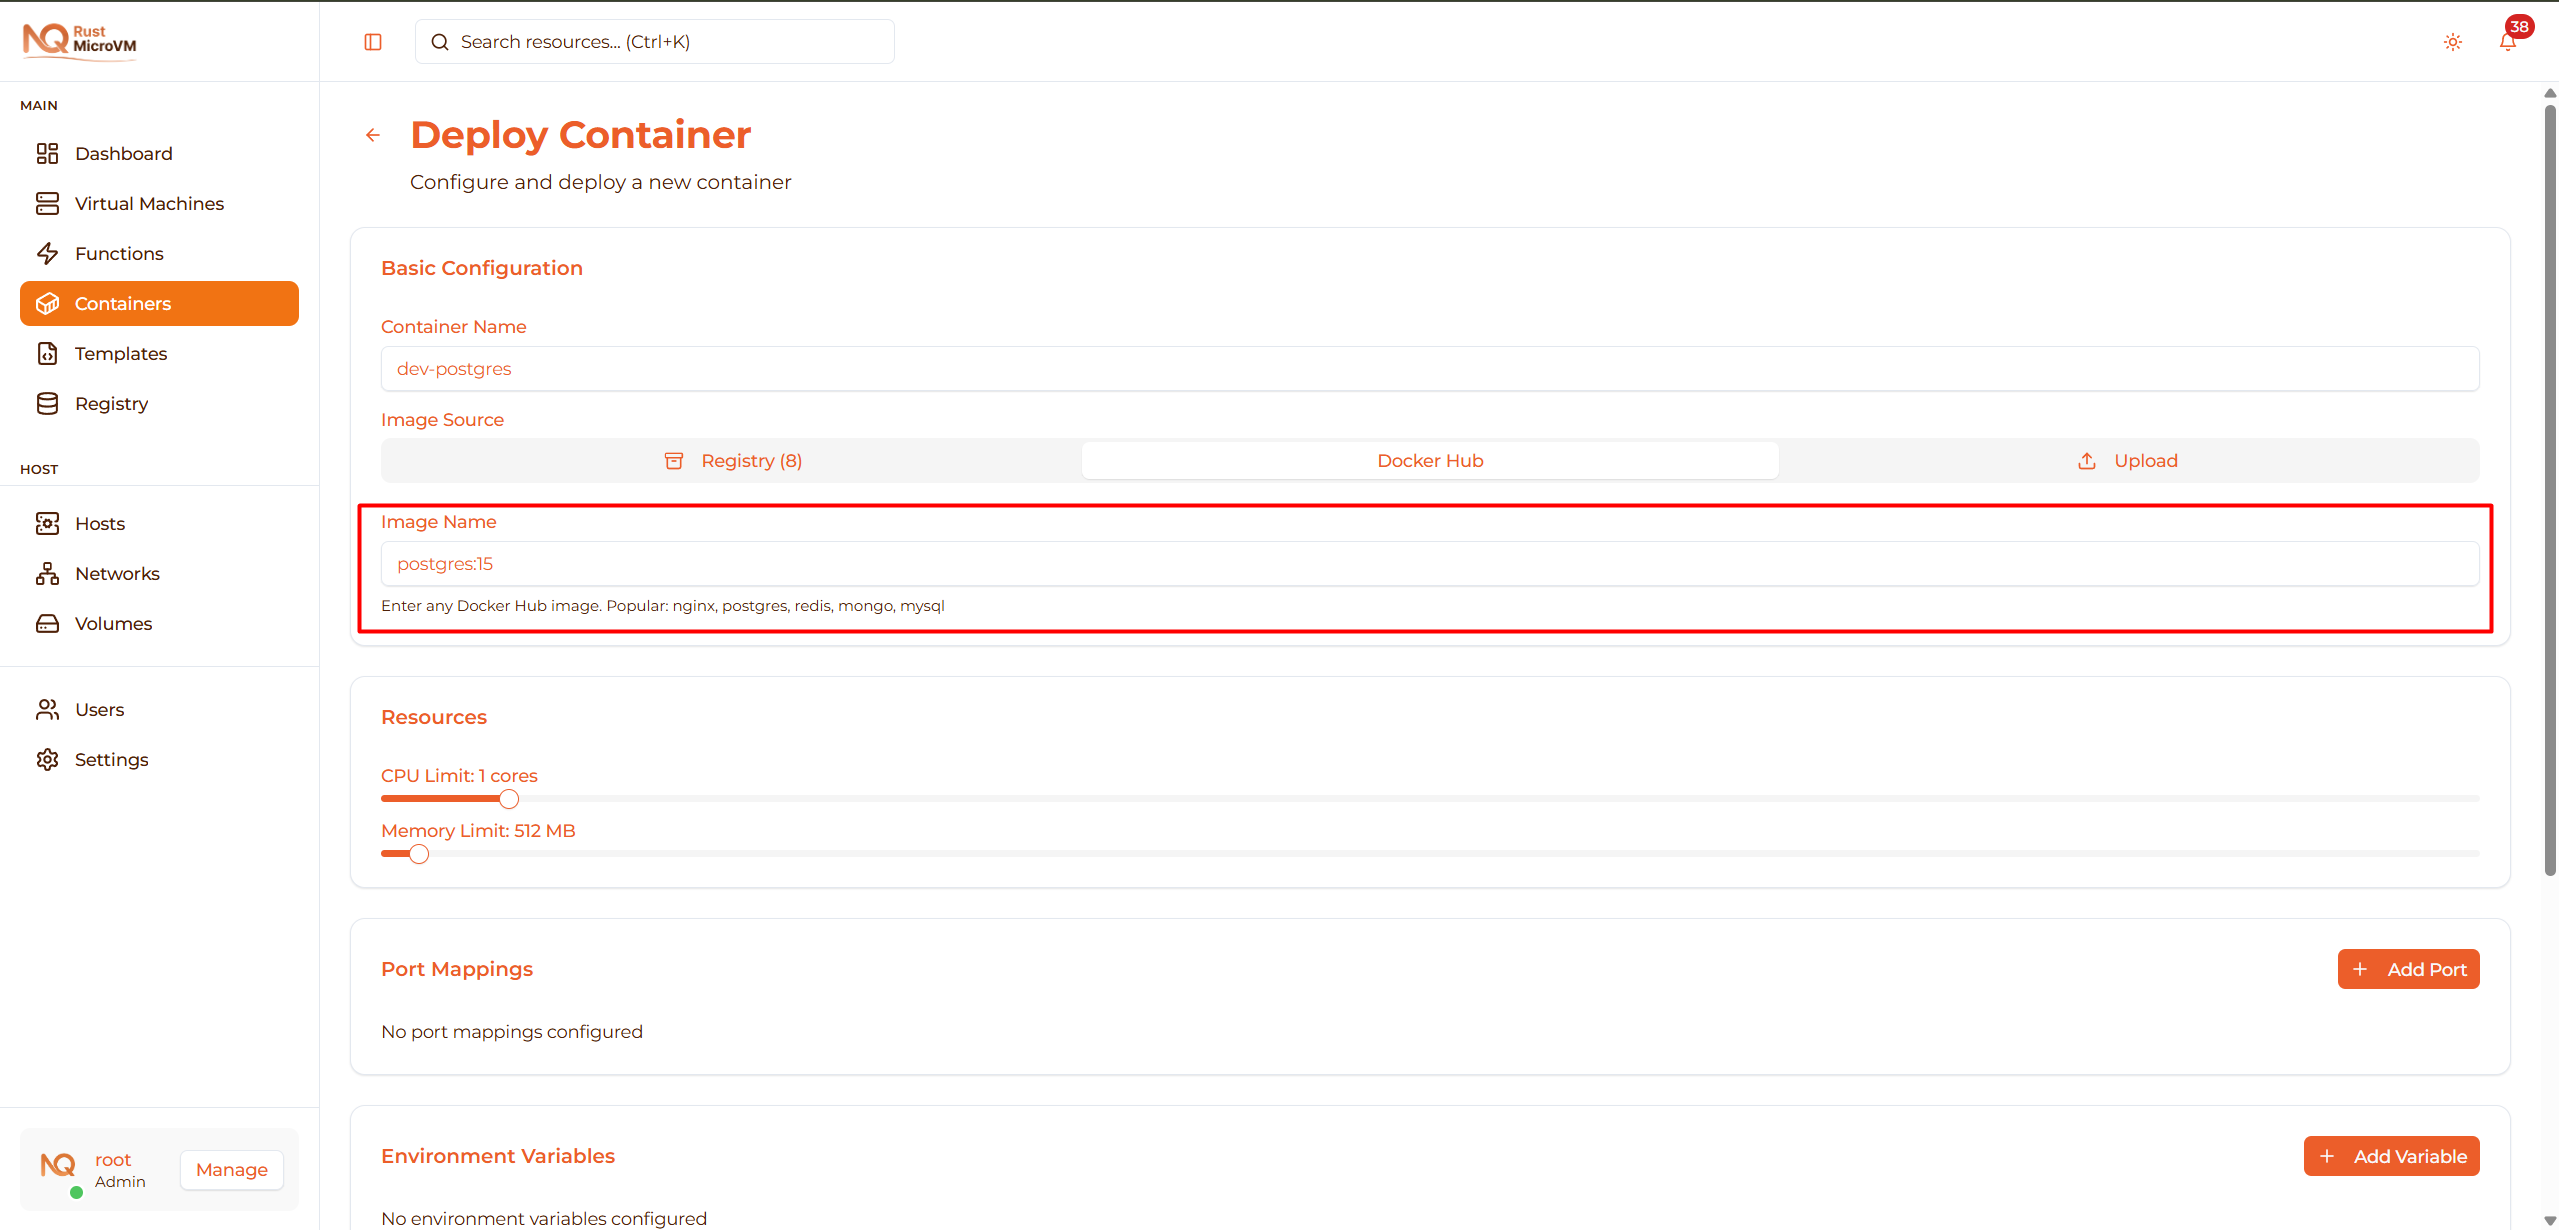
Step 2: Basic Configuration
Container Name
Enter a unique name for your container:
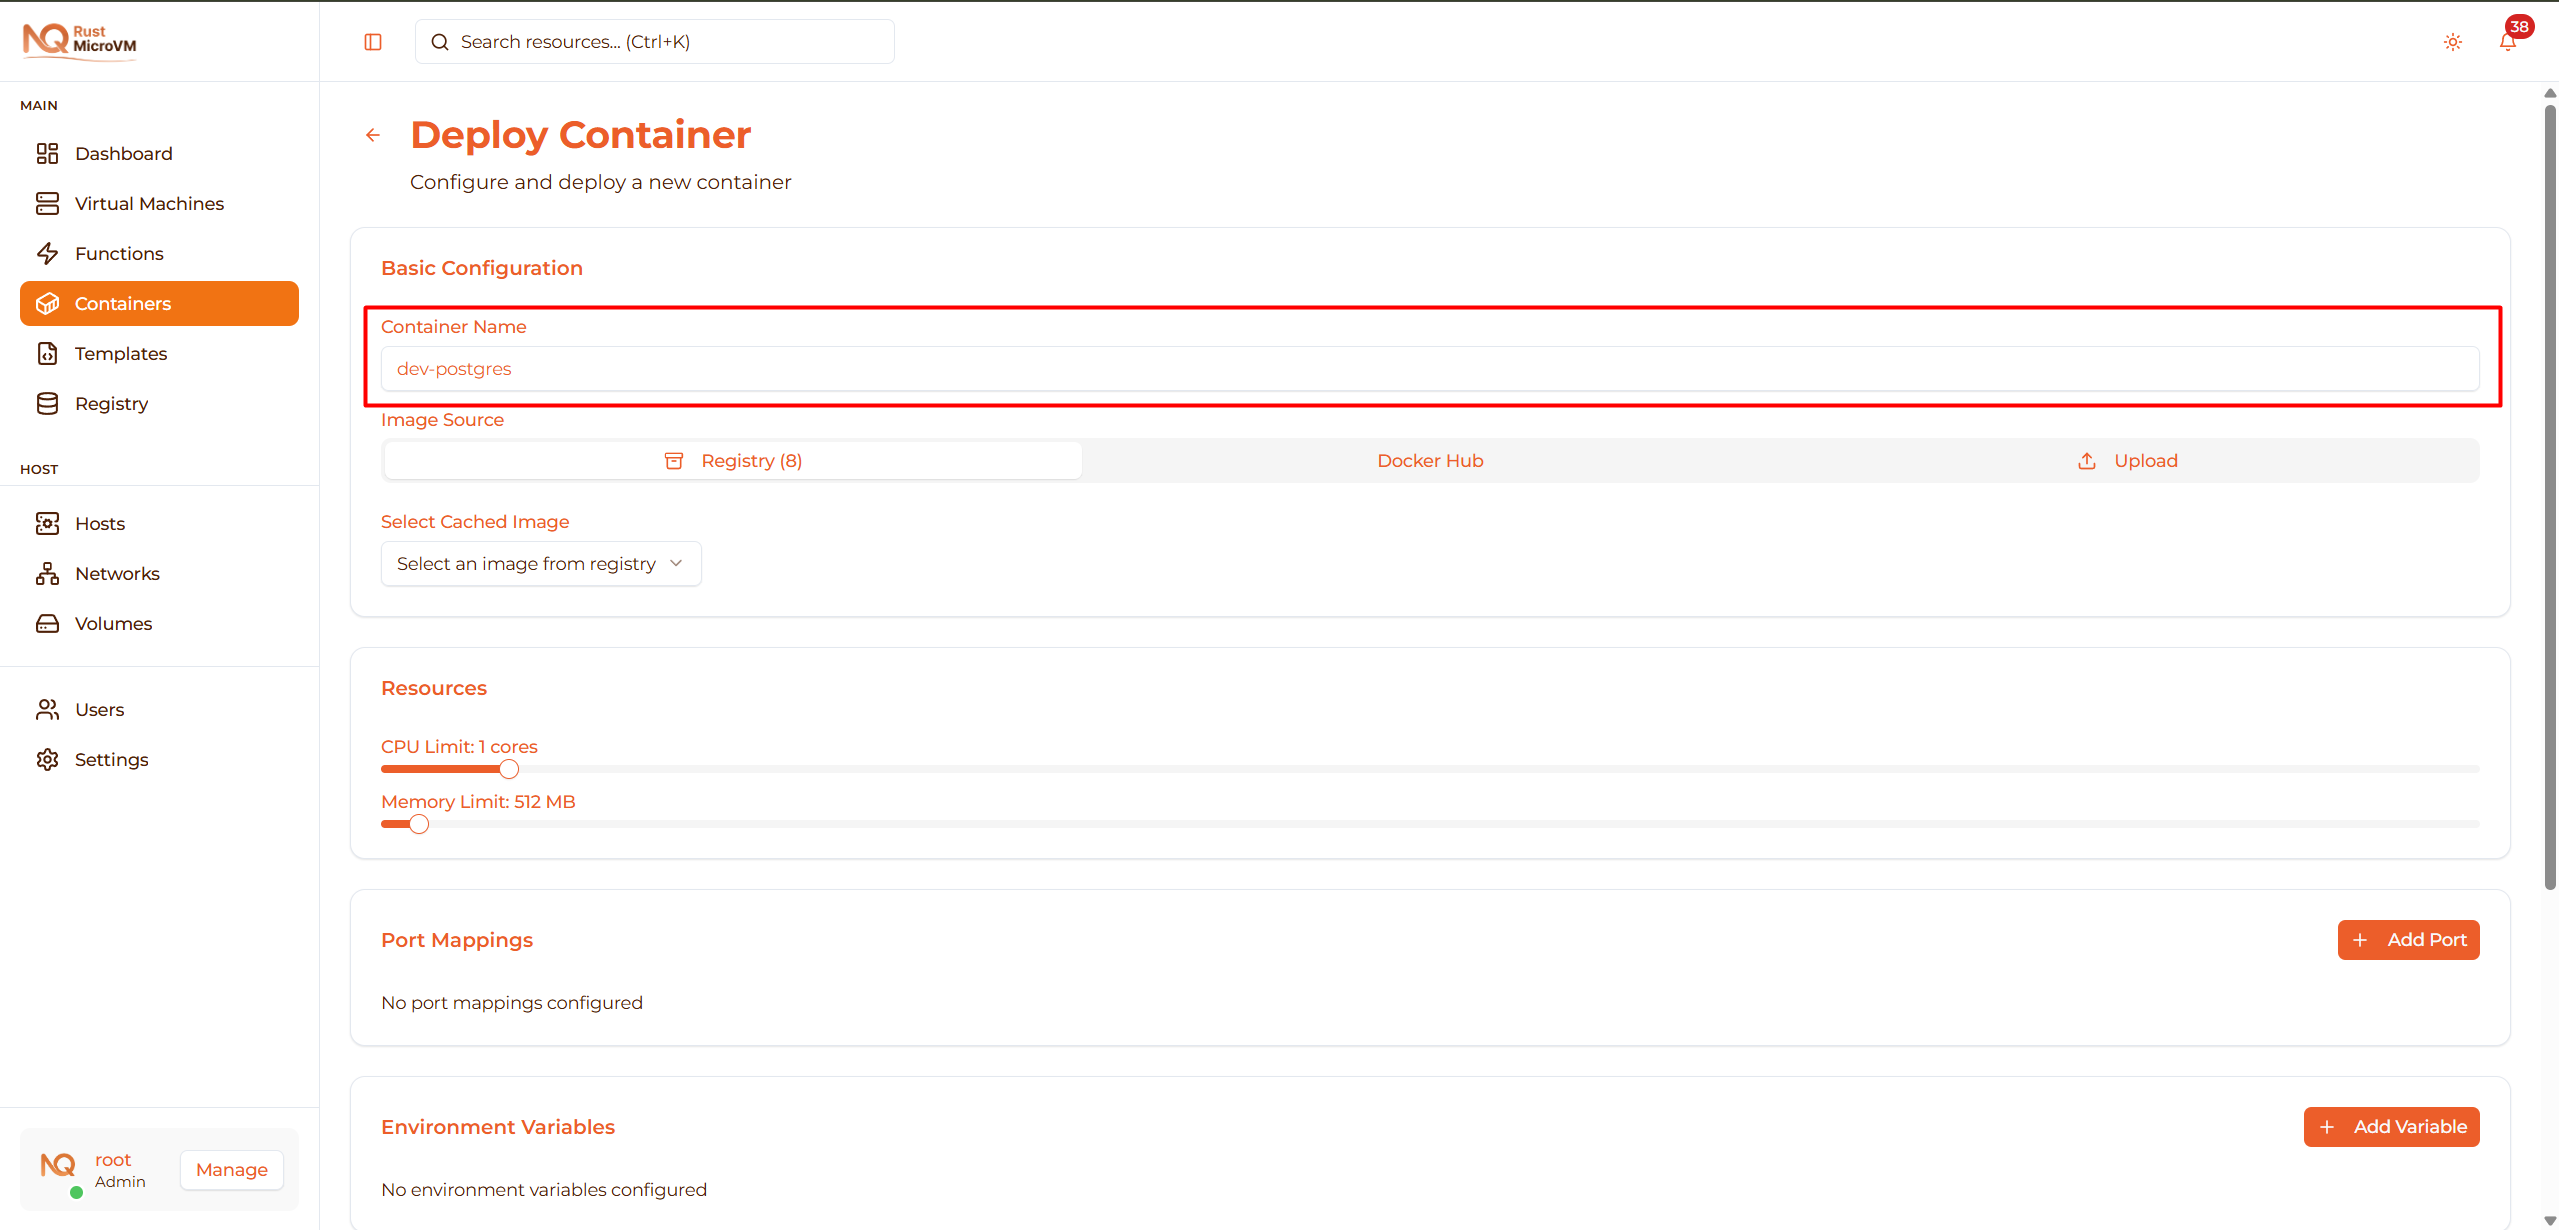
Guidelines:
- Use lowercase letters, numbers, hyphens
- Be descriptive:
prod-api,dev-postgres,nginx-frontend - Avoid generic names:
container1,test,my-container
Examples:
  Web servers:    nginx-prod, apache-dev
Databases:      postgres-main, mysql-users, mongo-analytics
APIs:           api-gateway, auth-service, payment-api
Caches:         redis-sessions, memcached-cache
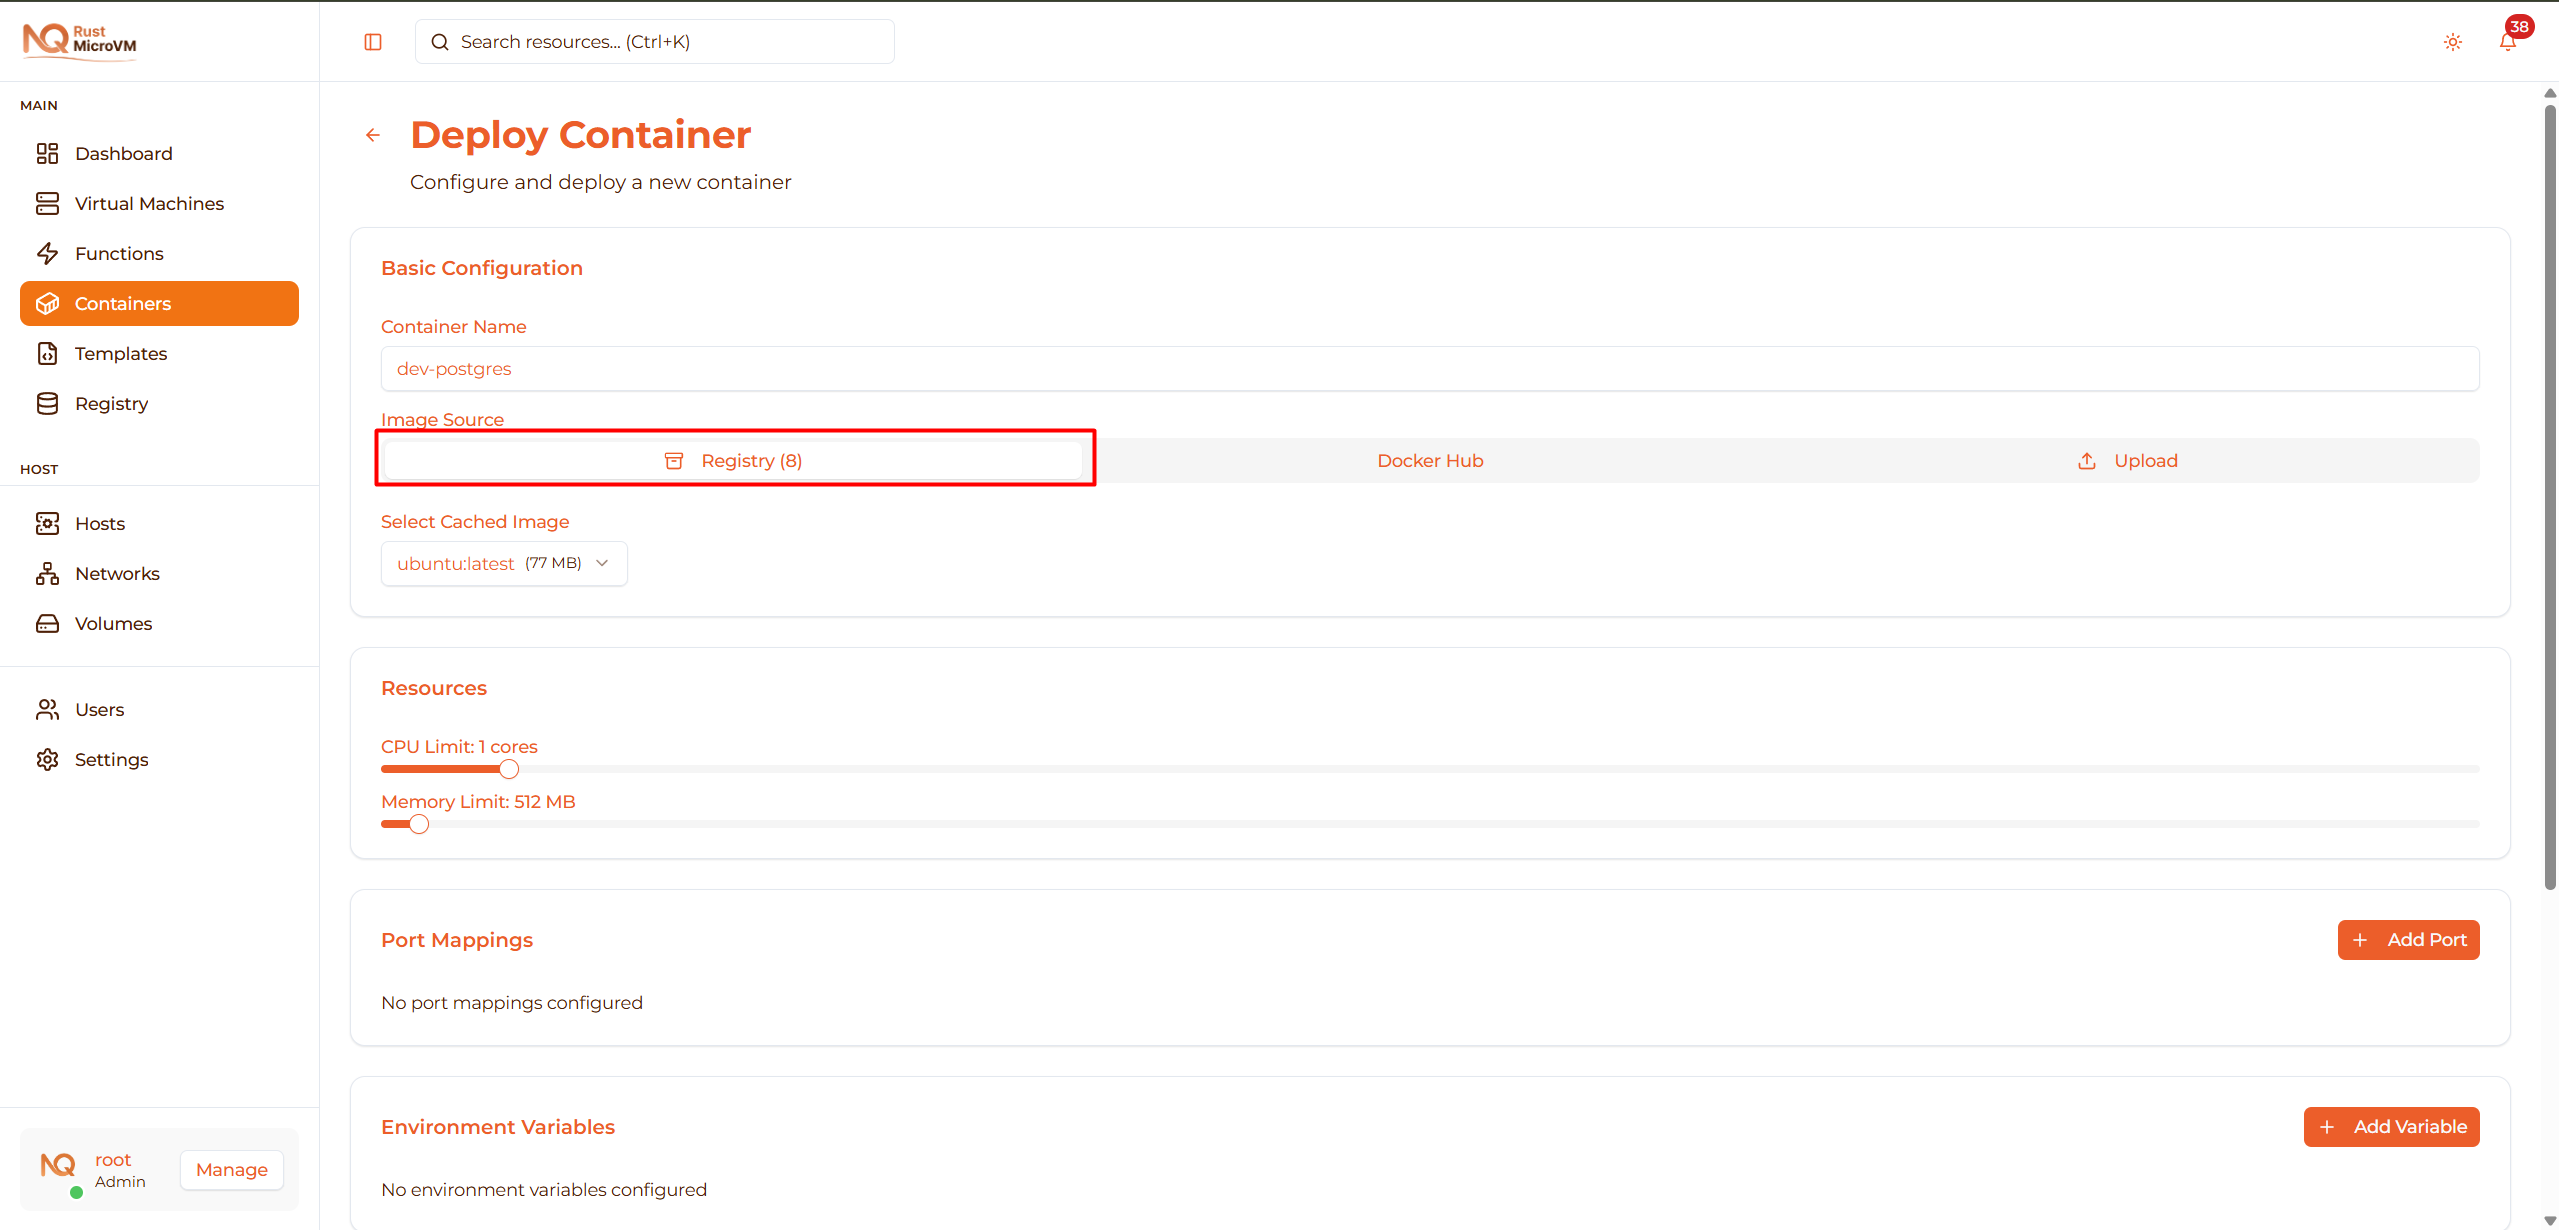
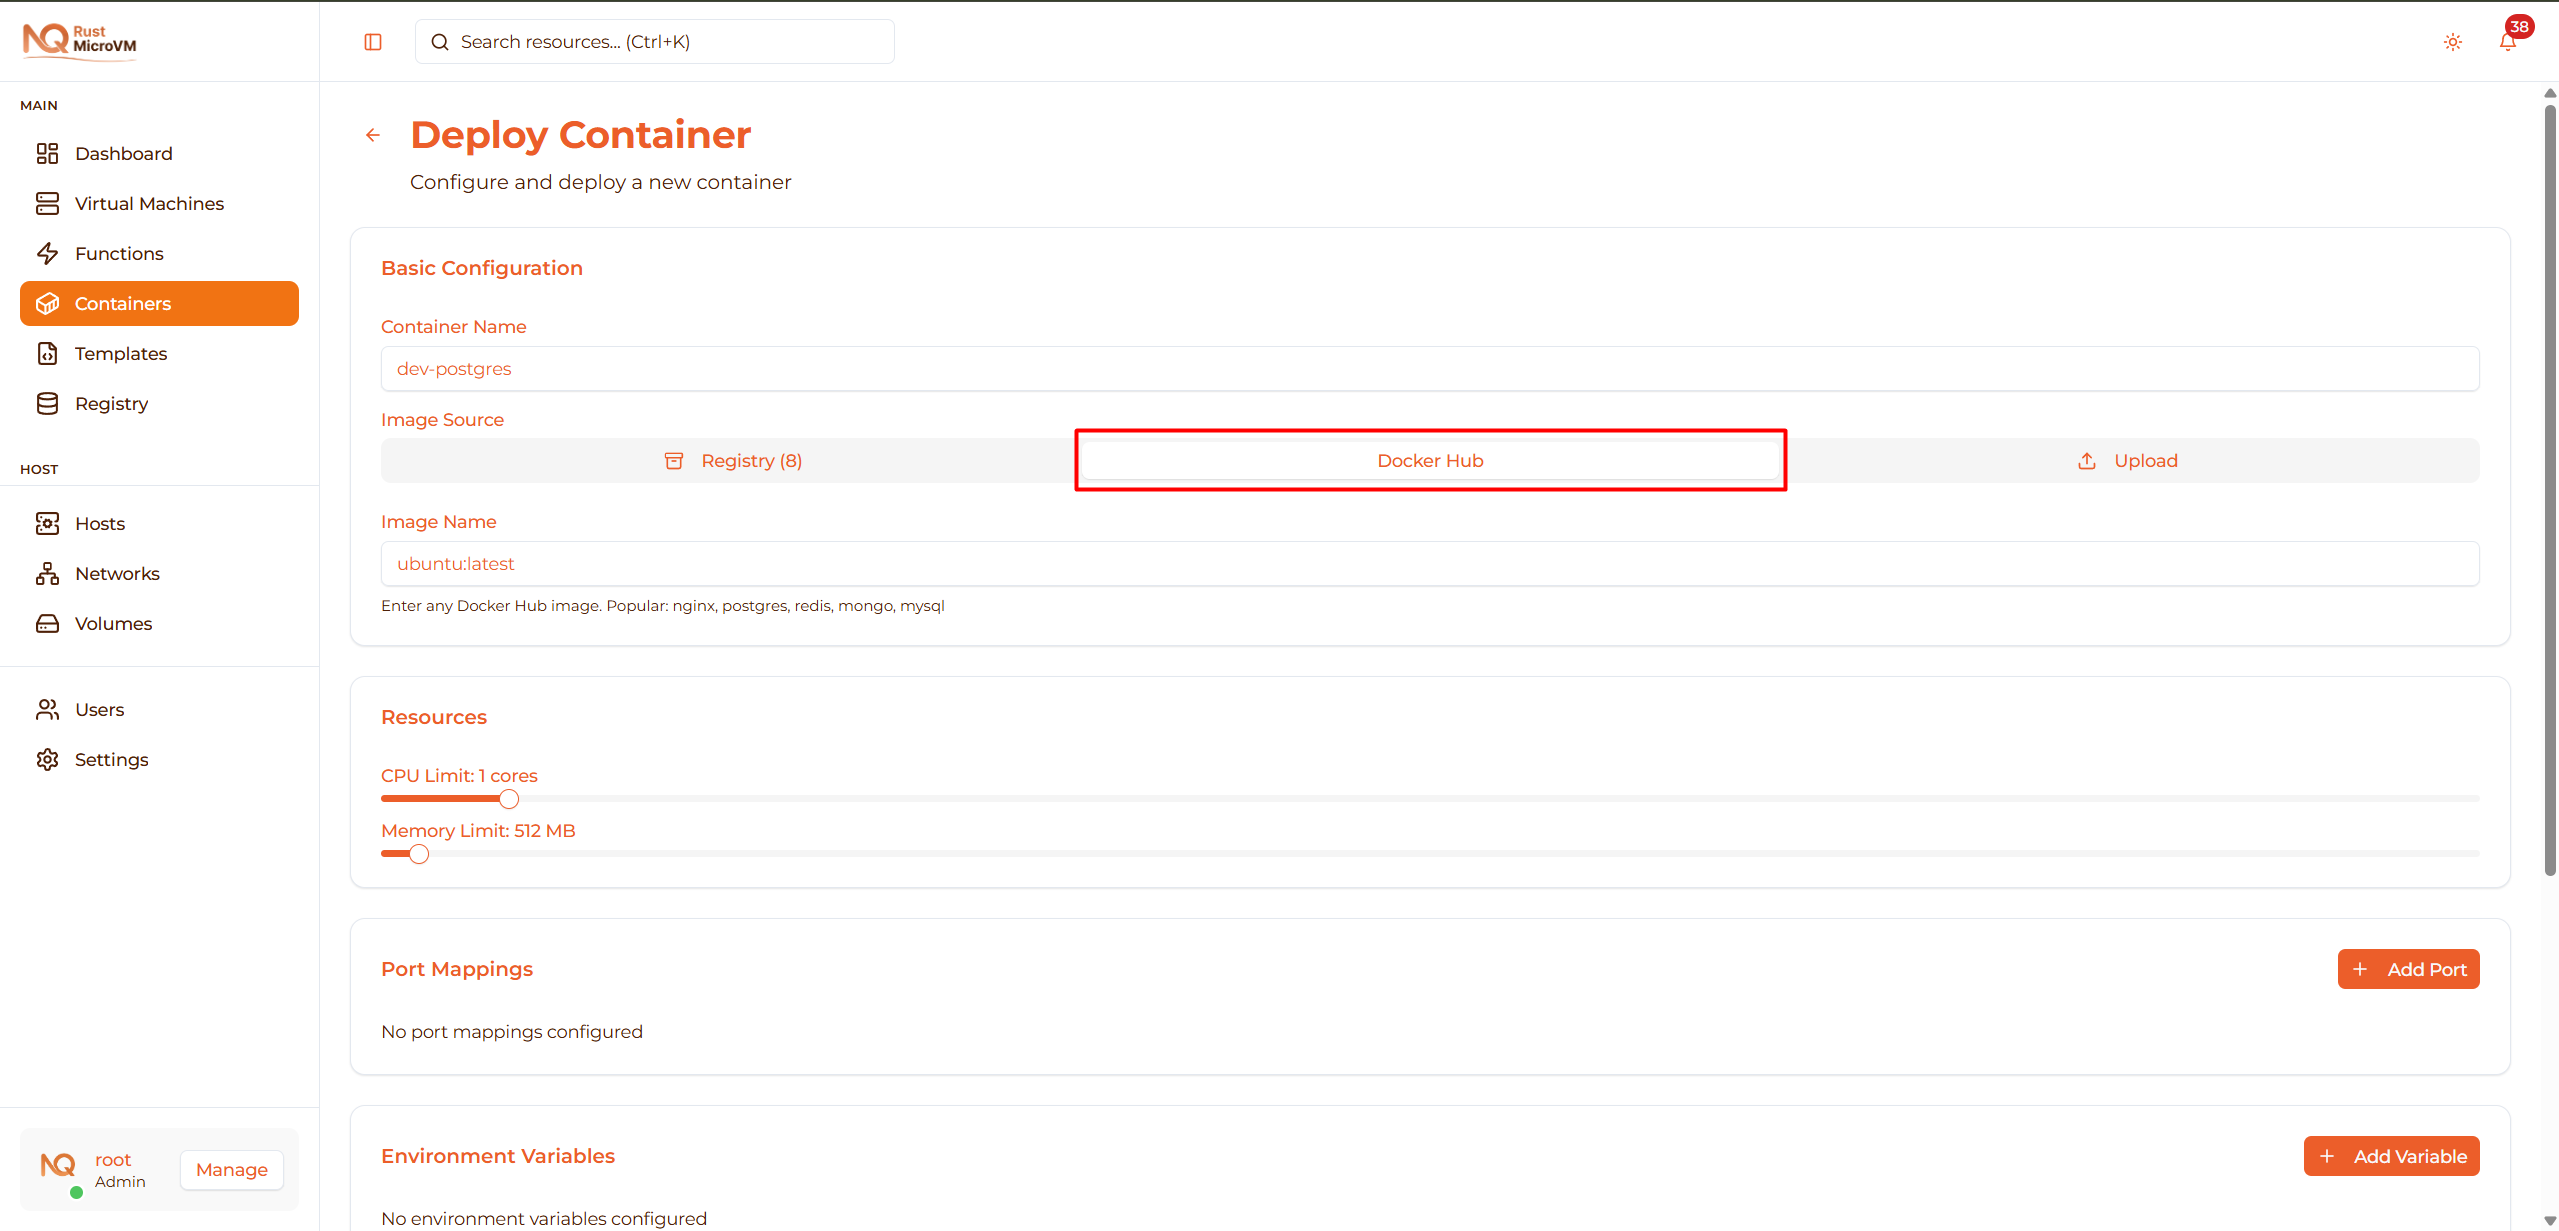
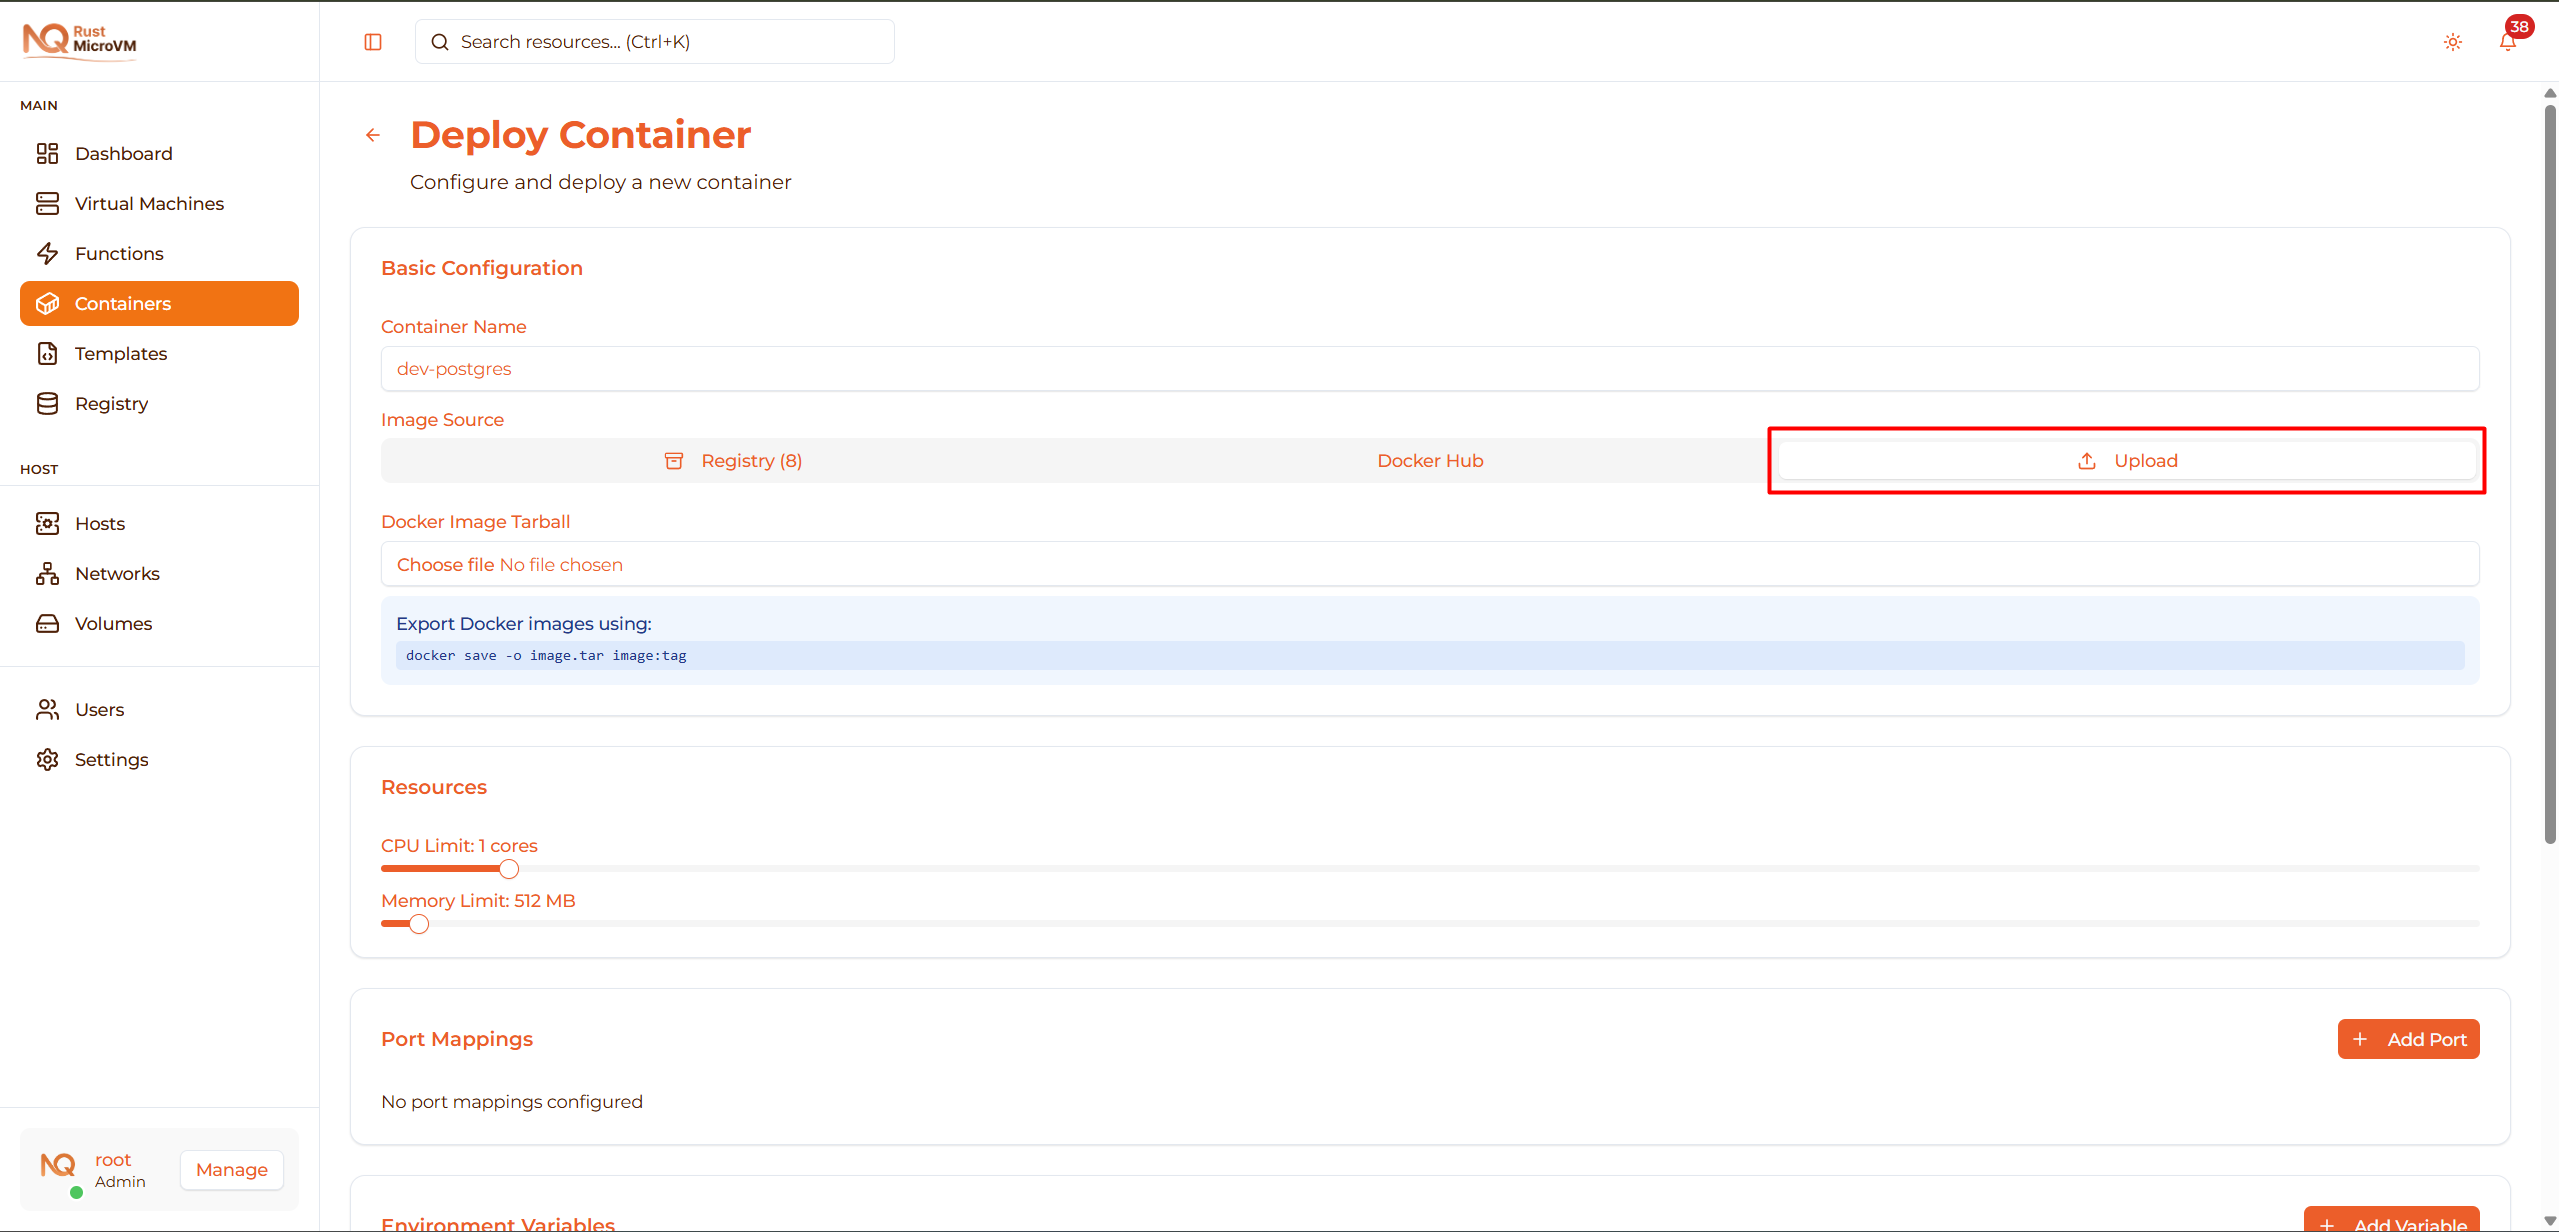
Select Image Source
Choose where to get your Docker image:
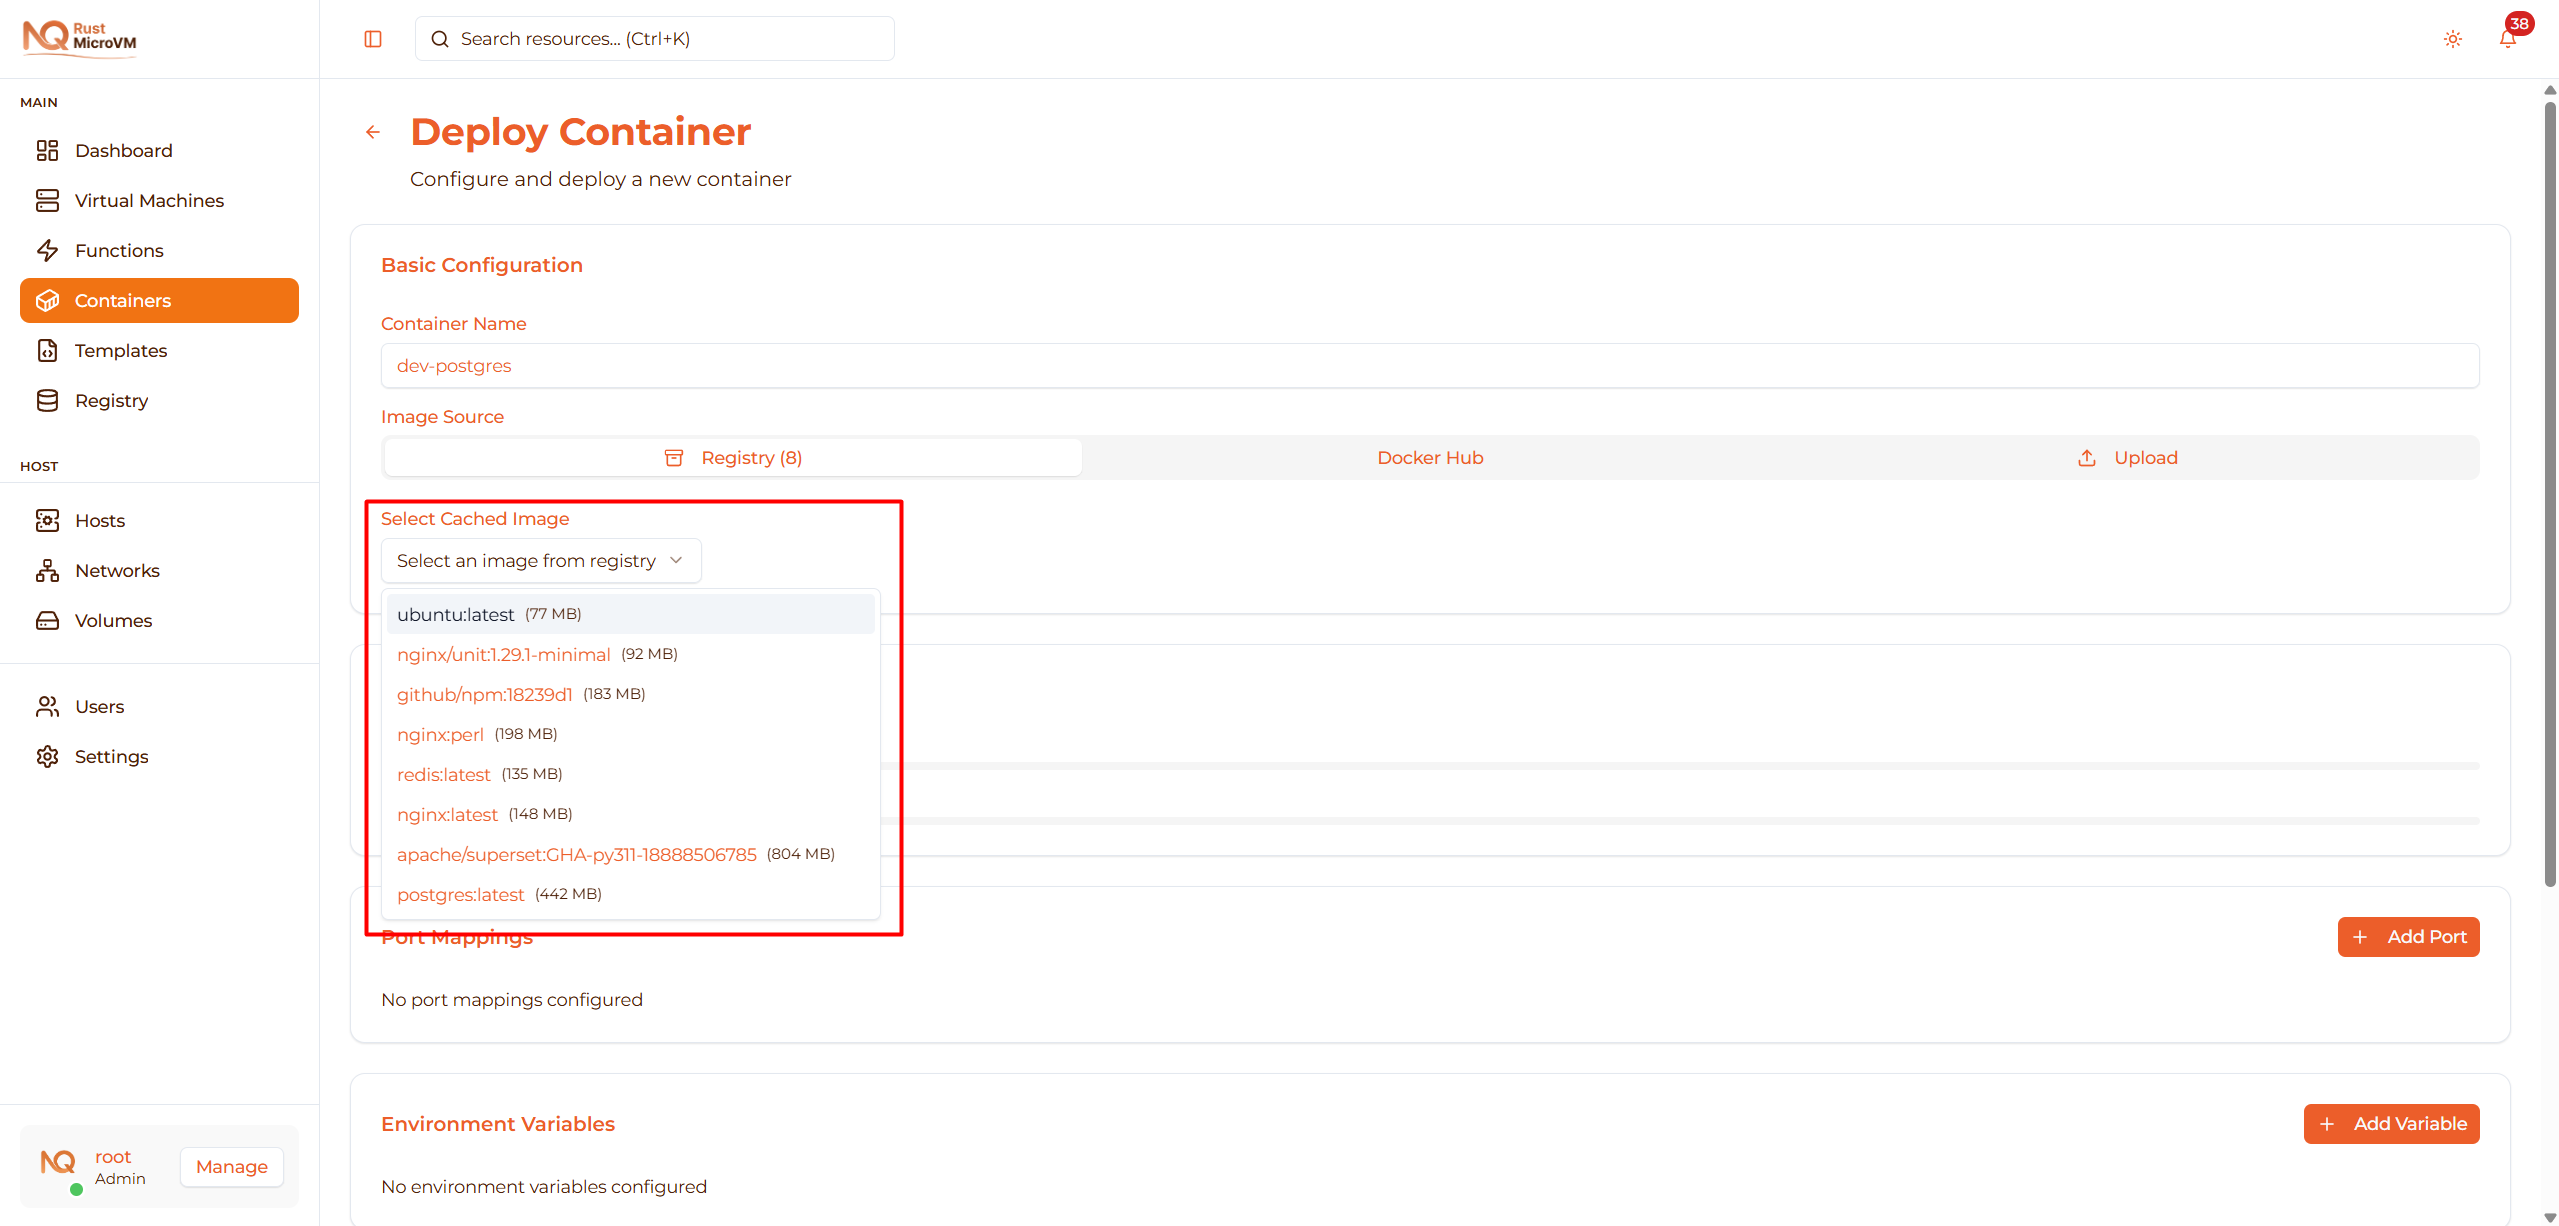
Three options available:
Option 1: Registry (Cached Images)
Use images already downloaded to the local registry:
When to use:
- Image already downloaded via Registry page
- Want faster deployment (no pull needed)
- Offline deployment
How to use:
- Click “Registry” tab
- Select image from dropdown
- Shows image size
If no images:
- Visit Registry page first
- Download images from Docker Hub
- Or upload custom images
Option 2: Docker Hub
Pull images directly from Docker Hub:
When to use:
- Need latest version
- Image not in local registry
- Deploying new image
How to use:
- Click “Docker Hub” tab
- Enter image name and tag
- Format:
repository:tag
Popular images:
  Web servers:
  nginx:alpine
  nginx:latest
  httpd:alpine
  caddy:latest

Databases:
  postgres:15-alpine
  postgres:16
  mysql:8-oracle
  mariadb:11
  mongo:7
  redis:7-alpine

Programming languages:
  node:20-alpine
  node:20
  python:3.11-alpine
  golang:1.21-alpine
  openjdk:21-slim

Message queues:
  rabbitmq:3-management-alpine
  nats:alpine
  kafka:latest
Tips:
- Use Alpine variants for smaller size (e.g.,
nginx:alpine) - Pin specific versions (e.g.,
postgres:15.3-alpine) - Check Docker Hub for available tags
Option 3: Upload Image Tarball
Upload Docker image exported from your machine:
When to use:
- Custom images not on Docker Hub
- Private images without registry
- Air-gapped environments
- Internal corporate images
How to export image:
On your development machine:
  # Export single image
docker save -o myapp.tar myapp:latest

# Export with compression
docker save myapp:latest | gzip > myapp.tar.gz

# Export multiple images
docker save -o images.tar nginx:alpine postgres:15 redis:7
How to use:
- Click “Upload” tab
- Click “Choose File” and select
.taror.tar.gz - Image name auto-filled from filename (can edit)
- Shows file size
File size note:
- Upload may take time for large images
- Typical sizes: 40 MB (Alpine) to 500 MB (full OS)
Step 3: Configure Resources
Set CPU and memory limits for your container:
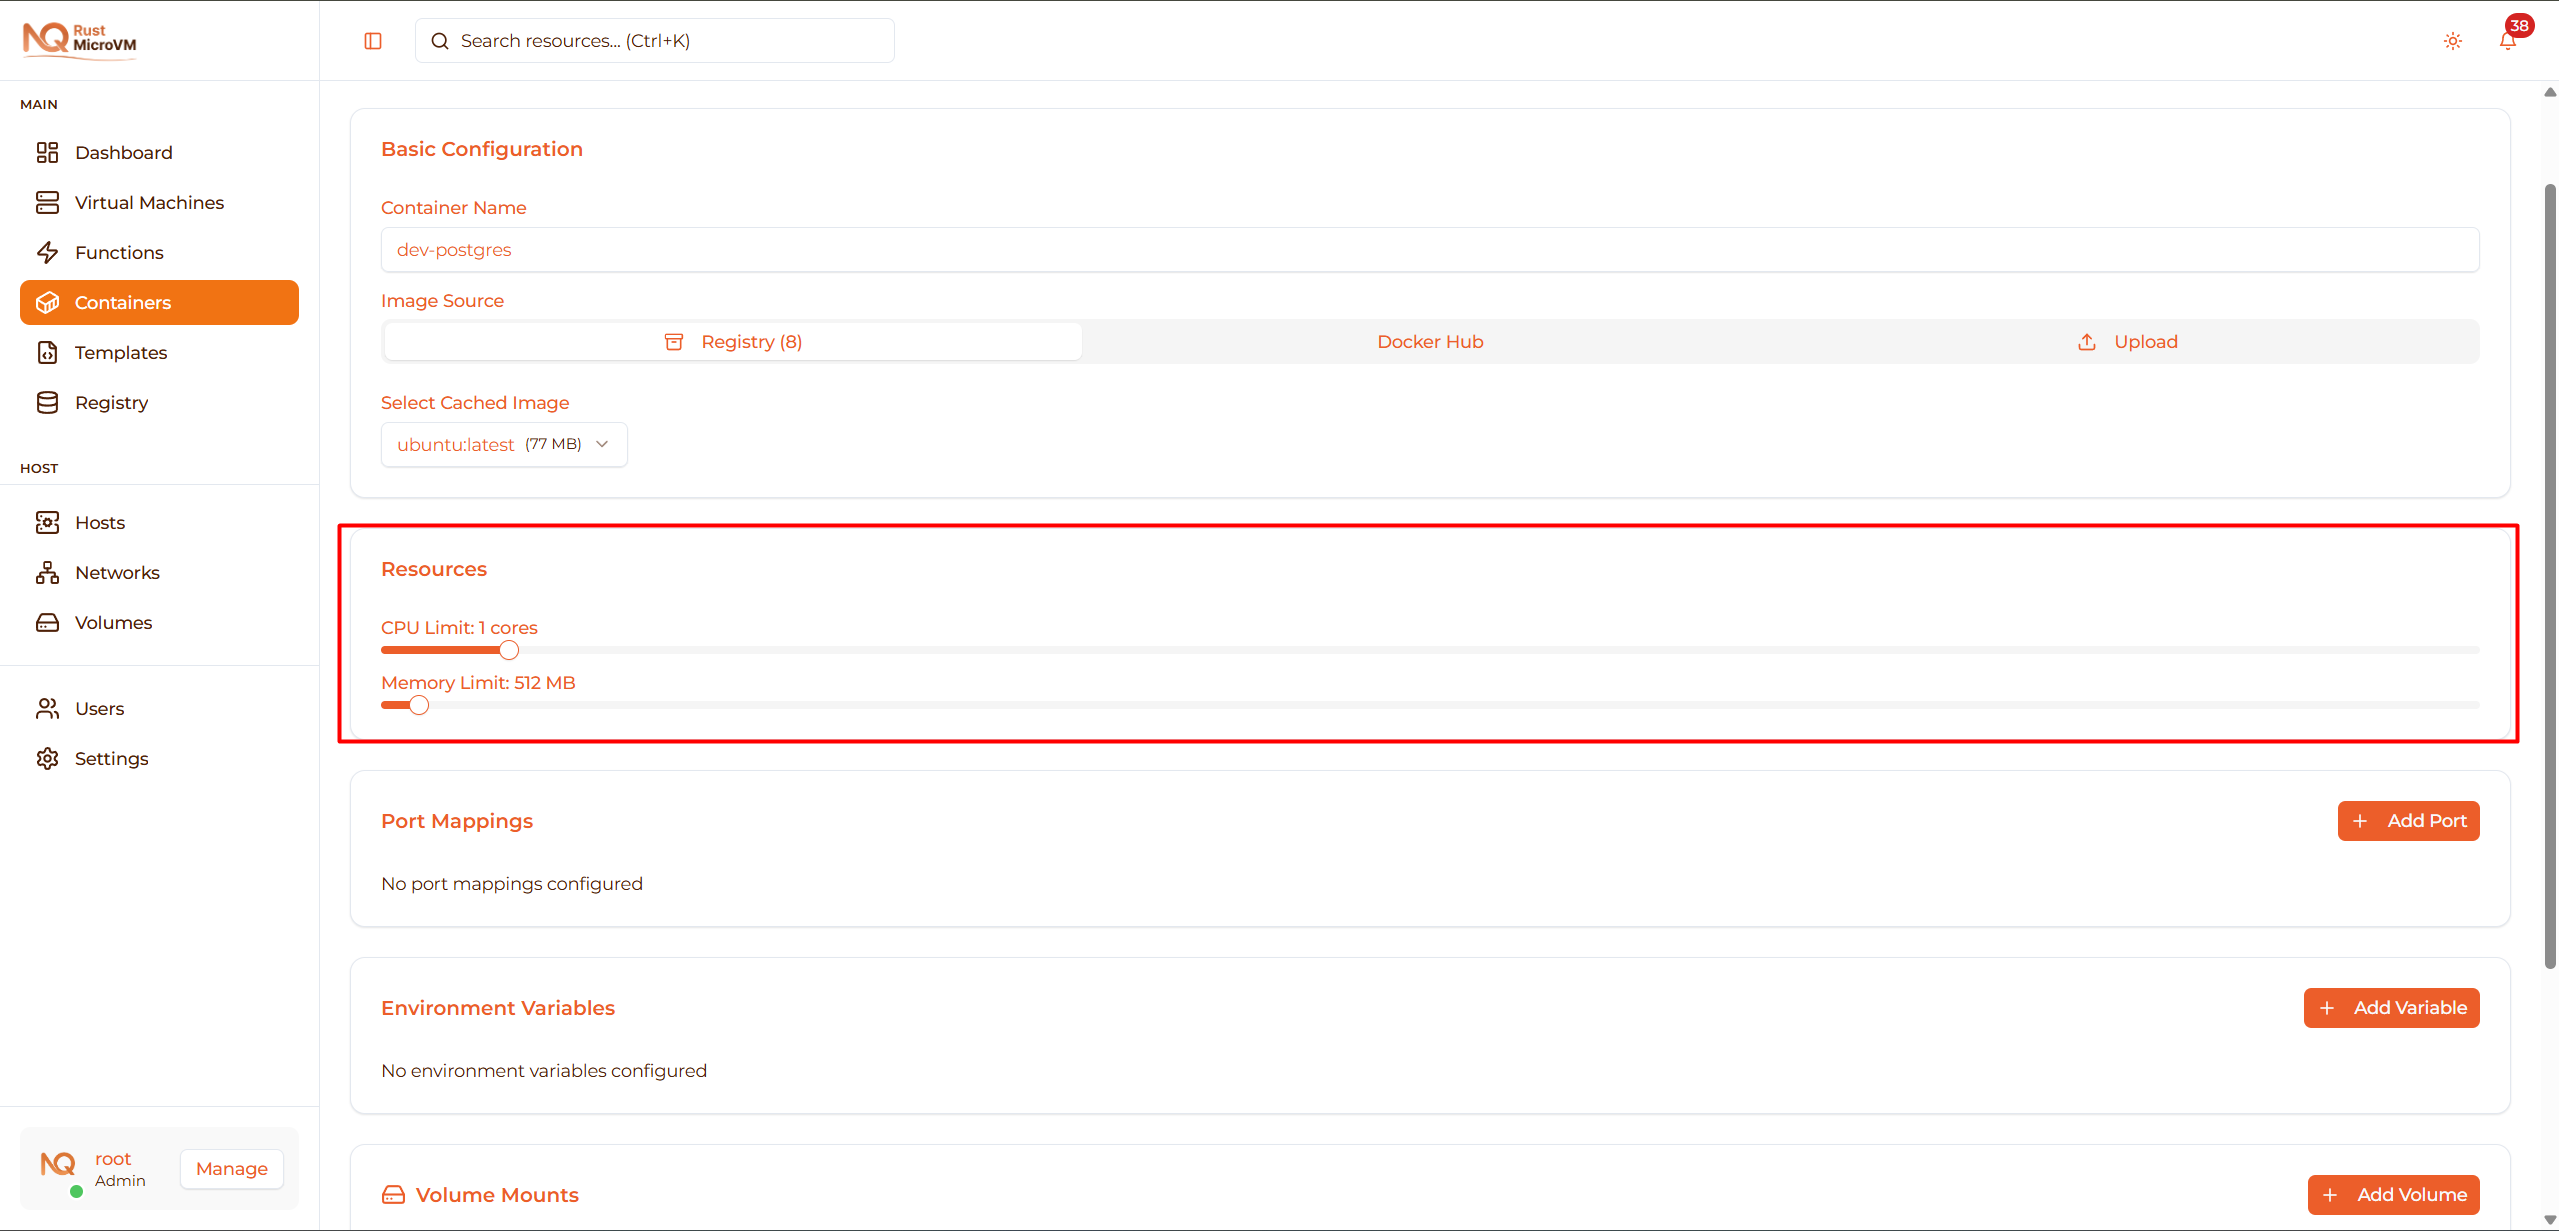
CPU Limit
Range: 0.1 to 16 cores Default: 1 core

Guidelines by service type:
  Static websites:       0.5 vCPU
Small APIs:            1 vCPU
Medium applications:   2 vCPU
Databases:             2-4 vCPU
Heavy processing:      4-8 vCPU
Tip: Start with lower CPU, monitor usage, and increase if needed.
Memory Limit
Range: 64 MB to 32 GB (32,768 MB) Default: 512 MB

Guidelines by service type:
  Static websites:       256 MB
Small APIs:            512 MB
Node.js apps:          1024 MB (1 GB)
Python apps:           1024-2048 MB
Databases (small):     2048 MB (2 GB)
Databases (medium):    4096 MB (4 GB)
Databases (large):     8192-16384 MB (8-16 GB)
Redis/Memcached:       512-2048 MB
Important:
- Container will be killed if it exceeds memory limit
- Check image requirements (some databases need minimum 1 GB)
- Monitor actual usage in Stats tab
Step 4: Port Mappings (Optional)
Expose container ports to the host network:
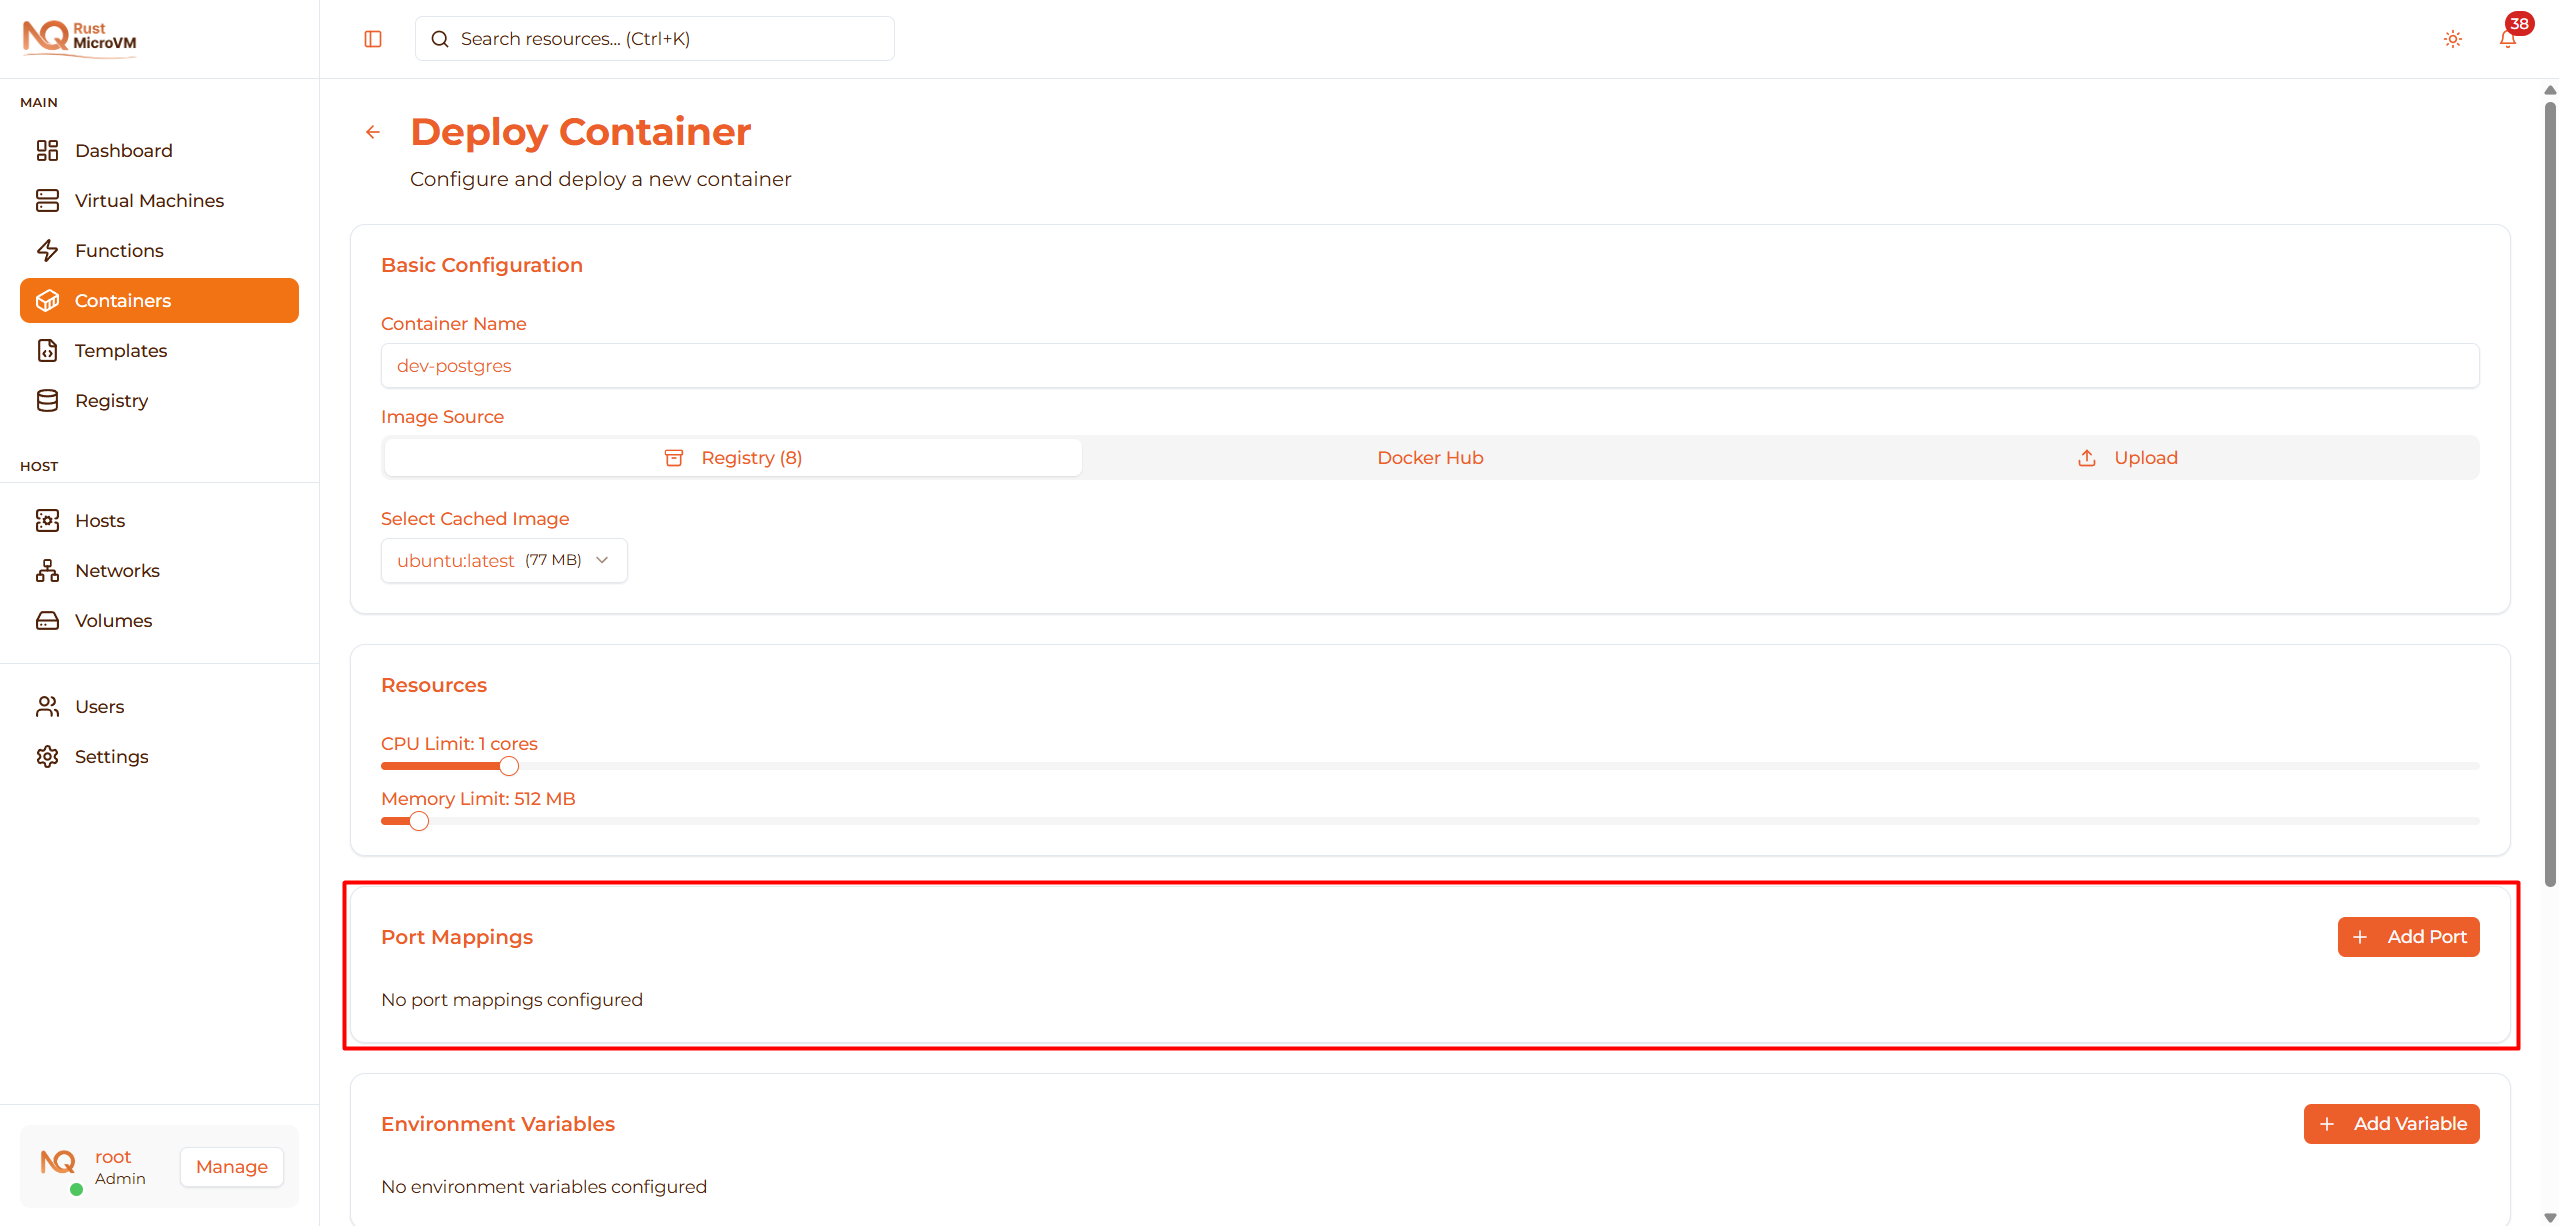
Add Port Mapping
Click “Add Port” to create a new mapping:

Configure Each Port

Fields:
- Host Port - Port on host machine (e.g., 8080)
- Container Port - Port inside container (e.g., 80)
- Protocol - TCP or UDP
Example mappings:
  Service          Host:Container  Protocol
────────────────────────────────────────
Nginx web        8080:80         TCP
PostgreSQL       5432:5432       TCP
Redis            6379:6379       TCP
MongoDB          27017:27017     TCP
RabbitMQ         5672:5672       TCP
RabbitMQ Mgmt    15672:15672     TCP
DNS server       53:53           UDP
Multiple Ports
Add multiple mappings for services with multiple ports:

Example: RabbitMQ with management:
  5672:5672   TCP  (AMQP)
15672:15672 TCP  (Management UI)
Example: Full stack application:
  3000:3000   TCP  (API)
3001:3001   TCP  (WebSocket)
Remove Port Mapping
Click the X button to remove a port mapping:

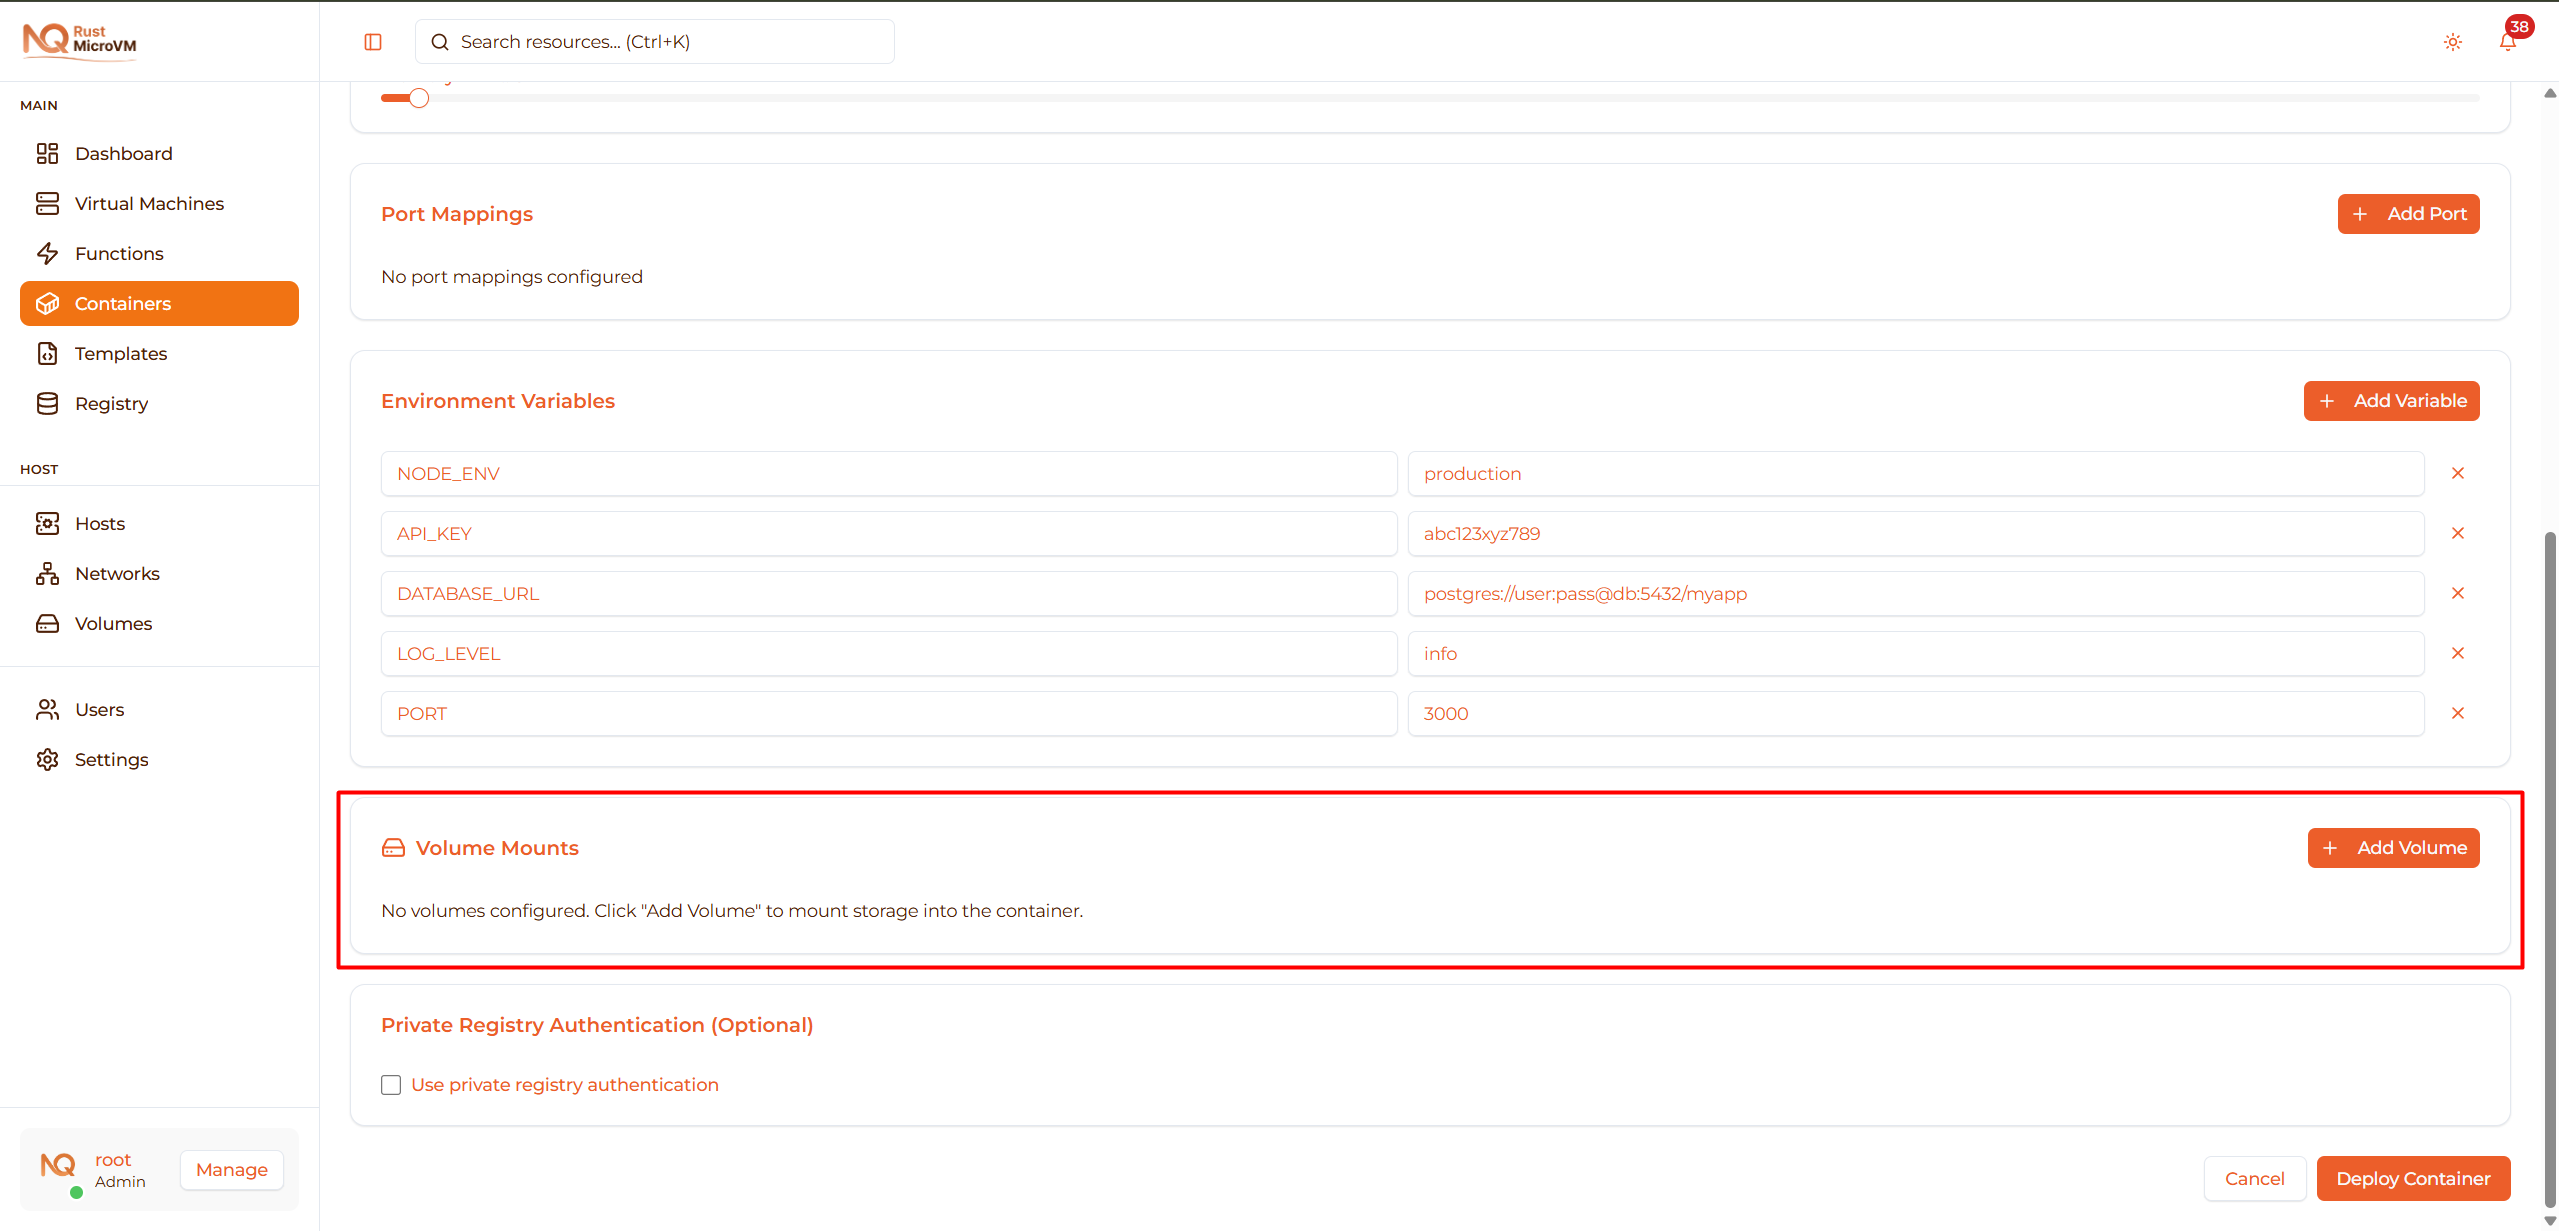
Step 5: Environment Variables (Optional)
Set environment variables for container configuration:
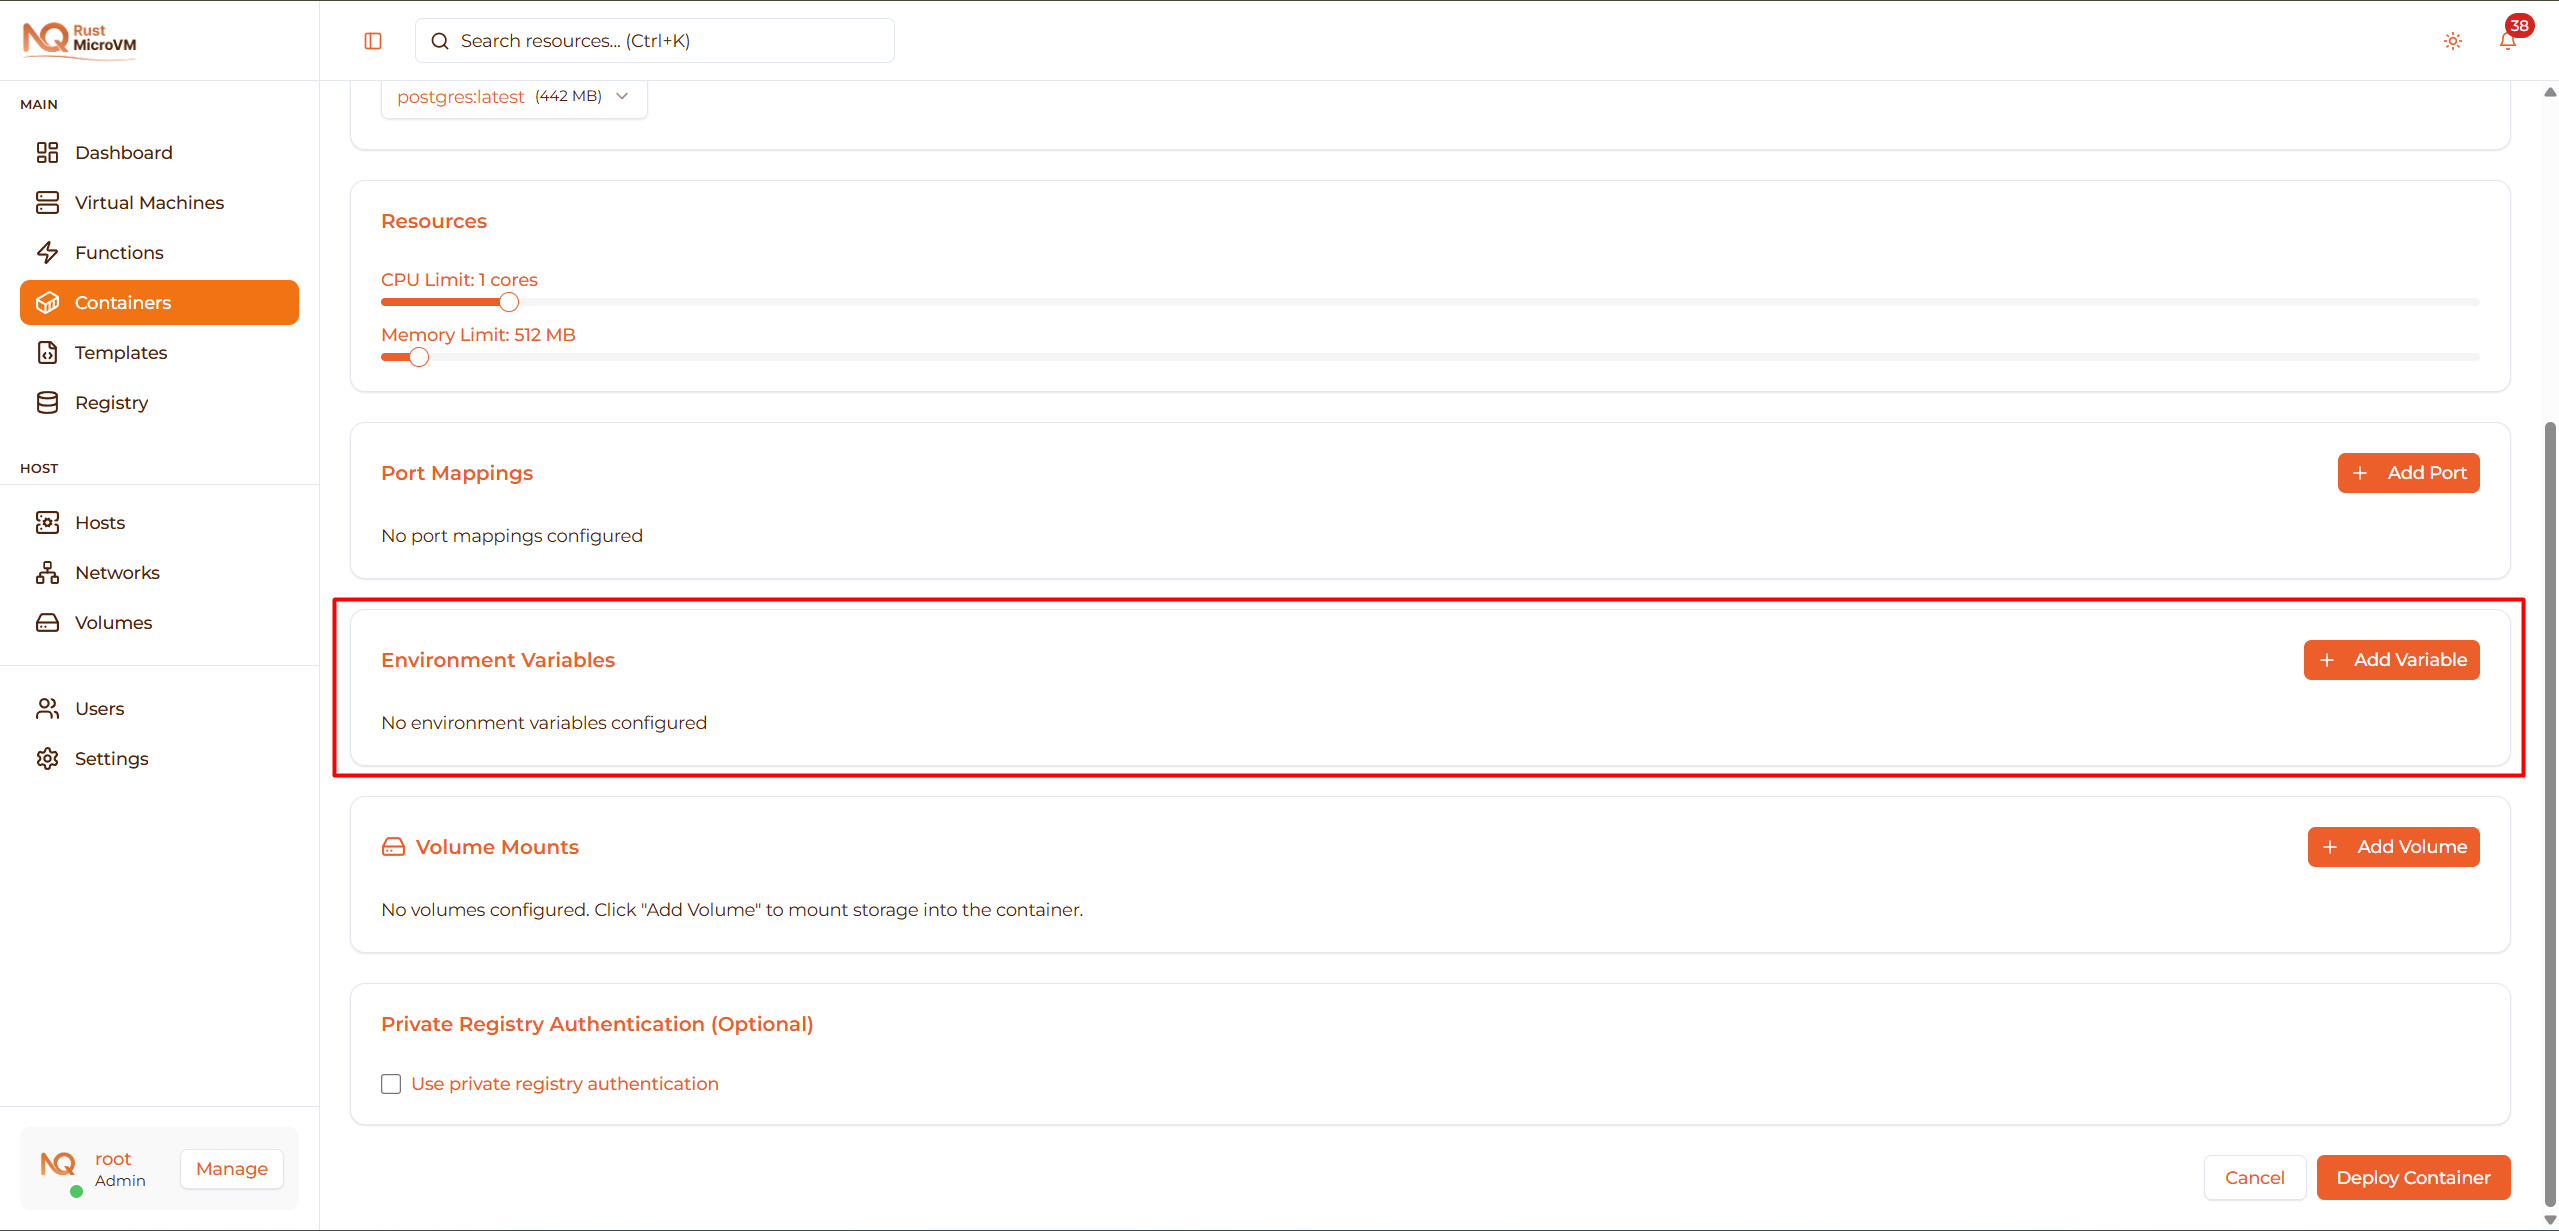
Add Environment Variable
Click “Add Variable” to create a new variable:

Configure Variables
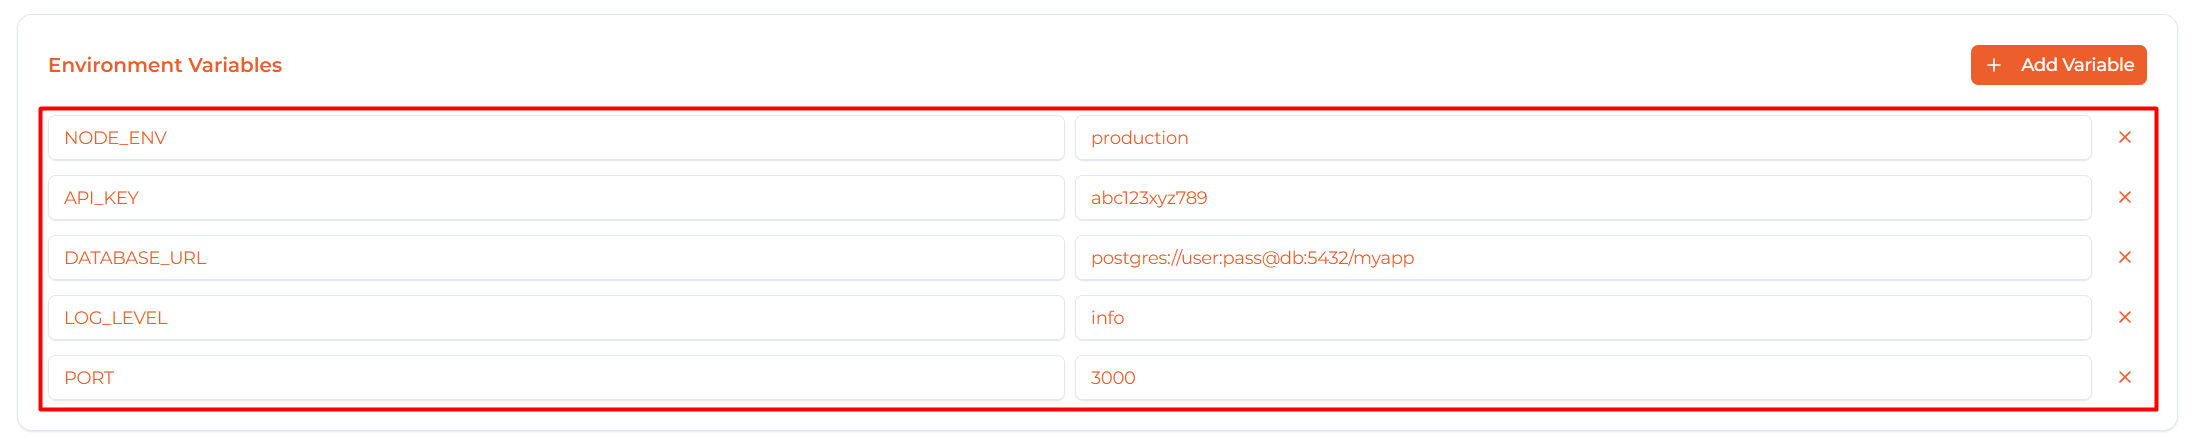
Fields:
- KEY - Variable name (uppercase convention)
- value - Variable value
Common Use Cases
Database configuration:
  POSTGRES_PASSWORD=mySecretPassword123
POSTGRES_USER=myapp
POSTGRES_DB=production
POSTGRES_INITDB_ARGS=--encoding=UTF8
Application configuration:
  NODE_ENV=production
API_KEY=abc123xyz789
DATABASE_URL=postgres://user:pass@db:5432/myapp
LOG_LEVEL=info
PORT=3000
Authentication:
  JWT_SECRET=mySecretKey
API_TOKEN=secure-token-here
ADMIN_PASSWORD=changeMe123
Feature flags:
  ENABLE_DEBUG=false
ENABLE_CACHE=true
MAX_CONNECTIONS=100
TIMEOUT_SECONDS=30
Remove Environment Variable
Click the X button to remove a variable:

Step 6: Volume Mounts (Optional)
Mount persistent storage into your container:
Why Use Volumes?
✅ Data persistence - Data survives container restarts/deletions ✅ Data sharing - Share data between containers ✅ Configuration - Mount config files from host ✅ Logs - Store logs on host for analysis
Add Volume
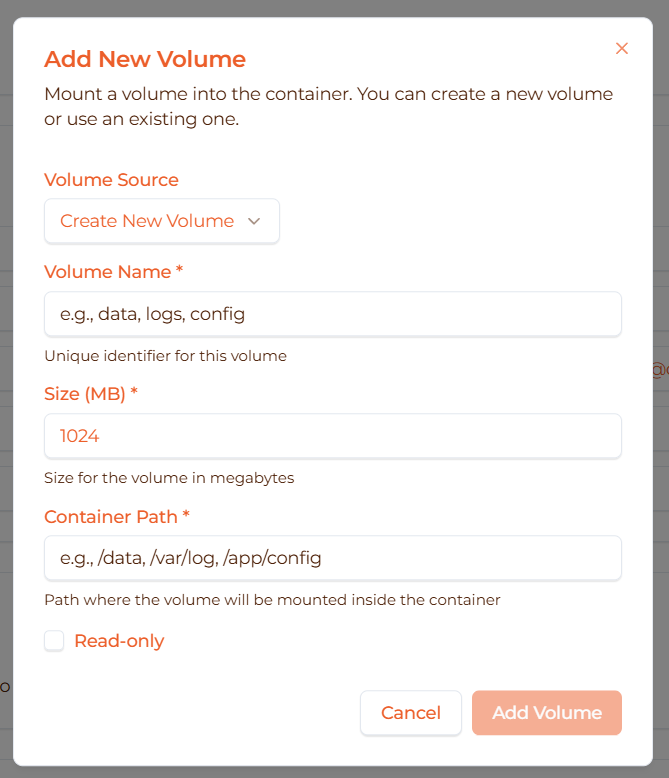
Click “Add Volume” to open the volume dialog:

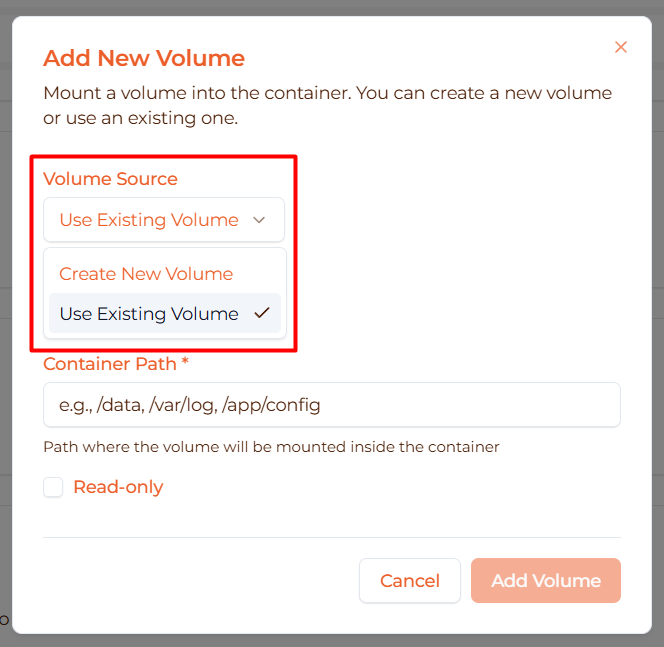
Volume Dialog
Two options:
Option 1: Create New Volume
Create a new volume for this container:

Fields:
- Volume Name - Unique identifier (e.g.,
postgres-data,app-uploads) - Size (MB) - Volume size in megabytes (e.g., 1024 = 1 GB)
- Container Path - Where to mount inside container (e.g.,
/data) - Read-only - Check to prevent writes
Example - Database volume:
  Volume Name:     postgres-data
Size:            10240 MB (10 GB)
Container Path:  /var/lib/postgresql/data
Read-only:       ☐ (unchecked)
Example - Config volume:
  Volume Name:     nginx-config
Size:            100 MB
Container Path:  /etc/nginx/conf.d
Read-only:       ☑ (checked)
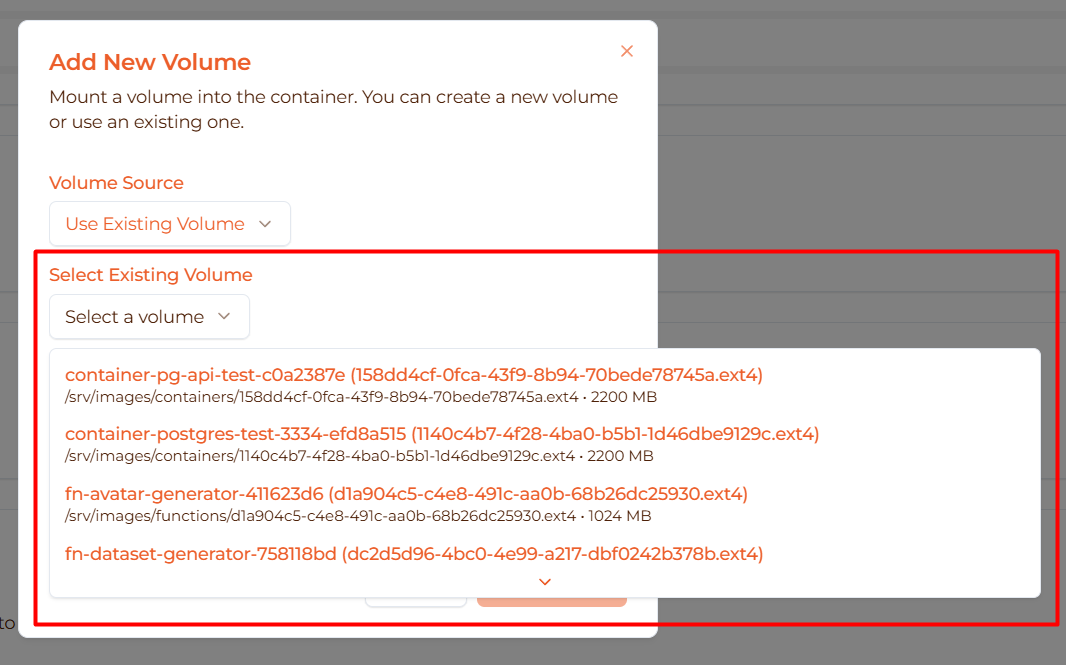
Option 2: Use Existing Volume
Mount a volume that already exists:
When to use:
- Share data between containers
- Reuse volume from deleted container
- Mount pre-populated data
Fields:
- Select Volume - Choose from dropdown
- Container Path - Where to mount inside container
- Read-only - Check to prevent writes
Volume Table
After adding volumes, they appear in a table:
Columns:
- Name - Volume identifier
- Host Path - Where stored on host (auto-generated)
- Container Path - Mount point inside container
- Size - Volume size in MB
- Read Only - Whether volume is read-only
- Actions - Remove button
Badge indicators:
- New (green) - Volume will be created
- Existing - Volume already exists
Remove Volume
Click the trash icon to remove a volume mount:

Common Volume Patterns
Database data:
  PostgreSQL: /var/lib/postgresql/data
MySQL:      /var/lib/mysql
MongoDB:    /data/db
Redis:      /data
Application data:
  Uploads:    /app/uploads
Media:      /app/media
Storage:    /app/storage
Configuration:
  Nginx:      /etc/nginx/conf.d (read-only)
App config: /app/config (read-only)
Logs:
  App logs:   /app/logs
Nginx logs: /var/log/nginx
Step 7: Private Registry Authentication (Optional)
Authenticate with private Docker registries:

Enable Authentication
Check “Use private registry authentication”:
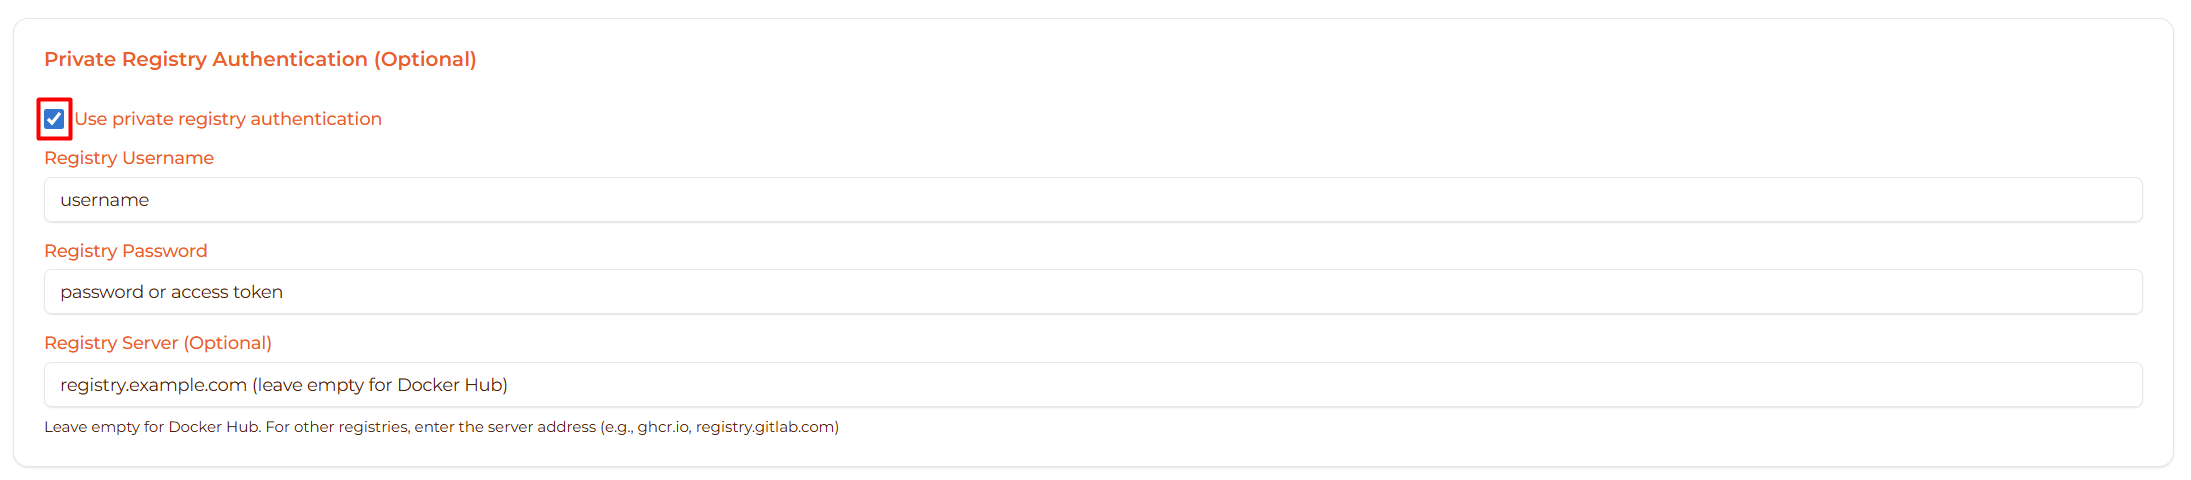
Configure Credentials
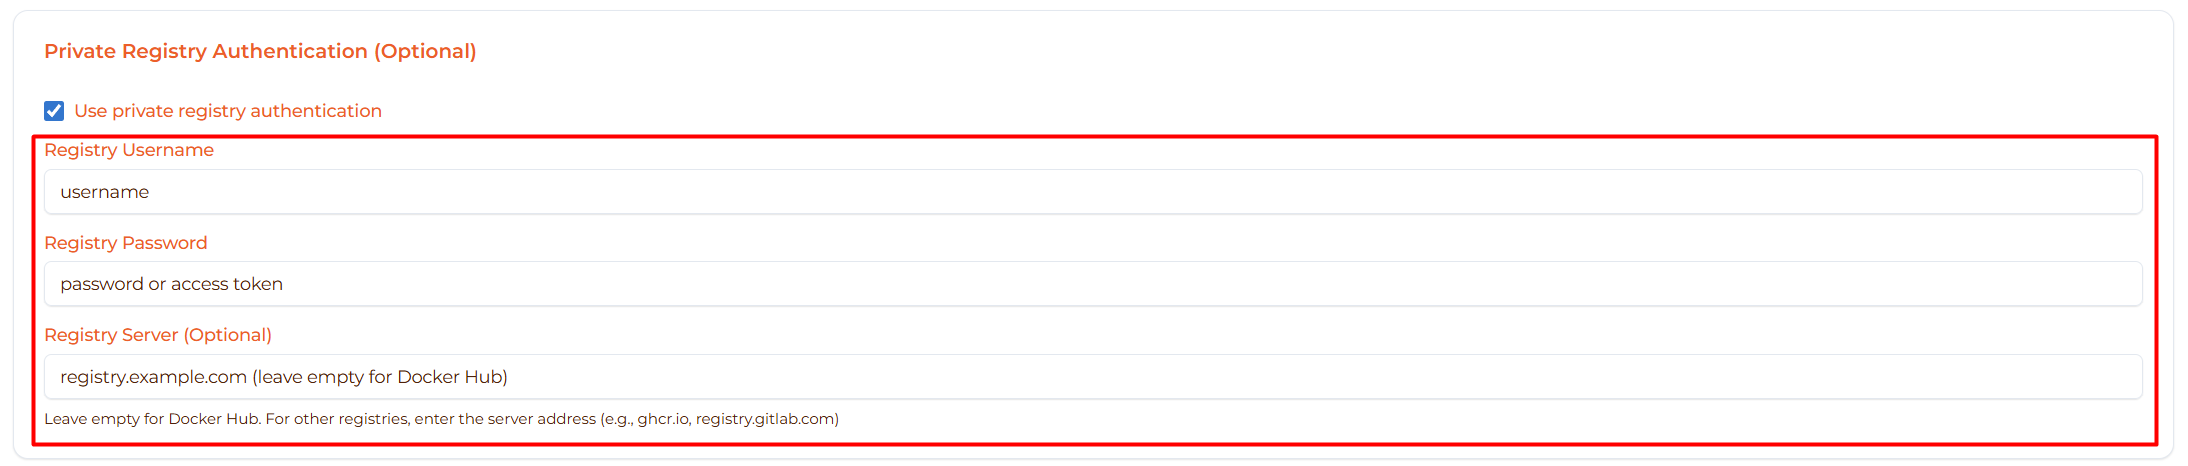
Fields:
- Registry Username - Your username or service account
- Registry Password - Password or access token
- Registry Server - Server address (optional for Docker Hub)
Docker Hub Private Repositories
For Docker Hub private repos:
  Username: your-dockerhub-username
Password: your-dockerhub-password (or access token)
Server:   (leave empty for Docker Hub)
Tip: Use Docker Hub access tokens instead of password for better security.
GitHub Container Registry (ghcr.io)
For GitHub packages:

  Username: your-github-username
Password: ghp_your_personal_access_token
Server:   ghcr.io
Creating GitHub token:
- GitHub → Settings → Developer settings → Personal access tokens
- Generate new token with
read:packagesscope - Use token as password
GitLab Container Registry
For GitLab packages:

  Username: your-gitlab-username
Password: your-gitlab-access-token
Server:   registry.gitlab.com
Other Registries
Azure Container Registry:
Server: yourregistry.azurecr.io
Google Container Registry:
  Server: gcr.io
Username: _json_key
Password: <service account JSON>
Self-hosted registries:
Server: registry.company.com:5000
Step 8: Review and Deploy
Review all configuration before deployment:

Check:
- ✅ Container name is unique and descriptive
- ✅ Image name is correct (with tag)
- ✅ Resources are appropriate for workload
- ✅ Ports are mapped correctly
- ✅ Environment variables are set
- ✅ Volumes are configured for persistent data
Deploy Button
Click “Deploy Container” to start deployment:
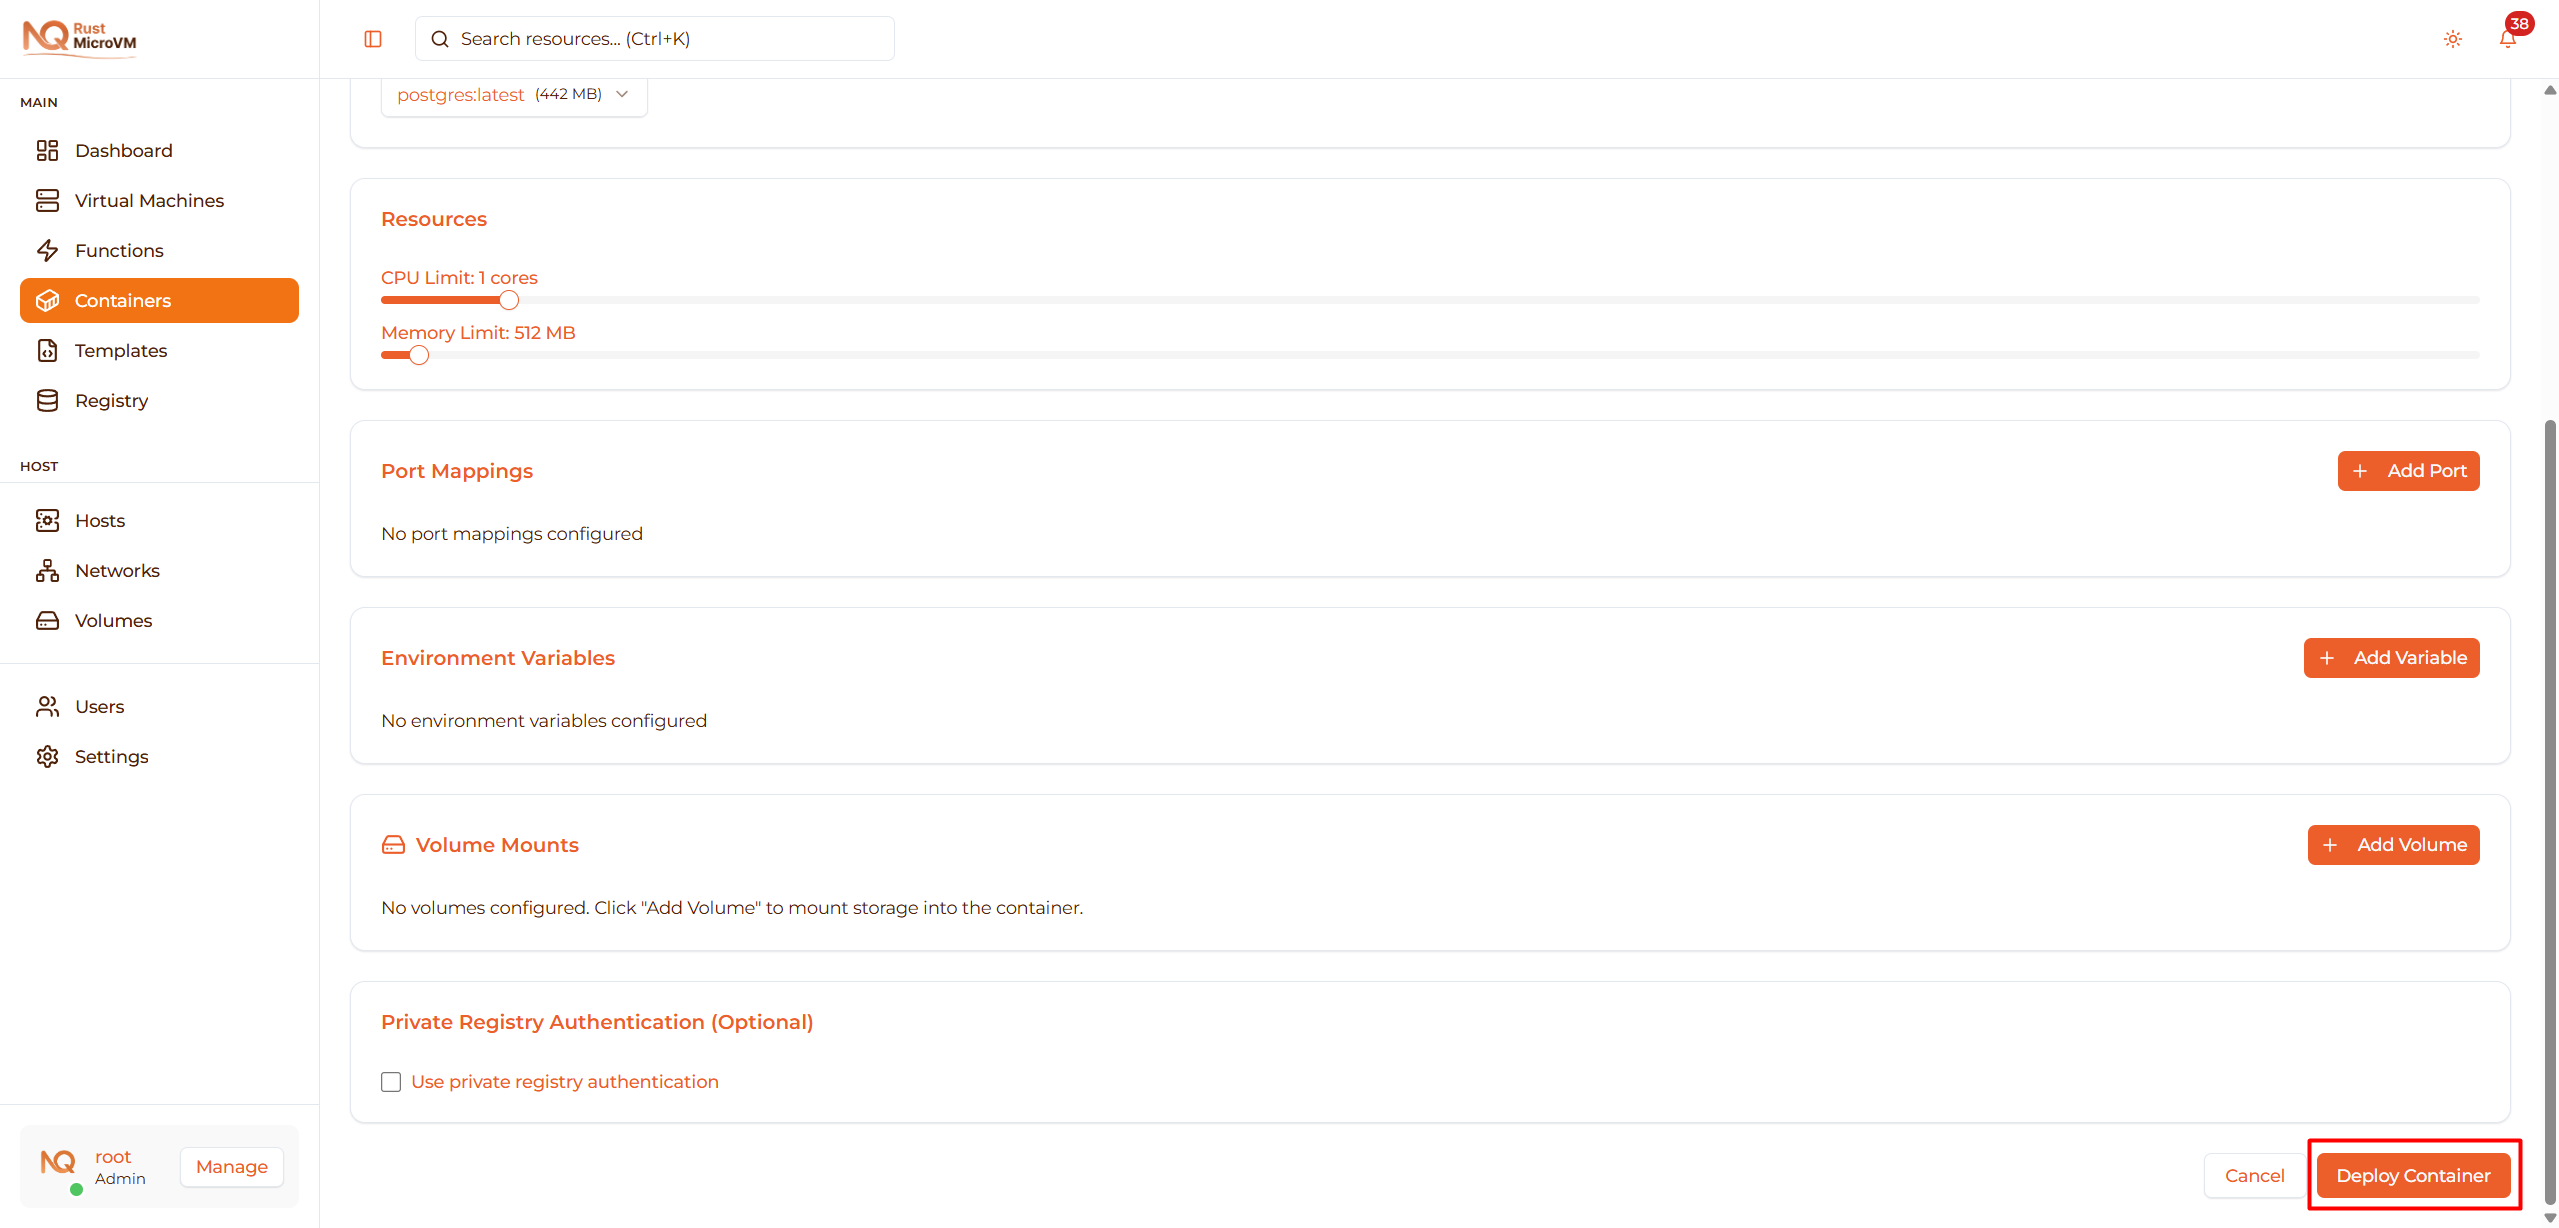
Button states:
- Enabled - Ready to deploy
- Disabled - Missing required fields
- Uploading… - Uploading image tarball (if using upload)
- Loading… - Creating container
Step 9: Deployment Progress
After clicking deploy, you’ll be redirected to the container detail page:
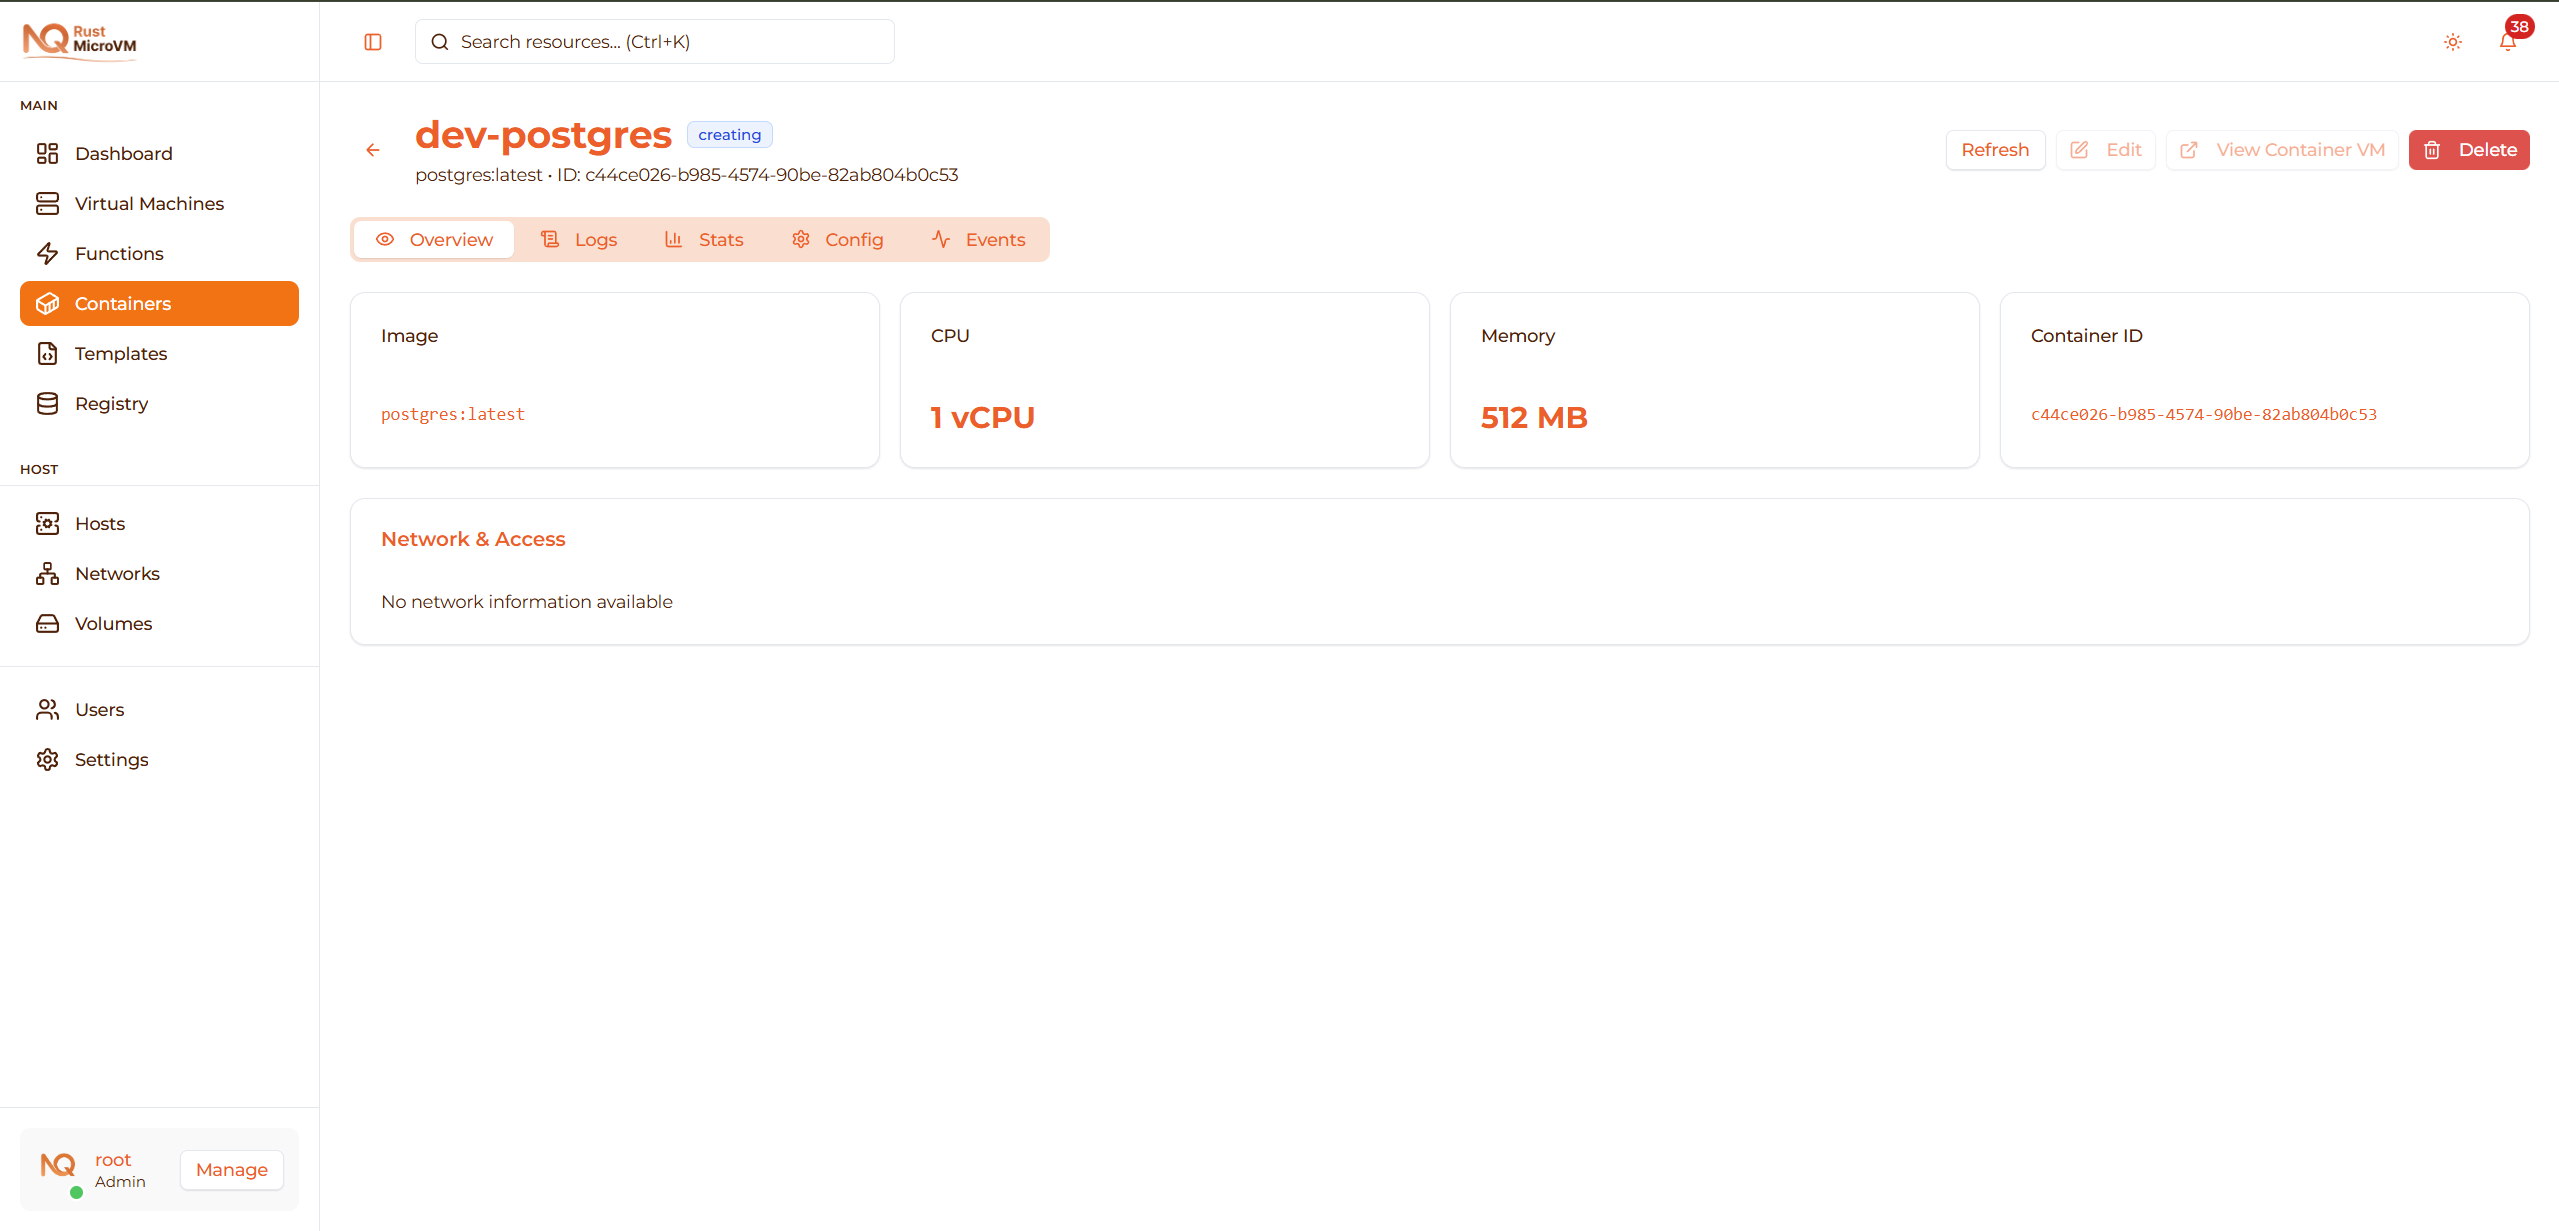
Deployment Stages
Watch the container state transition:
Creating 🟡 (1-2 seconds):
Creating Firecracker microVM...
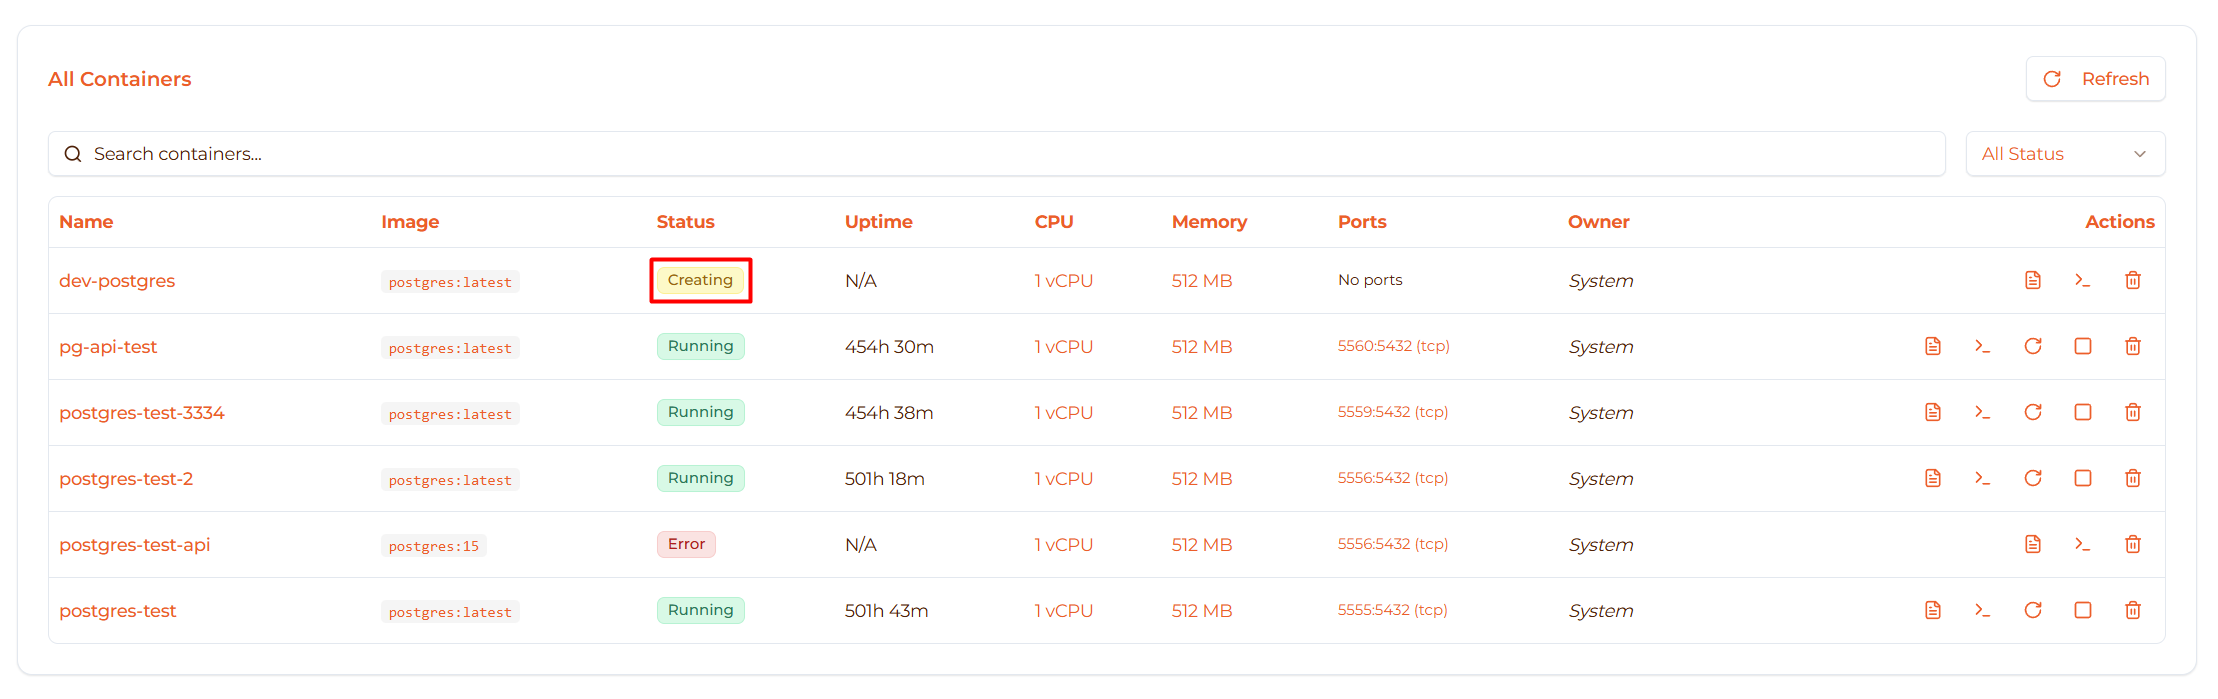
- Badge Color: Yellow (kuning)
- Status: Initial VM creation process
Booting ⚪ (2-3 seconds):
Booting microVM with container runtime...
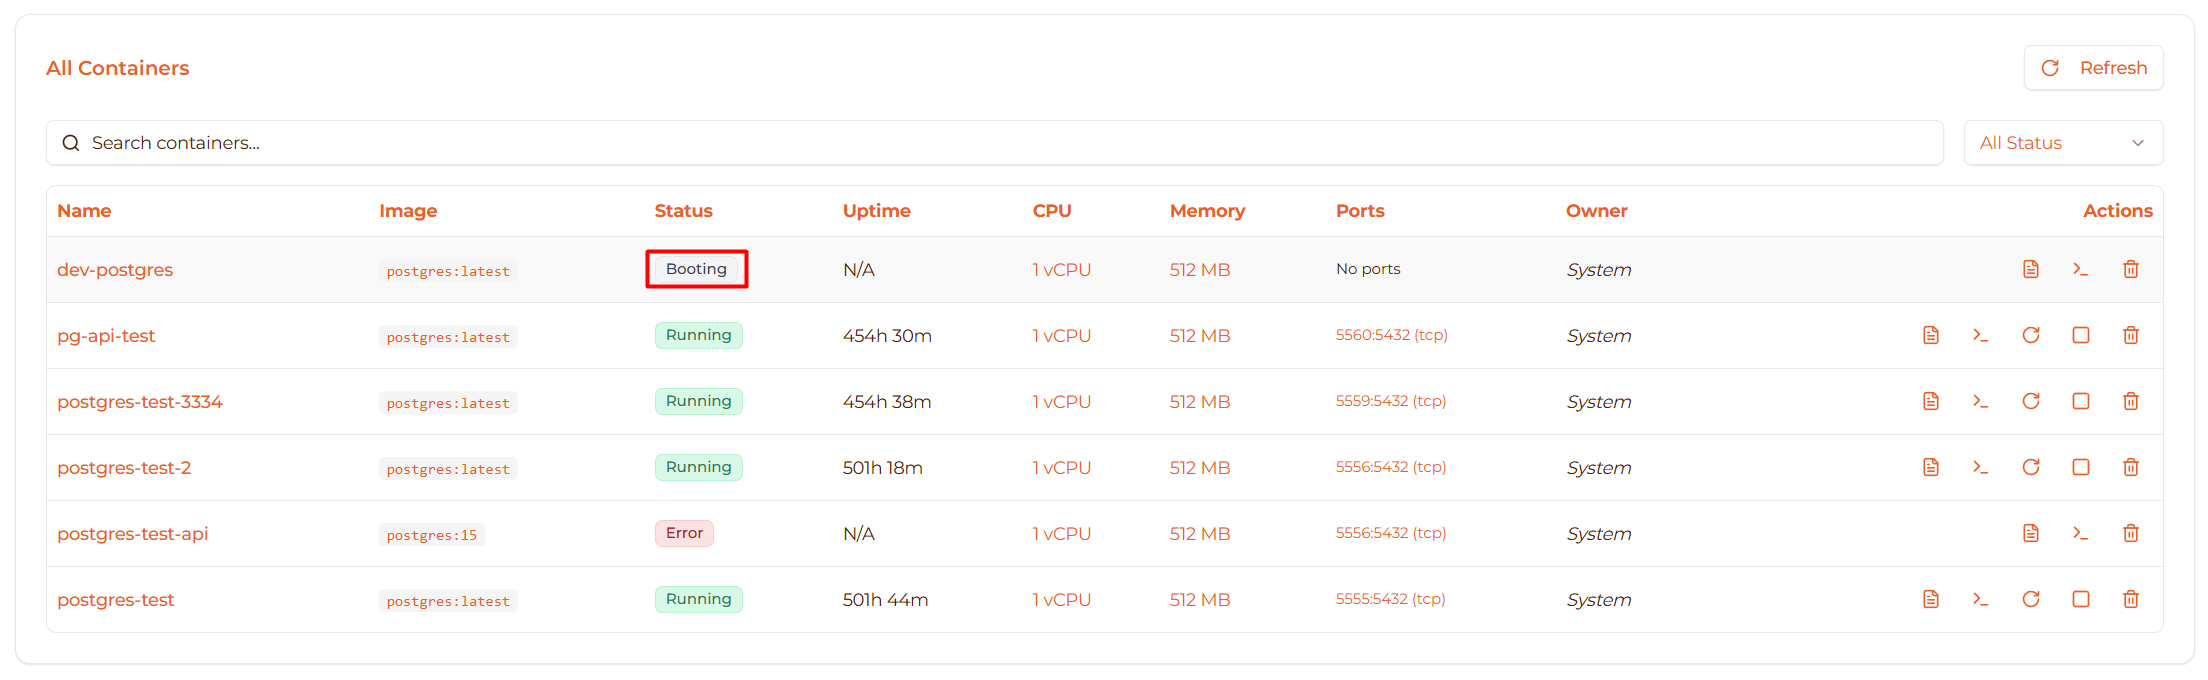
- Badge Color: Gray (abu-abu)
- Status: MicroVM is starting up
Initializing 🔵 (2-5 seconds):
  Starting Docker daemon...
Preparing container environment...
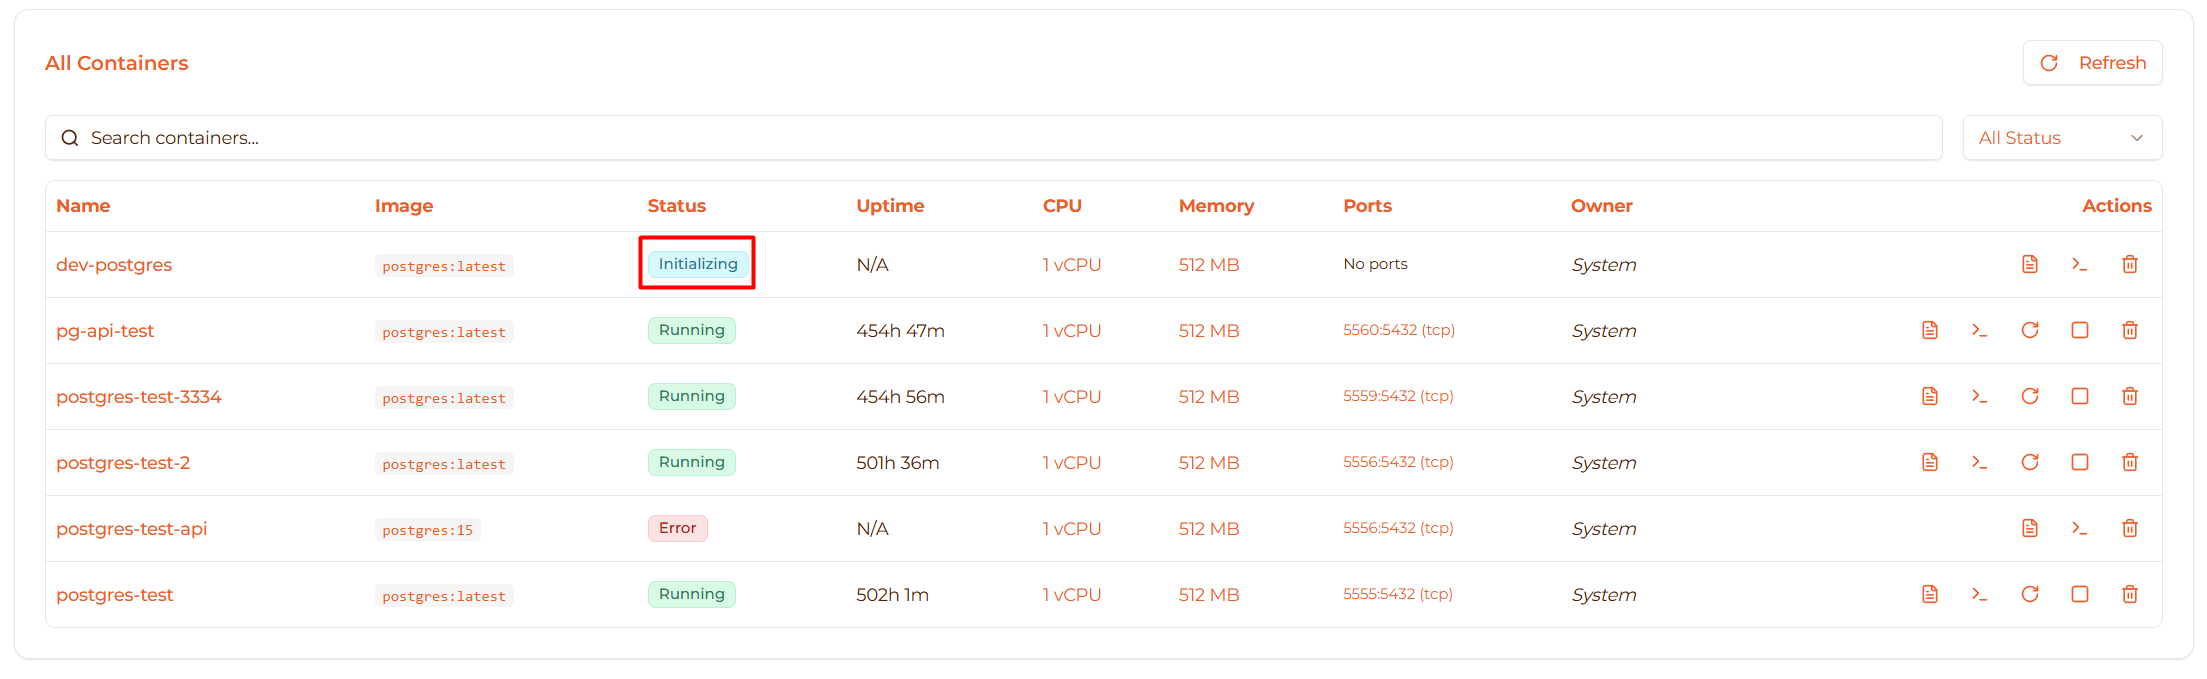
- Badge Color: Cyan (tosca/biru muda)
- Status: Docker daemon starting, preparing container runtime
Pulling image (10-60 seconds, varies by image size):
  Pulling alpine/nginx:latest...
Download in progress...
Running 🟢 - Deployment complete!
Container is now running
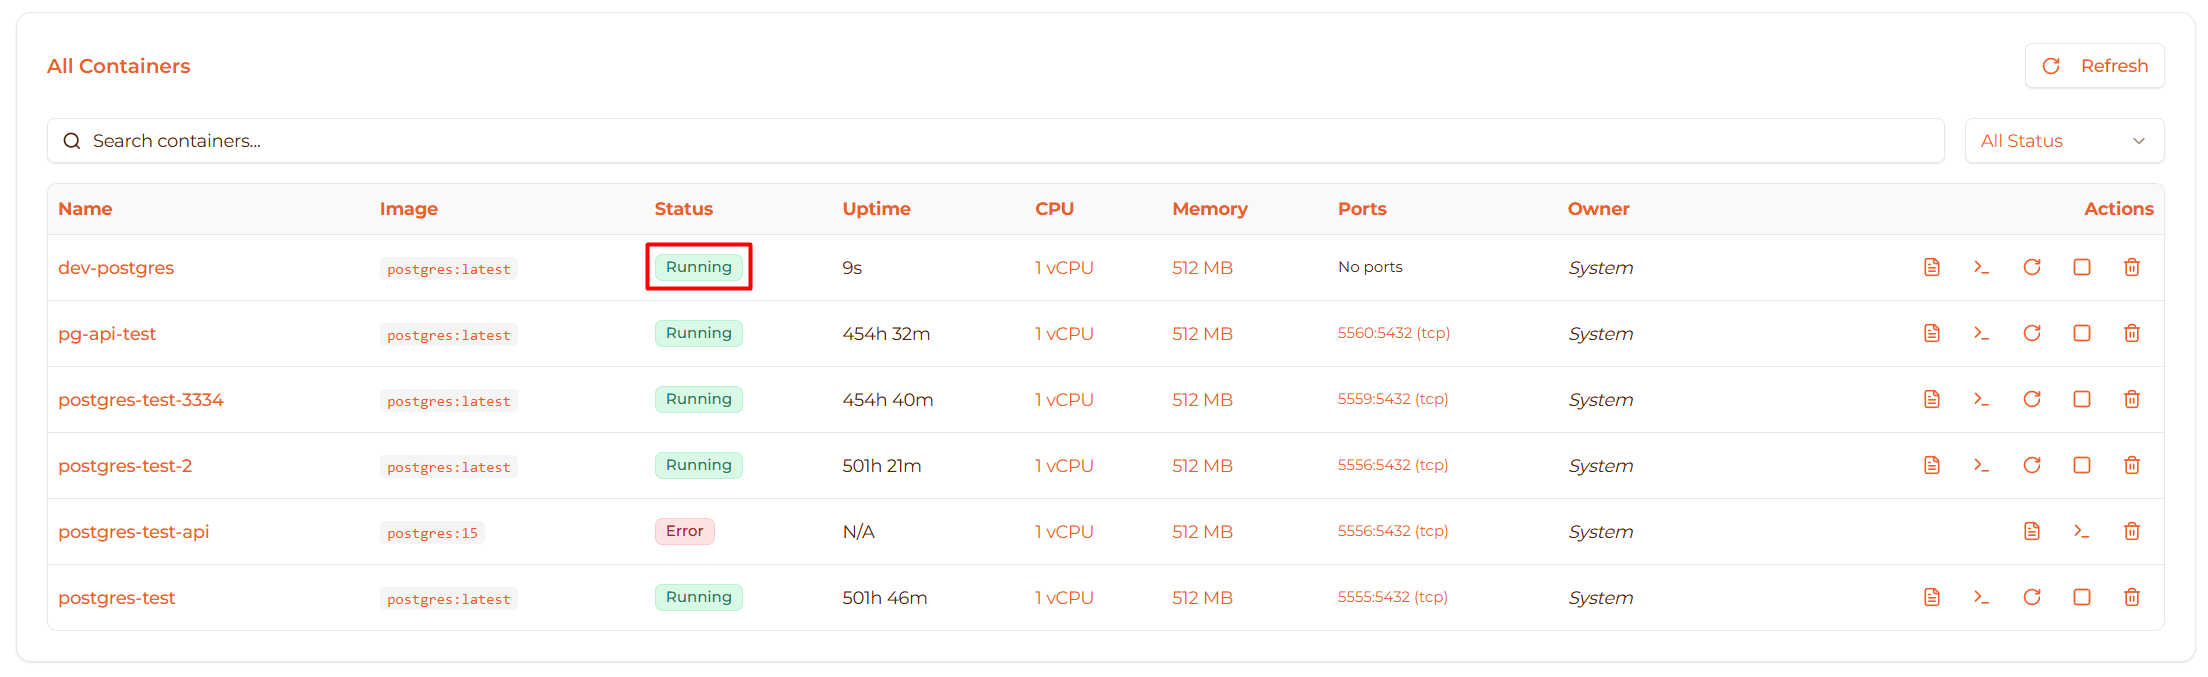
- Badge Color: Green (hijau)
- Status: Container is active and operational
Monitor Deployment
During deployment, you can:
View logs:
- Click “Logs” tab
- See real-time deployment logs
- Watch Docker pull progress

Check events:
- Click “Events” tab
- See deployment events timeline
Refresh status:
- Click “Refresh” button to update status
Complete Examples
Example 1: Nginx Web Server
Simple static website hosting:

Configuration:
  Name:        nginx-prod
Image:       nginx:alpine (Docker Hub)
CPU:         0.5 vCPU
Memory:      256 MB

Port Mappings:
  8080:80 (TCP)

Volume Mounts:
  New Volume:
    Name: nginx-html
    Size: 1024 MB
    Container Path: /usr/share/nginx/html
    Read-only: No
Access:
- Open browser:
http://<host-ip>:8080 - Upload files to volume for content
Example 2: PostgreSQL Database
Production database with persistent storage:

Configuration:
  Name:        postgres-main
Image:       postgres:15-alpine (Docker Hub)
CPU:         2 vCPU
Memory:      2048 MB

Port Mappings:
  5432:5432 (TCP)

Environment Variables:
  POSTGRES_PASSWORD=mySecretPassword123
  POSTGRES_USER=myapp
  POSTGRES_DB=production

Volume Mounts:
  New Volume:
    Name: postgres-data
    Size: 10240 MB (10 GB)
    Container Path: /var/lib/postgresql/data
    Read-only: No
Connect:
psql -h <host-ip> -p 5432 -U myapp -d production
Example 3: Redis Cache
In-memory cache with persistence:

Configuration:
  Name:        redis-cache
Image:       redis:7-alpine (Docker Hub)
CPU:         1 vCPU
Memory:      1024 MB

Port Mappings:
  6379:6379 (TCP)

Environment Variables:
  (none - Redis uses default config)

Volume Mounts:
  New Volume:
    Name: redis-data
    Size: 2048 MB (2 GB)
    Container Path: /data
    Read-only: No
Connect:
redis-cli -h <host-ip> -p 6379
Example 4: Node.js Application
Web application with environment config:

Configuration:
  Name:        api-server
Image:       node:20-alpine (Docker Hub)
CPU:         1 vCPU
Memory:      1024 MB

Port Mappings:
  3000:3000 (TCP)

Environment Variables:
  NODE_ENV=production
  PORT=3000
  DATABASE_URL=postgres://user:pass@db:5432/myapp
  API_KEY=abc123xyz
  LOG_LEVEL=info

Volume Mounts:
  New Volume:
    Name: app-logs
    Size: 1024 MB
    Container Path: /app/logs
    Read-only: No
Note: You’d typically build a custom image with your app code.
Example 5: Private GitHub Package
Deploy from GitHub Container Registry:

Configuration:
  Name:        my-private-app
Image:       ghcr.io/mycompany/myapp:latest (Docker Hub)
CPU:         2 vCPU
Memory:      2048 MB

Port Mappings:
  8000:8000 (TCP)

Environment Variables:
  APP_ENV=production

Private Registry:
  ✓ Use private registry authentication
  Username: myusername
  Password: ghp_myPersonalAccessToken
  Server: ghcr.io
Troubleshooting
Issue: “Image not found” error
Symptoms:
- Container stuck in “Creating” or “Error” state
- Logs show “image not found” or “pull failed”

Solutions:
Check image name:
- Verify correct spelling and tag
- Example:
nginx:alpinenotnginx:alpne
Verify image exists:
- Search Docker Hub: https://hub.docker.com
- Check tag is available
Check network:
- Ensure host can reach Docker Hub
- Test:
curl https://hub.docker.com
Rate limits:
- Docker Hub limits: 100 pulls/6h (anonymous)
- Wait or authenticate with Docker Hub account
Issue: Container exits immediately
Symptoms:
- Container reaches “Running” then goes to “Stopped”
- No errors during deployment

Solutions:
Check logs:
- Go to Logs tab
- Look for error messages
- Common: missing environment variables, config errors
Verify required env vars:
- Some images require specific variables
- Example: PostgreSQL needs
POSTGRES_PASSWORD
Check image documentation:
- Read Docker Hub image docs
- Verify all requirements met
Test locally first:
docker run -it --rm nginx:alpine
Issue: Can’t connect to exposed port
Symptoms:
- Container is “Running”
- Port mapping configured
- Connection refused or timeout

Solutions:
Verify container is running:
- Check status is “Running”
- View logs for errors
Check port mapping:
- Ensure host port is correct
- Container port matches service
- Example: Nginx listens on 80, not 8080
Check firewall:
  # Test if port is accessible
telnet <host-ip> 8080
Verify network bridge:
ip link show fcbr0Check port conflicts:
  # See if port already in use
netstat -tlnp | grep 8080
Issue: Out of memory
Symptoms:
- Container crashes or restarts
- Logs show “OOM killed” or “out of memory”

Solutions:
Increase memory limit:
- Stop container
- Edit configuration
- Increase memory
- Restart container
Check image requirements:
- Some databases need minimum memory
- PostgreSQL: 1 GB minimum recommended
- MongoDB: 2 GB minimum recommended
Monitor actual usage:
- Go to Stats tab
- Check memory usage
- Set limit slightly above peak usage
Issue: Volume data not persisting
Symptoms:
- Data disappears after container restart
- Changes not saved

Solutions:
Verify volume mounted:
- Go to Config tab
- Check Volume Mounts section
- Verify container path is correct
Check correct path:
- Different images store data in different paths
- PostgreSQL:
/var/lib/postgresql/data - MySQL:
/var/lib/mysql - MongoDB:
/data/db
Verify not read-only:
- Check volume isn’t marked read-only
- Re-add volume without read-only flag
Check volume permissions:
- Some containers need specific UID/GID
- Check logs for permission errors
Issue: Private registry authentication fails
Symptoms:
- “authentication required” error
- “unauthorized” error
- Pull fails

Solutions:
Verify credentials:
- Check username is correct
- Check password/token is correct
- No typos or extra spaces
Check token permissions:
- GitHub: Needs
read:packagesscope - GitLab: Needs
read_registryscope
- GitHub: Needs
Verify server address:
- GitHub:
ghcr.io - GitLab:
registry.gitlab.com - Azure:
yourregistry.azurecr.io
- GitHub:
Test credentials locally:
docker login ghcr.io -u username -p token
Issue: Upload fails or takes too long
Symptoms:
- Upload stuck or very slow
- Browser timeout
- Upload fails with error

Solutions:
Check file size:
- Large images (>1 GB) take long time
- Use Docker Hub instead for large images
Check network:
- Upload speed depends on connection
- Use wired connection if possible
Compress image:
docker save myapp:latest | gzip > myapp.tar.gzUse Docker Hub:
- Push to Docker Hub from local
- Pull from Docker Hub in deployment
Best Practices
Deployment
✅ Test locally first:
  # Test image works before deploying
docker run -it --rm -p 8080:80 nginx:alpine
✅ Use descriptive names:
  Good: prod-api-gateway, staging-postgres, redis-sessions
Bad:  container1, test, my-container
✅ Pin image versions:
  Good: postgres:15.3-alpine, node:20.10-alpine
Bad:  postgres:latest, node
✅ Start small, scale up:
- Deploy with minimal resources
- Monitor usage in Stats tab
- Increase resources as needed
Security
✅ Use environment variables for secrets:
- Don’t hardcode passwords in image
- Use env vars to inject secrets
- Rotate credentials regularly
✅ Use read-only volumes for config:
  Config files:     Read-only ✓
Application data: Read-write
✅ Limit port exposure:
- Only expose necessary ports
- Use non-standard host ports
- Consider firewall rules
✅ Keep images updated:
- Regularly pull latest versions
- Check for security updates
- Rebuild with new base images
Performance
✅ Use Alpine images:
  nginx:alpine    (40 MB)  vs  nginx:latest     (187 MB)
postgres:15-alpine (230 MB) vs  postgres:15  (420 MB)
✅ Right-size resources:
- Don’t over-allocate (wastes resources)
- Don’t under-allocate (causes failures)
- Monitor and adjust
✅ Use volumes wisely:
- Only mount what’s needed
- Size volumes appropriately
- Don’t use volumes for temporary data
Maintenance
✅ Document your configuration:
- Keep deployment notes
- Document environment variables
- Note port mappings and volumes
✅ Monitor regularly:
- Check logs for errors
- Monitor resource usage
- Watch for unusual behavior
✅ Plan for data:
- Always use volumes for databases
- Regular backups (future feature)
- Test restoration process
Quick Reference
Required Fields
| Field | Required | Default |
|---|---|---|
| Container Name | Yes | - |
| Image | Yes | - |
| CPU Limit | No | 1 vCPU |
| Memory Limit | No | 512 MB |
Optional Fields
| Field | When to Use |
|---|---|
| Port Mappings | When service needs external access |
| Environment Variables | When image requires configuration |
| Volume Mounts | When data must persist |
| Registry Auth | When using private images |
Deployment Times
| Stage | Duration |
|---|---|
| Creating VM | 1-2 seconds |
| Booting VM | 2-3 seconds |
| Docker startup | 2-5 seconds |
| Pull small image (Alpine) | 5-15 seconds |
| Pull medium image | 15-30 seconds |
| Pull large image | 30-120 seconds |
| Total (Alpine) | ~15-30 seconds |
| Total (Standard) | ~30-90 seconds |
Container States Reference
All Possible States
| State | Badge Color | Emoji | Description |
|---|---|---|---|
| Creating | Yellow (kuning) | 🟡 | Initial VM creation, starting Firecracker |
| Booting | Gray (abu-abu) | ⚪ | MicroVM is booting up |
| Initializing | Cyan (tosca) | 🔵 | Docker daemon starting, preparing runtime |
| Running | Green (hijau) | 🟢 | Container is active and operational |
| Stopped | Red (merah) | 🔴 | Container has been stopped |
| Error | Red (merah) | ❌ | Container encountered an error |
| Paused | Amber (kuning tua) | 🟠 | Container is paused/suspended |
State Lifecycle
Normal Deployment Flow:
Creating (🟡) → Booting (⚪) → Initializing (🔵) → Running (🟢)
Stop Flow:
Running (🟢) → Stopped (🔴)
Error Flow:
Any State → Error (❌)
Resume Flow:
Paused (🟠) → Running (🟢)
State Indicators in UI
Each state is displayed with:
- Color-coded badge - Easy visual identification
- Emoji indicator - Quick status recognition (🟢🔴🟡🔵)
- Status text - Clear state name
Example in table:
- Creating: Yellow badge with “Creating” text
- Running: Green badge with “Running” text
- Error: Red badge with “Error” text
Next Steps
- Manage Containers - Start, stop, restart, delete containers
- View Logs - Real-time log streaming and debugging
- Monitor Stats - Resource usage and performance metrics
- Container Overview - Learn more about containers