Create a Function
Learn how to create serverless functions using the web interface with built-in code editor and testing capabilities.
Prerequisites
Before creating a function, ensure:
- ✅ You have access to the NQRust-MicroVM dashboard
- ✅ At least one host/agent is online
- ✅ Sufficient resources available (minimum: 1 vCPU, 512 MB RAM per function)
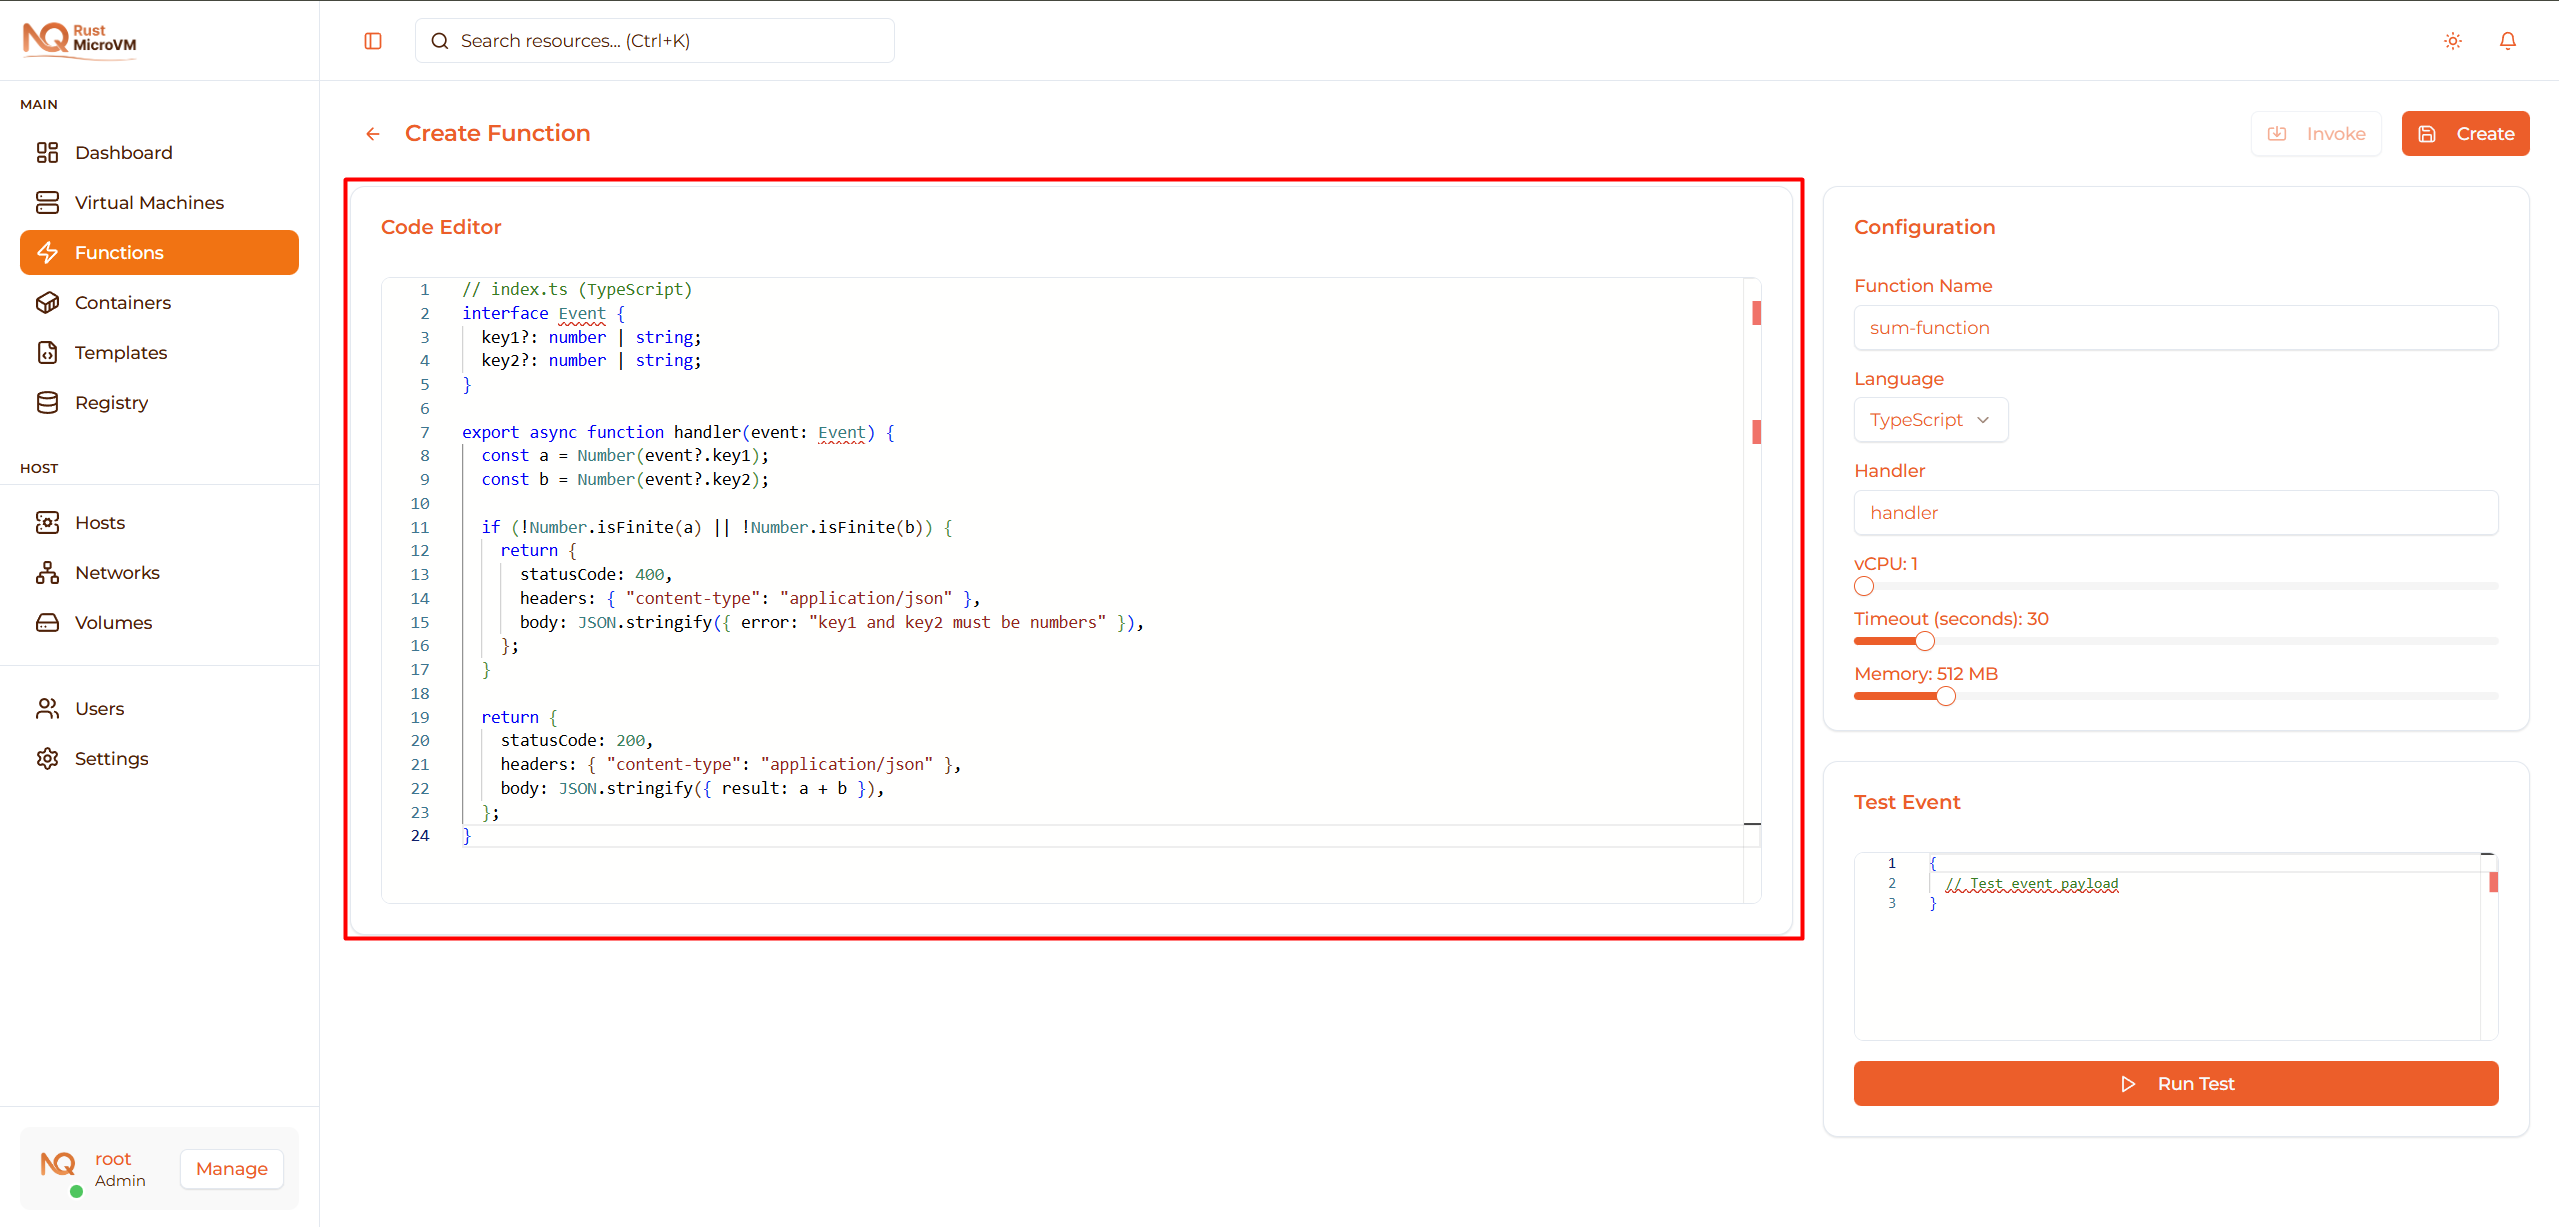
Step 1: Open Function Creation Page
- Click Functions in the left sidebar
- Click the New Function button in the top-right corner
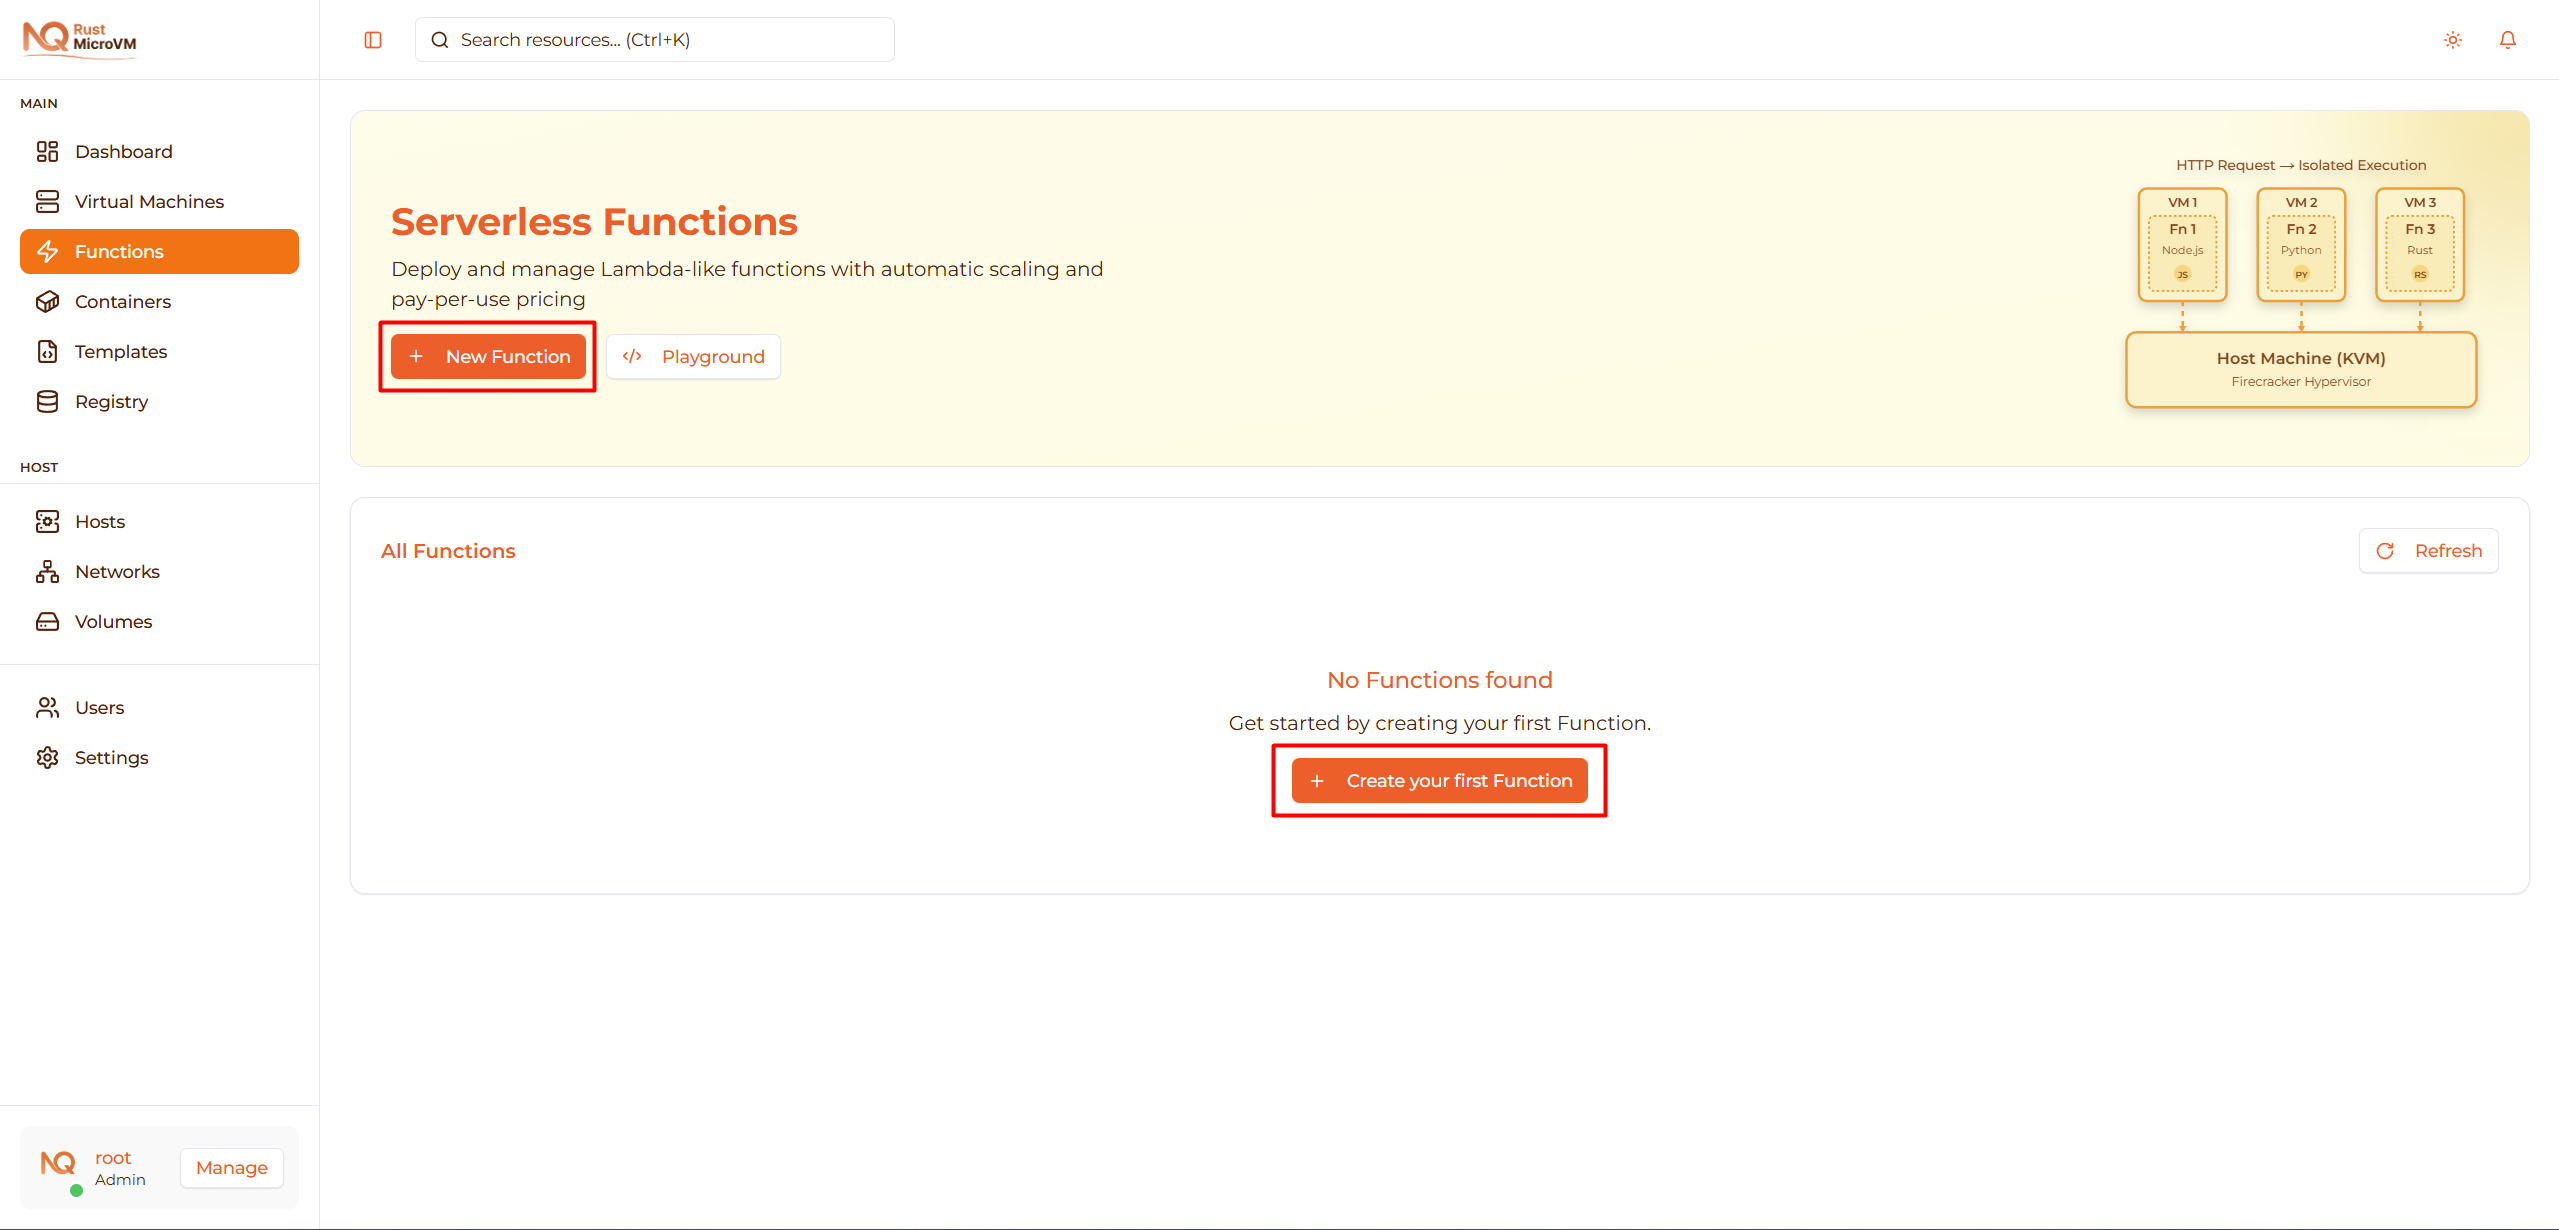
The function editor will open with a Monaco code editor.
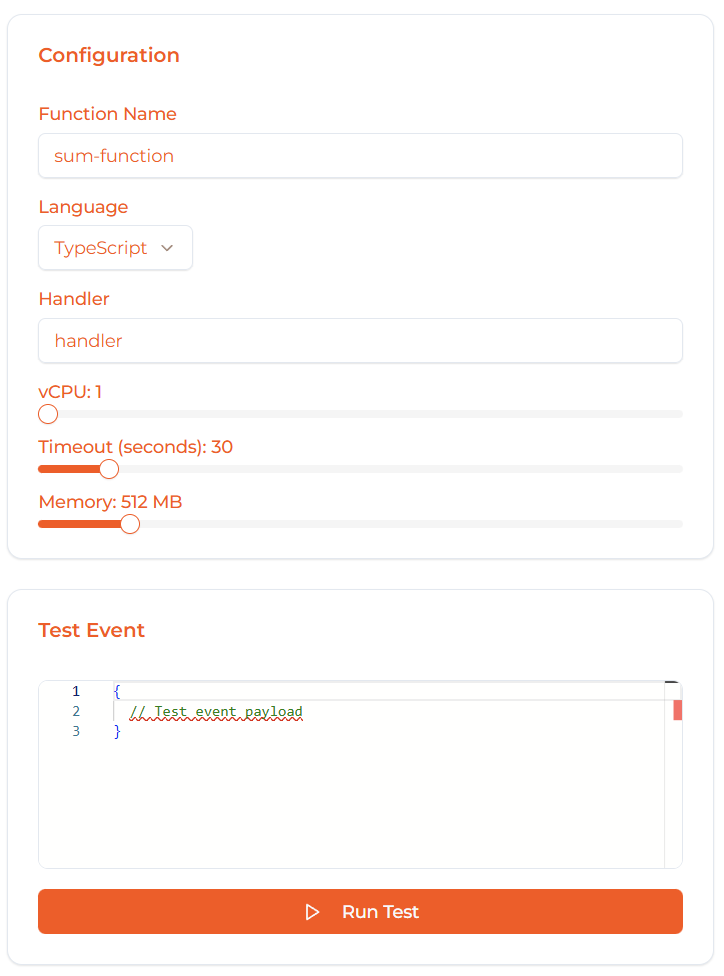
Step 2: Basic Configuration
Function Name (Required)
Enter a unique, descriptive name for your function:
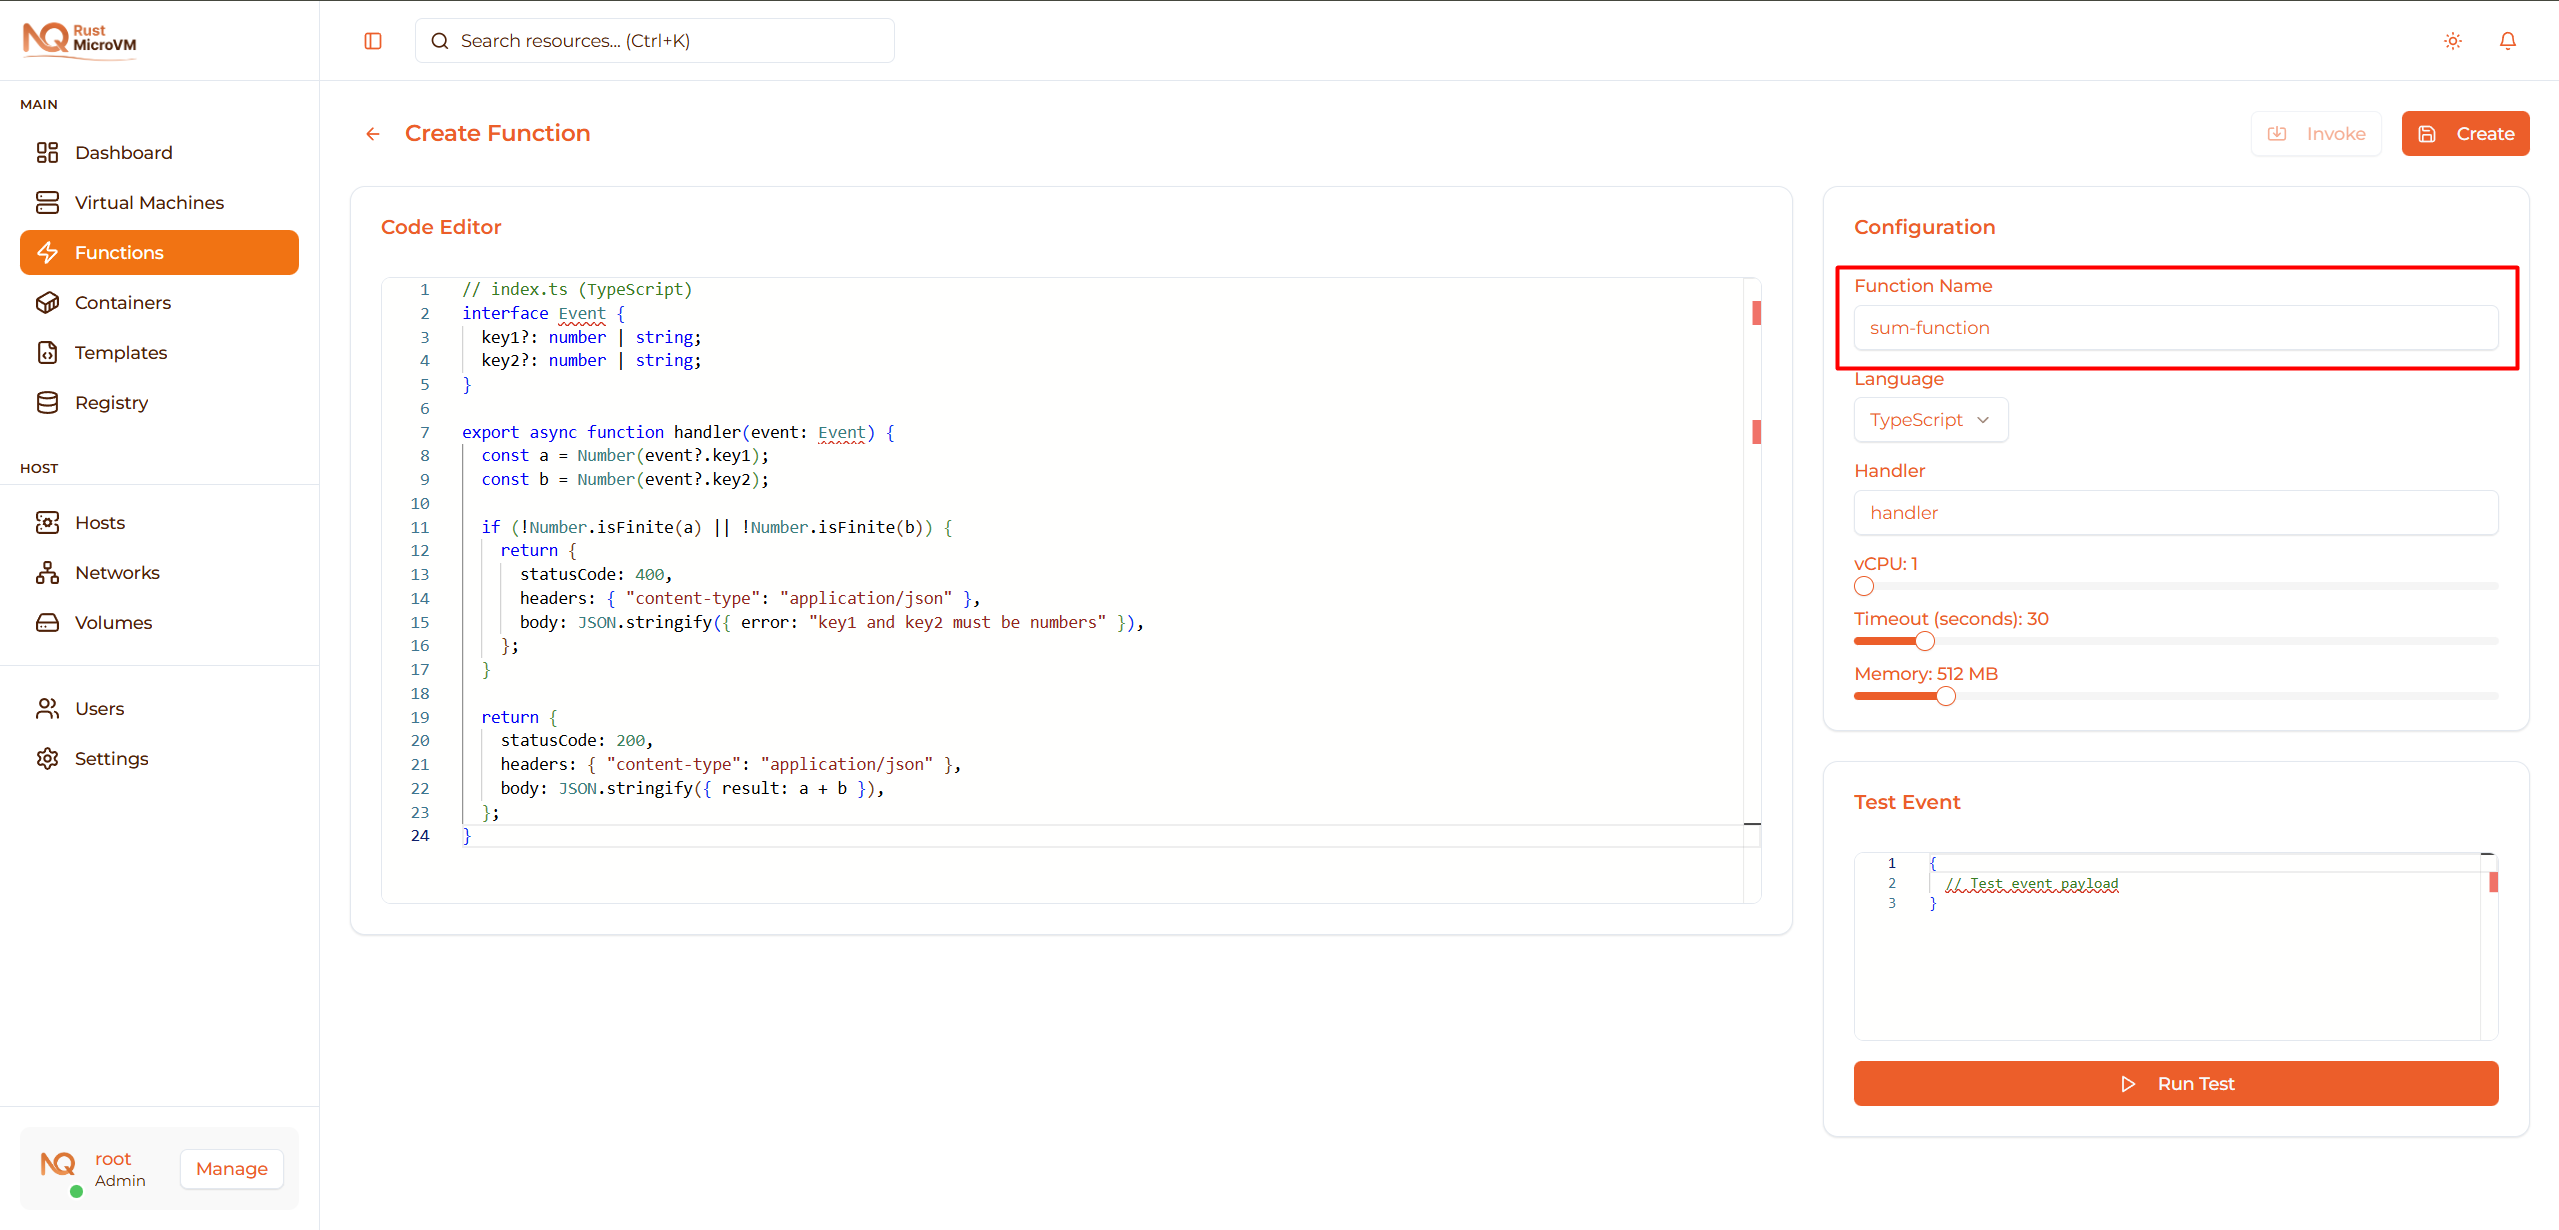
- Must be between 1-50 characters
- Use descriptive names that indicate purpose
- Examples:
image-resizer,email-sender,data-processor
Tip: Use kebab-case for function names (e.g., process-payment, send-notification)
Runtime (Required)
Select the programming language for your function:
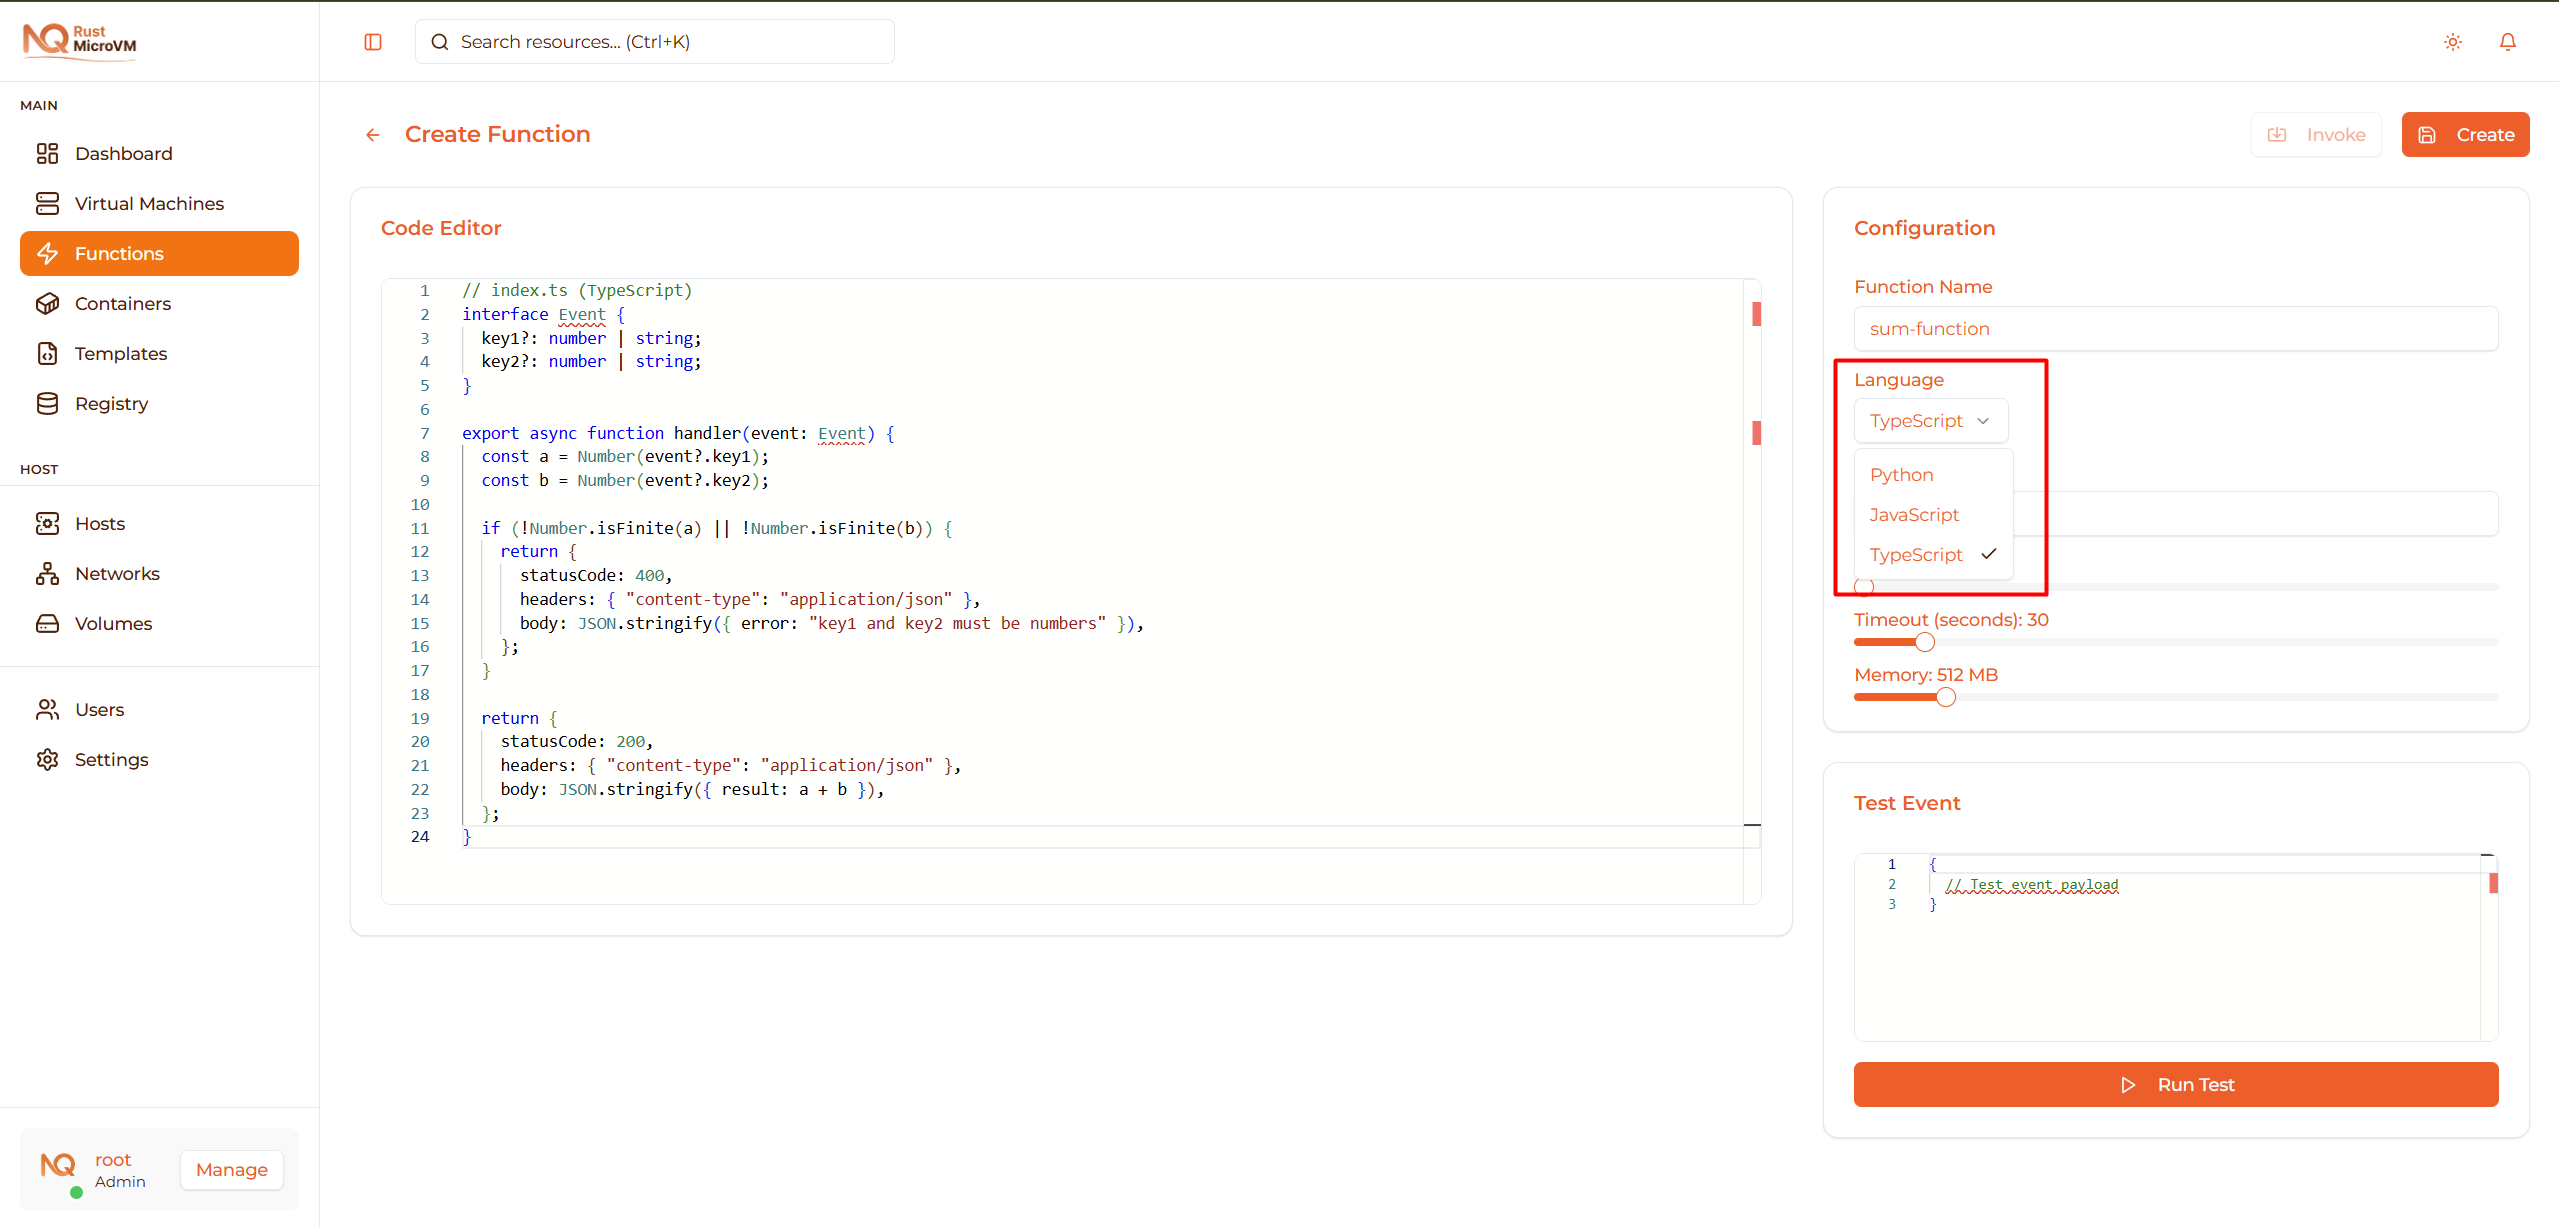
Available runtimes:
| Runtime | Version | Best For |
|---|---|---|
| Python | 3.11 | Data processing, ML, APIs |
| JavaScript (Bun) | Latest | Web APIs, JSON processing |
| TypeScript (Bun) | Latest | Type-safe applications |
Default: TypeScript
Performance note: All runtimes have similar cold start times (~2-3 seconds)
Handler Name (Required)
Specify the entry point function name:
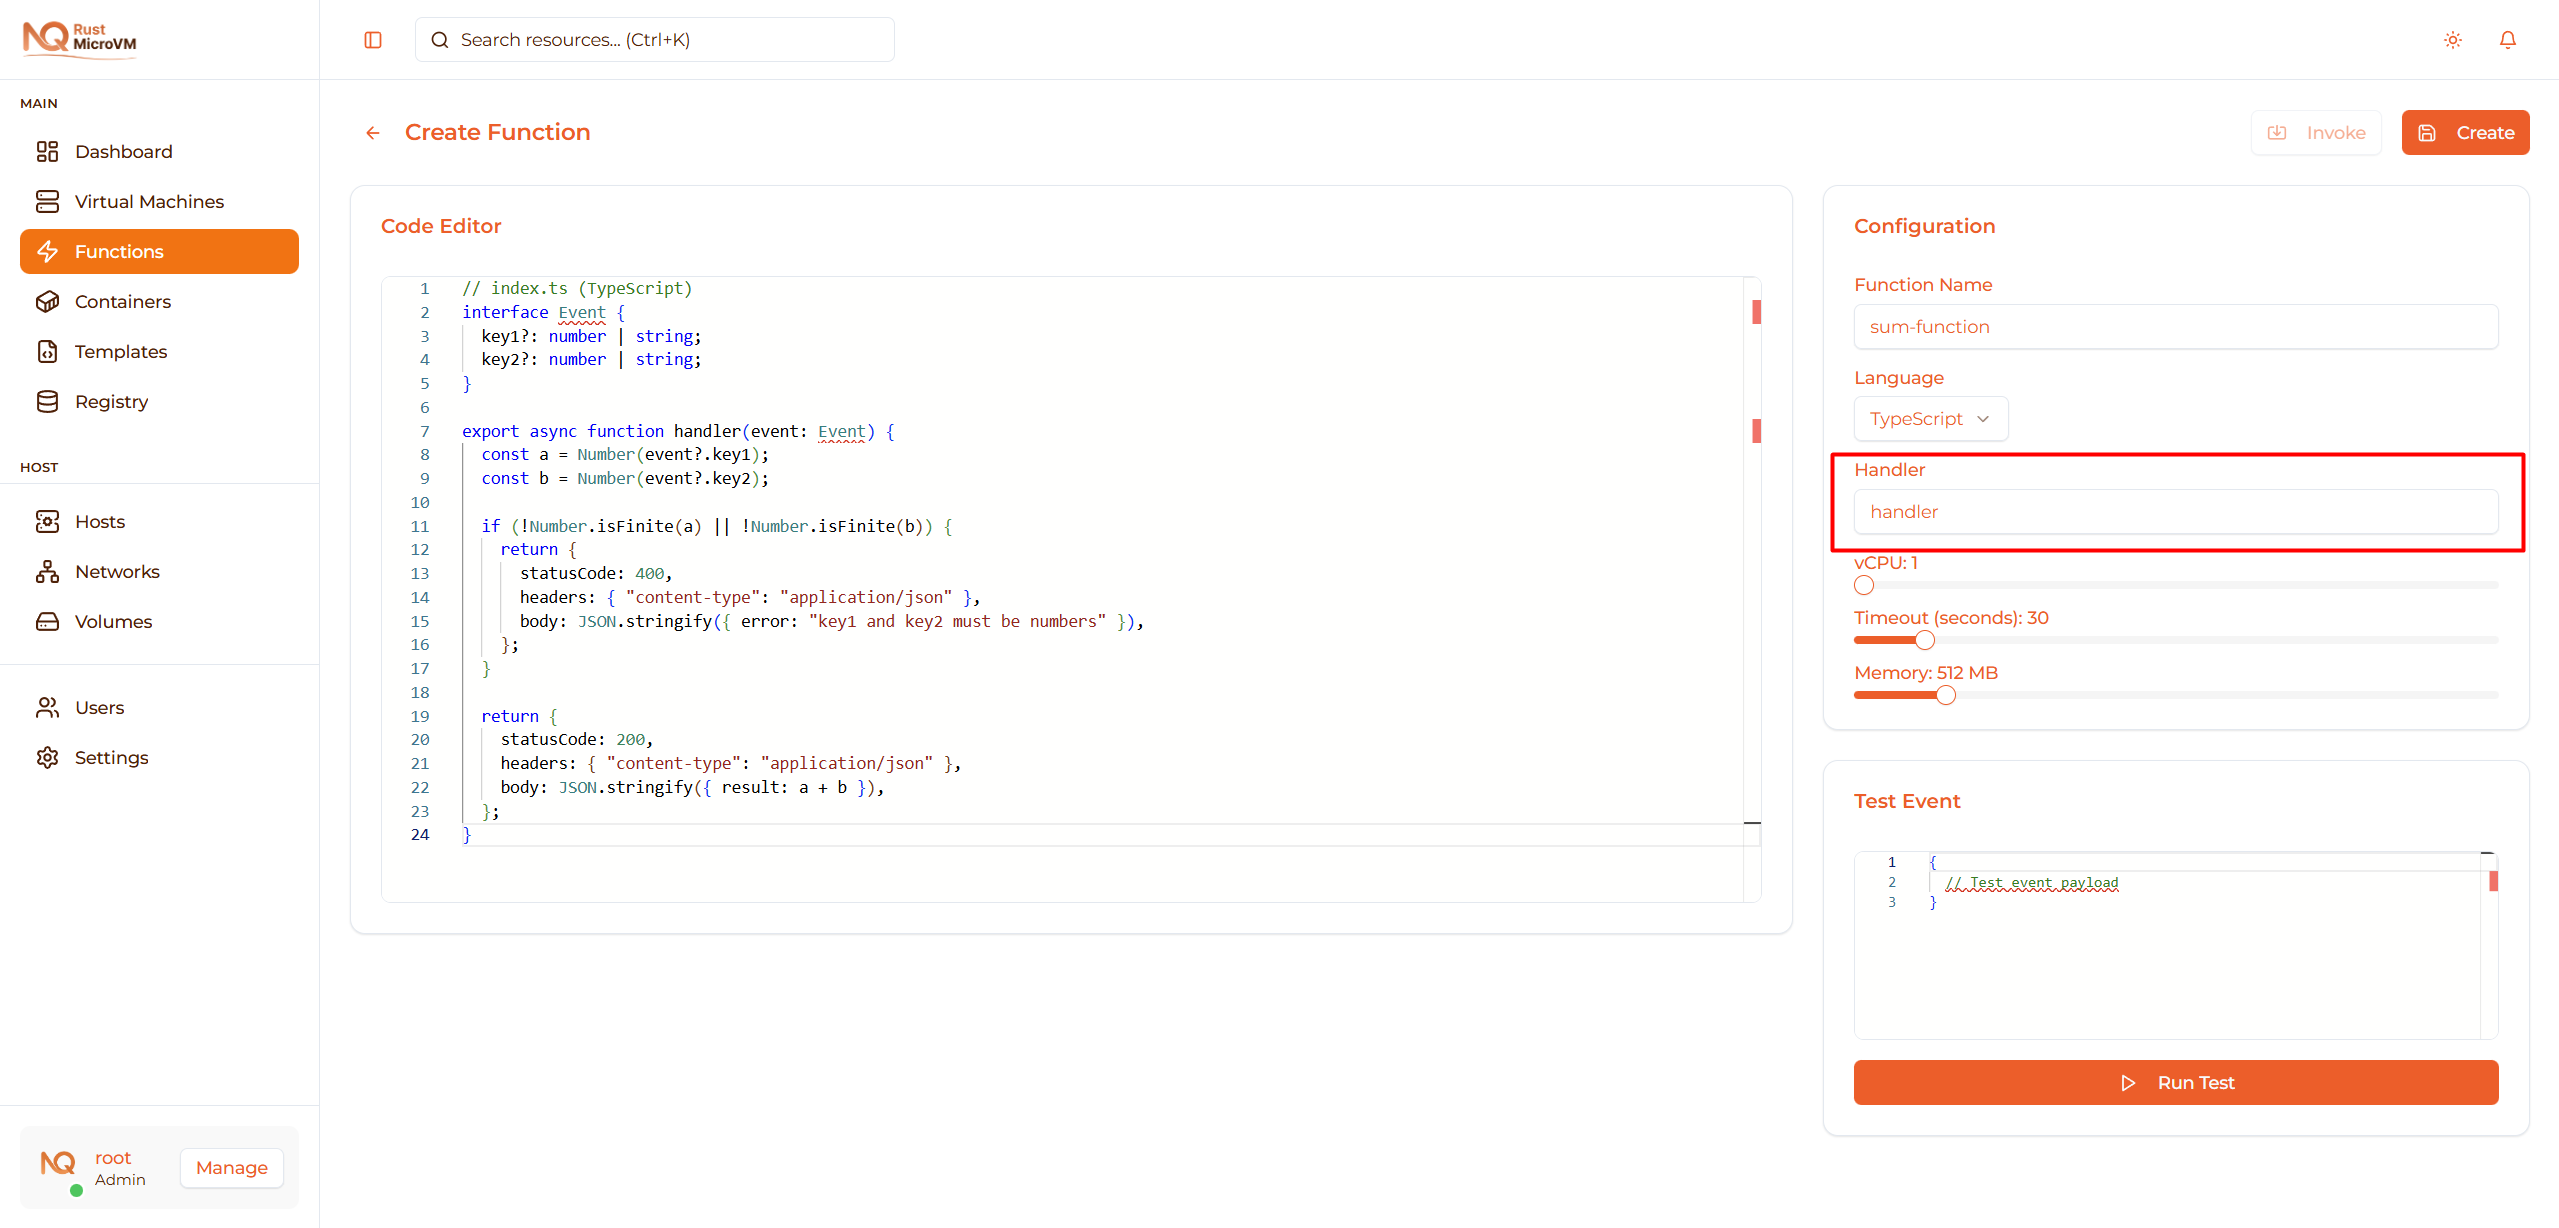
- Default:
handler - Must match the function name in your code
- Common names:
handler,main,lambda_handler
Examples:
  # If handler = "handler"
def handler(event):
    return {"statusCode": 200}
  // If handler = "handler"
export async function handler(event) {
  return { statusCode: 200 };
}
Step 3: Write Function Code
Use the built-in Monaco code editor to write your function:
The editor provides:
- ✅ Syntax highlighting
- ✅ Auto-completion
- ✅ Error detection
- ✅ Code formatting
- ✅ Multi-line editing
Default Code Templates
When you select a runtime, default code is provided:
Python Template
  # index.py  (Python 3.11)
def handler(event):
    try:
        a = float(event.get("key1"))
        b = float(event.get("key2"))
    except Exception:
        return {
            "statusCode": 400,
            "headers": {"content-type": "application/json"},
            "body": '{"error":"key1 and key2 must be numbers"}',
        }

    return {
        "statusCode": 200,
        "headers": {"content-type": "application/json"},
        "body": '{"result": %s}' % (a + b),
    }
JavaScript Template
  // index.js (JavaScript)
export async function handler(event) {
  const a = Number(event?.key1);
  const b = Number(event?.key2);

  if (!Number.isFinite(a) || !Number.isFinite(b)) {
    return {
      statusCode: 400,
      headers: { "content-type": "application/json" },
      body: JSON.stringify({ error: "key1 and key2 must be numbers" }),
    };
  }

  return {
    statusCode: 200,
    headers: { "content-type": "application/json" },
    body: JSON.stringify({ result: a + b }),
  };
}
TypeScript Template
  // index.ts (TypeScript)
interface Event {
  key1?: number | string;
  key2?: number | string;
}

export async function handler(event: Event) {
  const a = Number(event?.key1);
  const b = Number(event?.key2);

  if (!Number.isFinite(a) || !Number.isFinite(b)) {
    return {
      statusCode: 400,
      headers: { "content-type": "application/json" },
      body: JSON.stringify({ error: "key1 and key2 must be numbers" }),
    };
  }

  return {
    statusCode: 200,
    headers: { "content-type": "application/json" },
    body: JSON.stringify({ result: a + b }),
  };
}
Function Signature
All functions receive an event parameter with the request payload:
Python:
  def handler(event):
    # event is a dict with the JSON payload
    name = event.get("name")
    return {"statusCode": 200, "body": "..."}
JavaScript/TypeScript:
  export async function handler(event) {
  // event is an object with the JSON payload
  const name = event?.name;
  return { statusCode: 200, body: "..." };
}
Response Format
Functions should return an object with:
  {
  "statusCode": 200,                          // HTTP status code
  "headers": {                                // Optional headers
    "content-type": "application/json"
  },
  "body": "{\"message\": \"Hello World\"}"   // Response body (string)
}
Important: The body field must be a string, not an object. Use JSON.stringify() or string formatting.
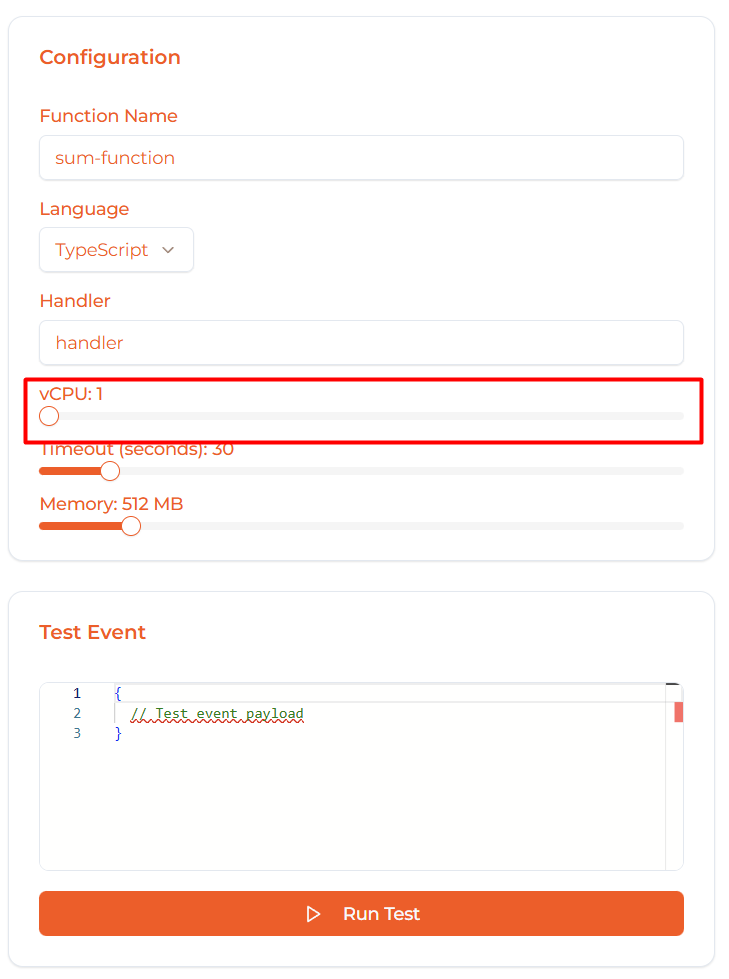
Step 4: Resource Configuration
Configure CPU, memory, and timeout for your function:
vCPU (Virtual CPU)
Select CPU cores (1-32):
| vCPU | Best For | Example |
|---|---|---|
| 1 | Simple APIs, data transformations | JSON parser, webhook handler |
| 2 | Moderate processing, I/O operations | Image resize, CSV processing |
| 4+ | CPU-intensive tasks | Video encoding, ML inference |
Default: 1 vCPU
Tip: Start with 1 vCPU and increase if you see performance issues.
Memory (MB)
Allocate memory (128-3072 MB):

| Memory | Best For | Example |
|---|---|---|
| 128 MB | Minimal functions, simple logic | Hello World, calculator |
| 512 MB | Standard APIs, data processing | REST API, JSON transformer |
| 1024 MB (1 GB) | Large datasets, complex operations | Image processing, report gen |
| 2048 MB (2 GB+) | ML models, video processing | ML inference, video resize |
Default: 512 MB
Important: More memory = higher cost per invocation.
Timeout (seconds)
Set maximum execution time (1-300 seconds):

| Timeout | Use Case |
|---|---|
| 1-10s | Quick APIs, simple processing |
| 30s | Standard functions (default) |
| 60-120s | Complex processing, external API calls |
| 300s (5 min) | Long-running tasks, batch processing |
Default: 30 seconds
Note: Function automatically terminates if it exceeds timeout.
Step 5: Test Your Function
1. Write Test Event
Enter JSON payload in the test event editor:
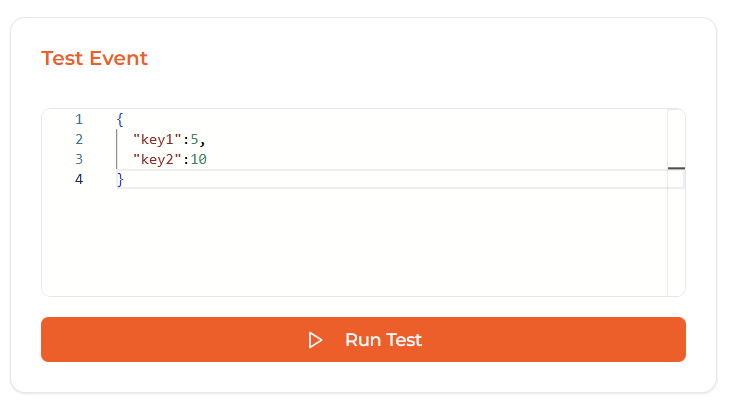
Example payloads:
  {
  "key1": 10,
  "key2": 5
}
  {
  "name": "Alice",
  "age": 30,
  "city": "Jakarta"
}
2. Run Test
Click the Run Test button:
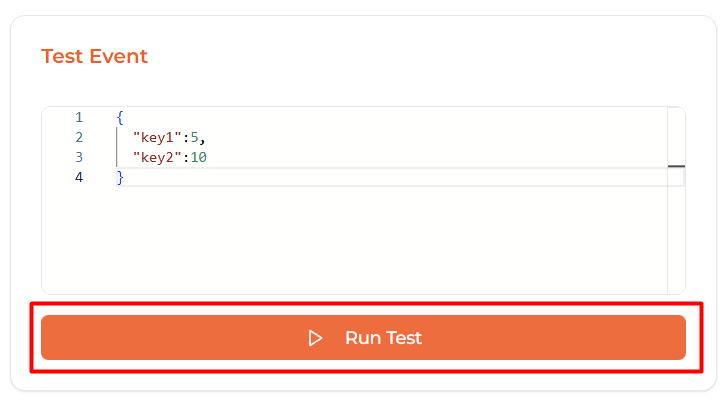
The function will execute locally and show results:

Test Output Shows:
- ✅ Response - Function return value
- ✅ Logs - Console output and errors
- ✅ Execution Time - How long it took
- ✅ Status - Success or error
3. Verify Output
Check the test output:
  {
  "statusCode": 200,
  "headers": {
    "content-type": "application/json"
  },
  "body": "{\"result\": 15}"
}
If there are errors:
- Review the error message in logs
- Fix your code
- Run test again
Tip: Test with multiple payloads to cover different scenarios.
Step 6: Deploy Function
When your function works correctly, deploy it:
Click Save/Deploy
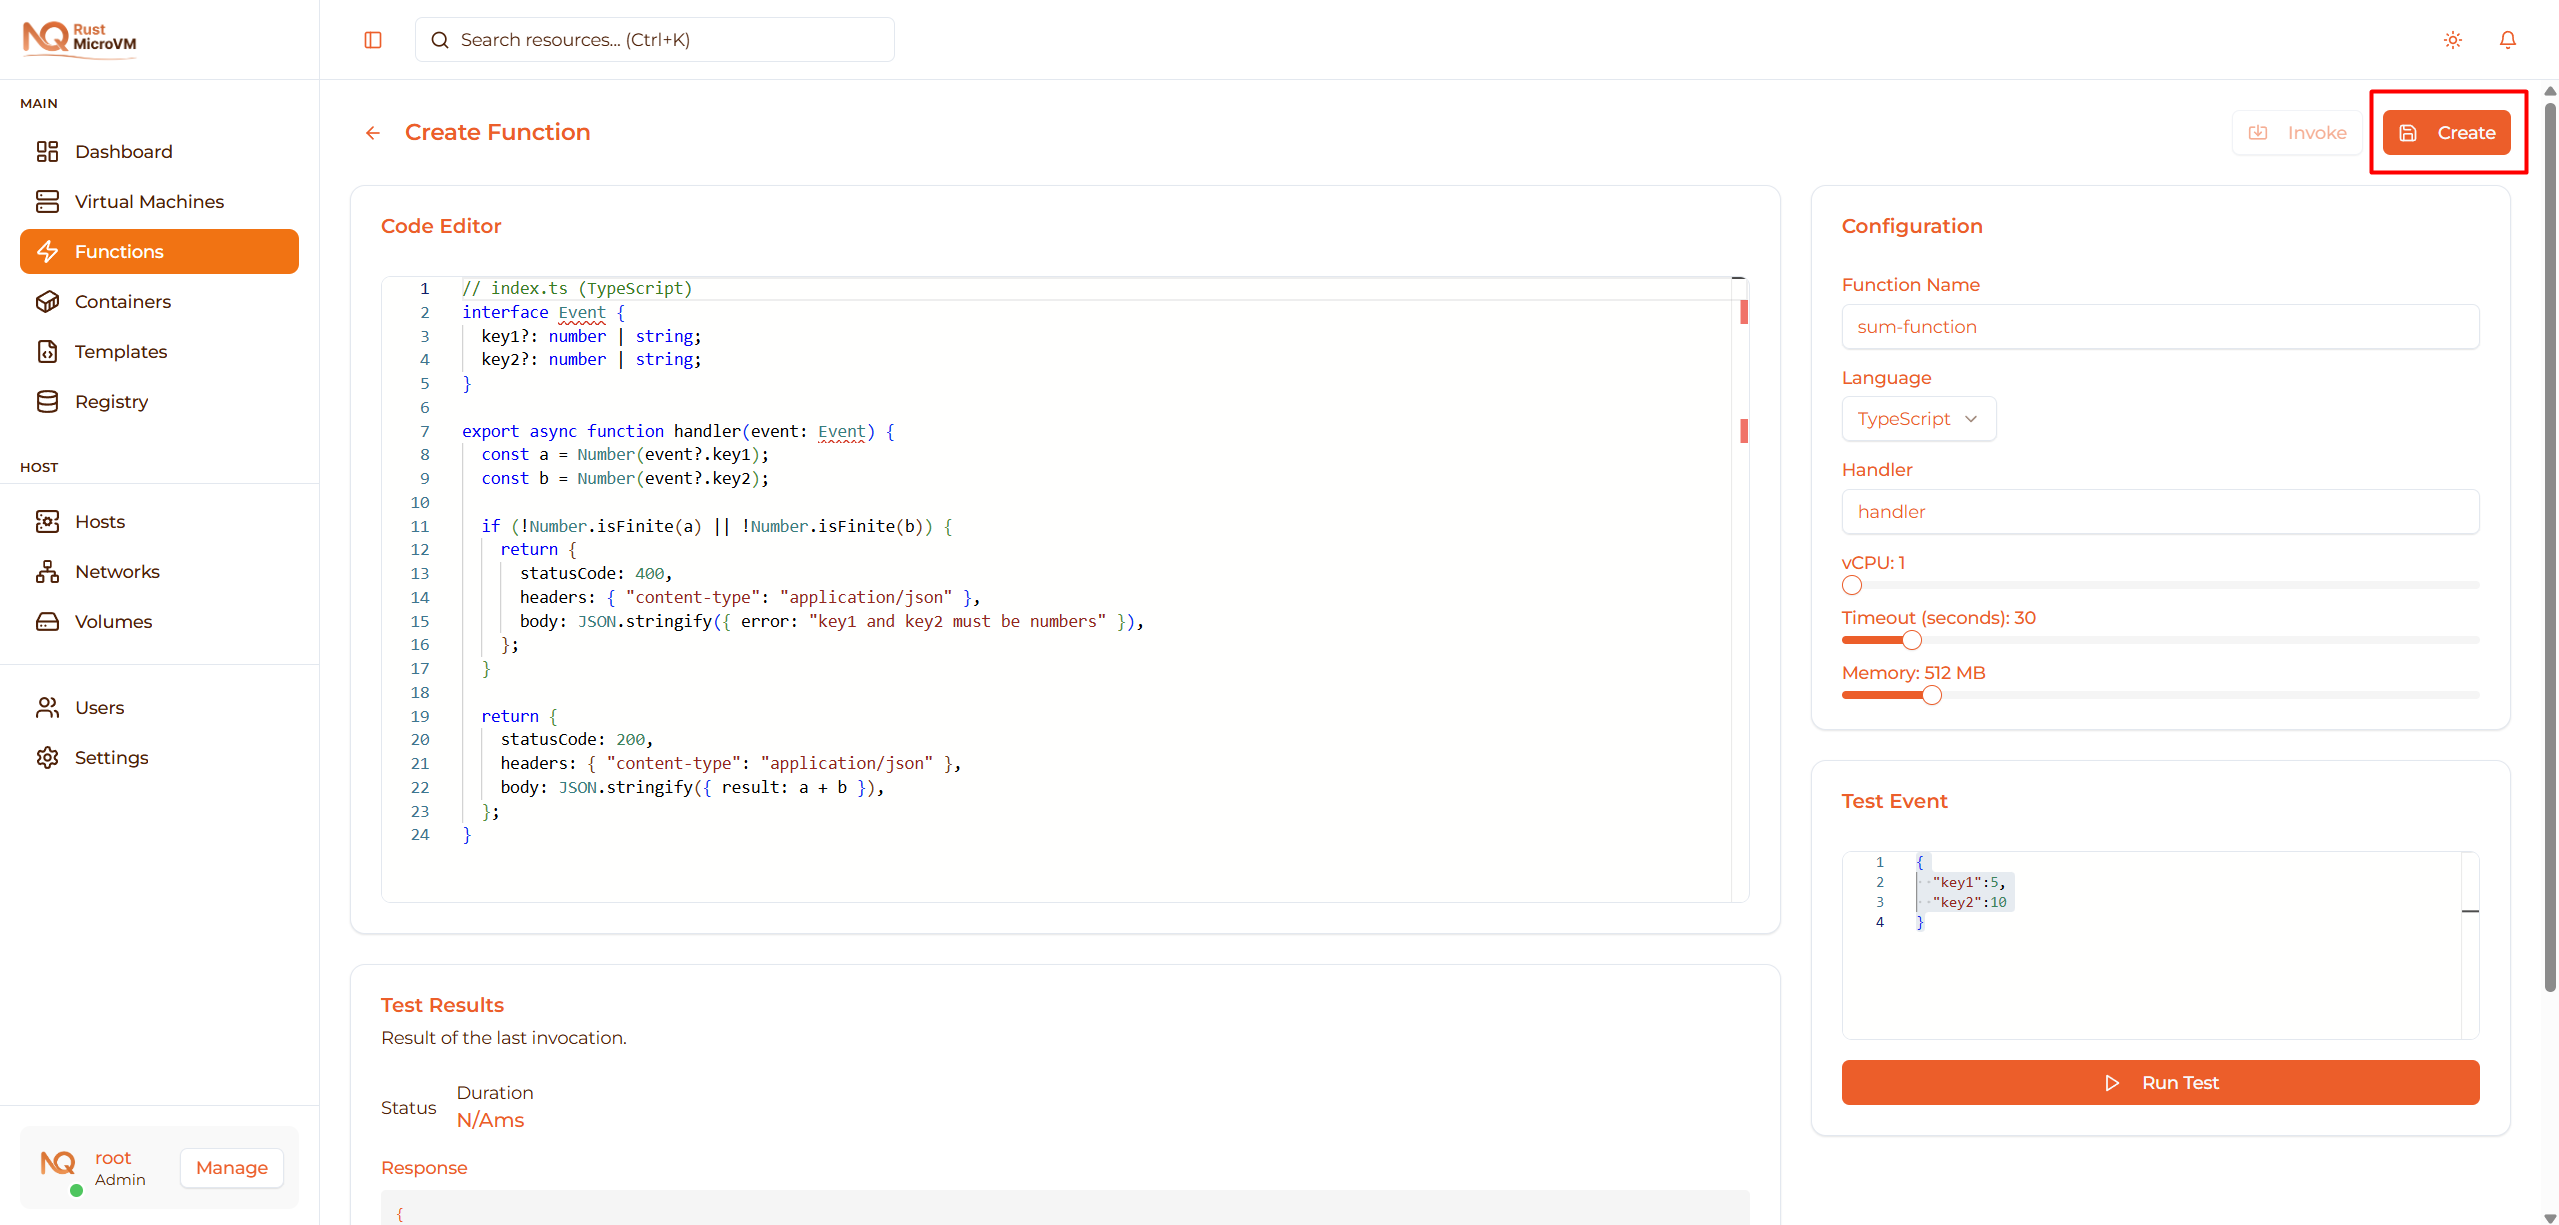
Click the Save button in the top-right corner.
Deployment Process
The system will:
- ✓ Validate function code and configuration
- ✓ Create microVM for the function
- ✓ Deploy runtime and dependencies
- ✓ Start function service
- ✓ Mark function as “Ready”
Time: Usually completes in 2-5 seconds
Success Notification
You’ll see a success message:
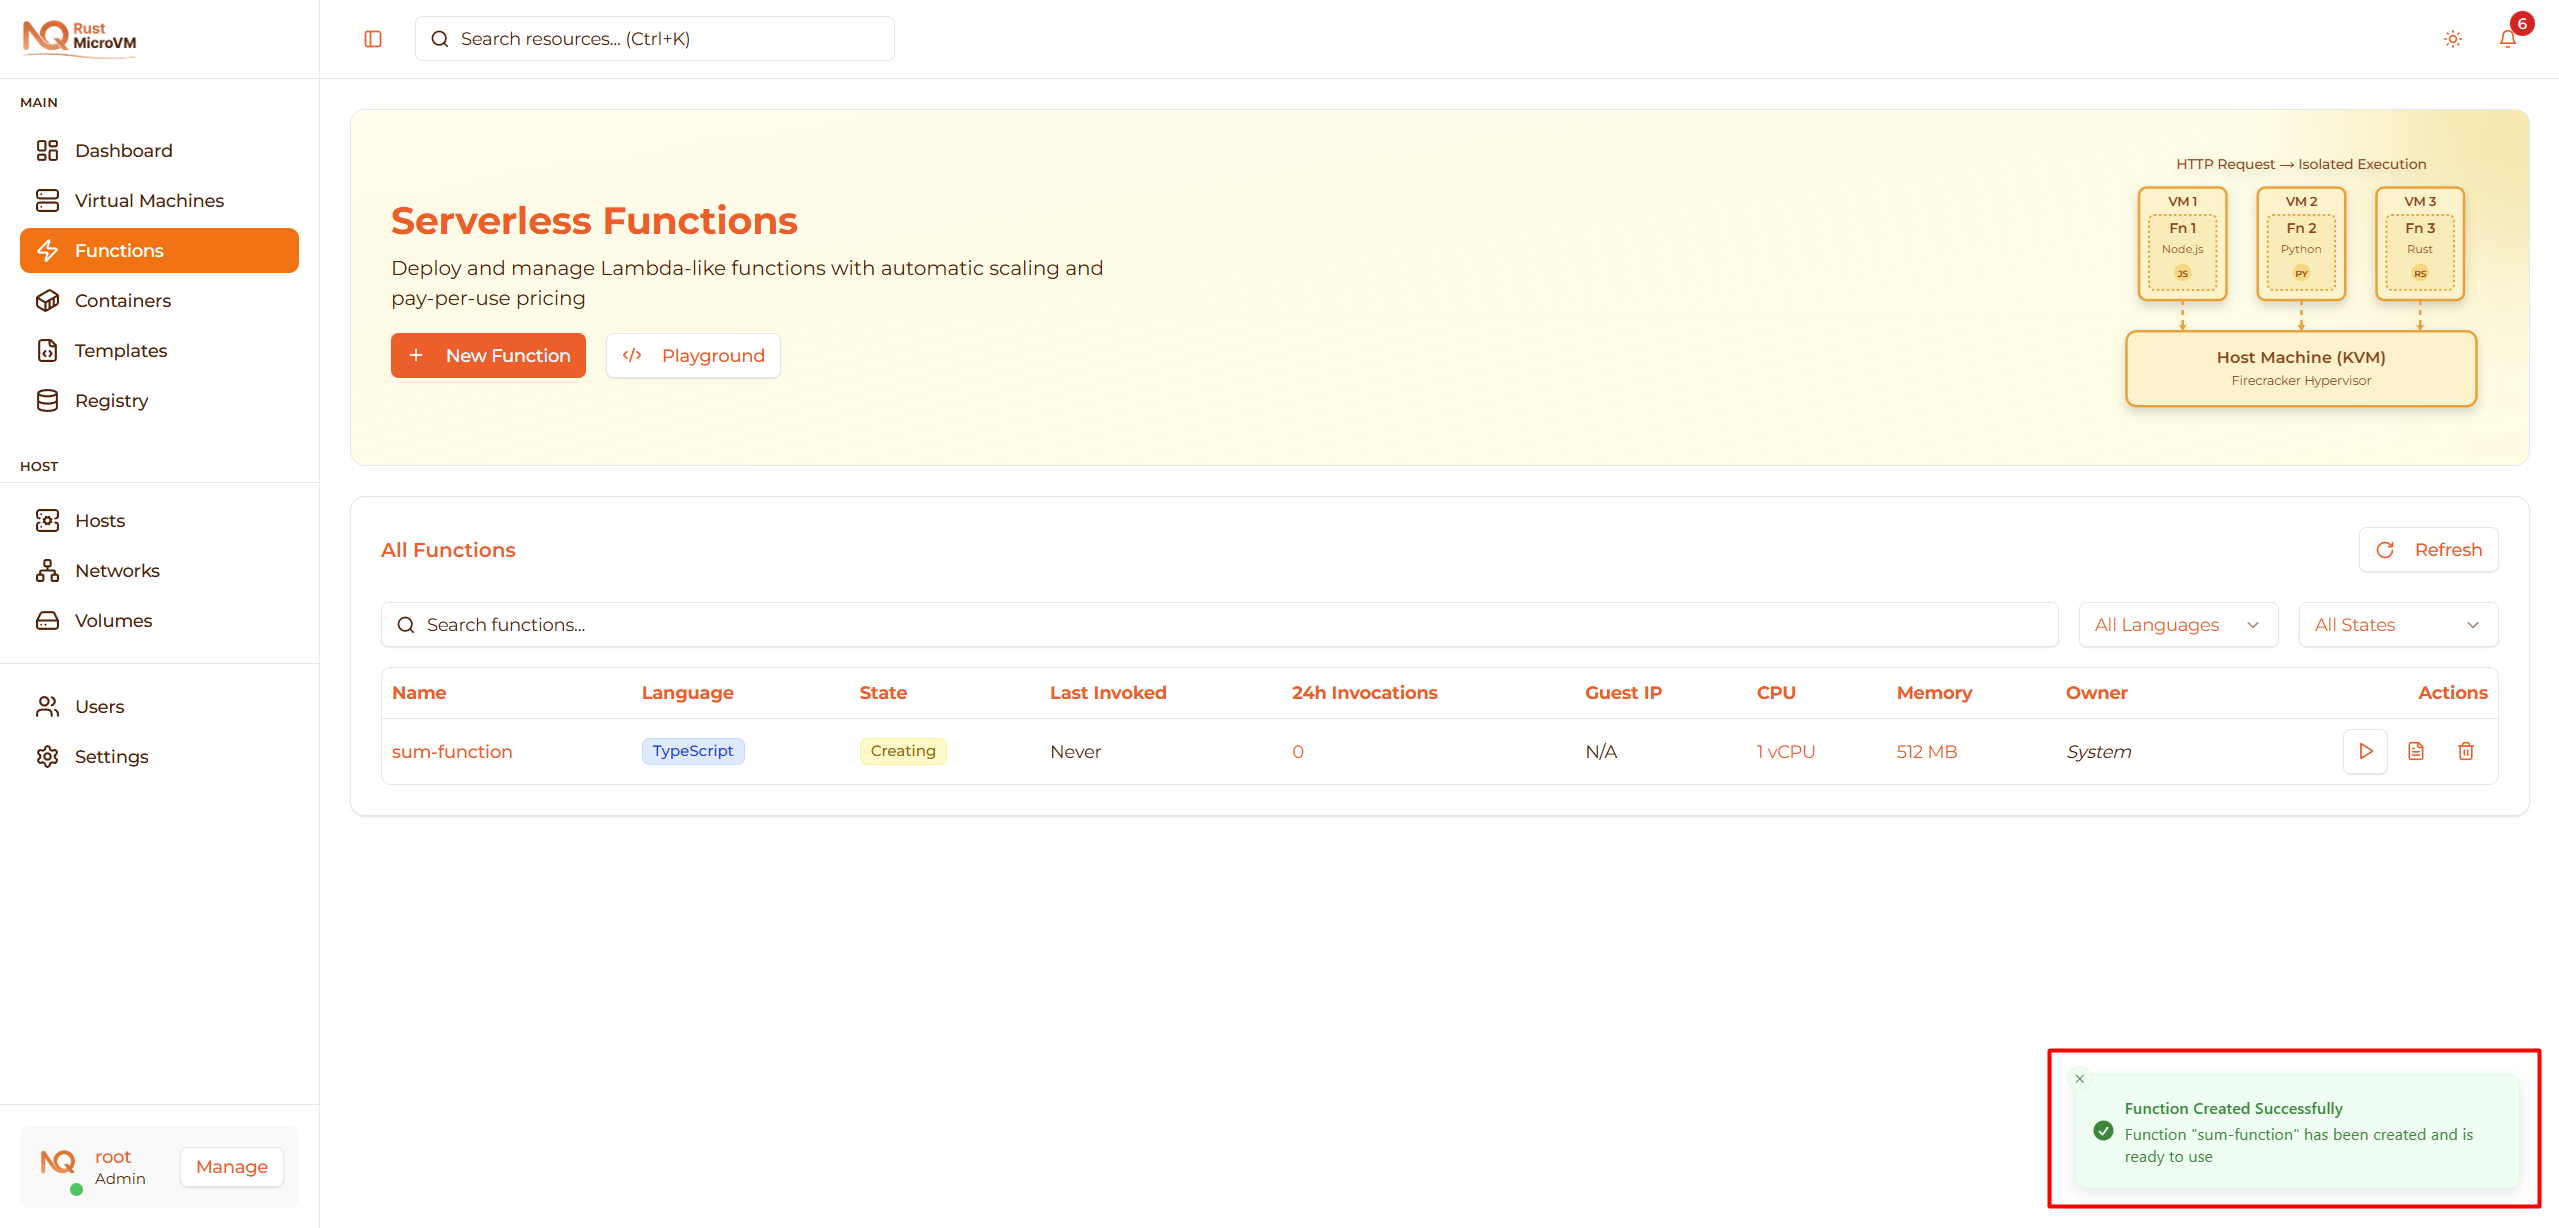
“Function created - [function-name] successfully created.”
You’ll be redirected to the Functions list page.
Step 7: Verify Deployment
After deployment, verify your function is ready:

Check Function Table
On the Functions list page, locate your function:
- State should be “Ready” (green badge)
- Language shows your selected runtime
- Guest IP shows the function’s IP address
- Owner shows “You”
Invoke Test
Click the Invoke button (▶ Play icon) to test:

Enter test payload and click Invoke:
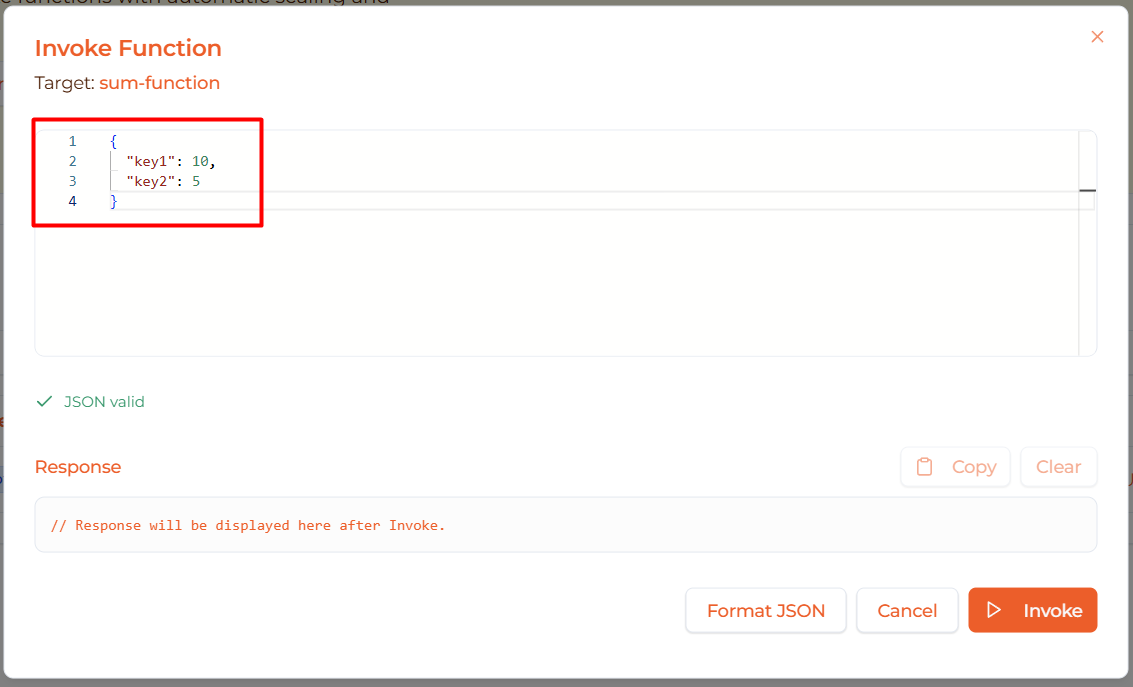
Verify the response matches your expectations.
Complete Example: Hello World API
Let’s create a complete function from scratch:
Configuration
- Name:
hello-api - Runtime: TypeScript
- Handler:
handler - vCPU: 1
- Memory: 512 MB
- Timeout: 30s
Code
  interface Event {
  name?: string;
  language?: string;
}

export async function handler(event: Event) {
  const name = event?.name || "World";
  const language = event?.language || "en";

  const greetings: Record<string, string> = {
    en: "Hello",
    es: "Hola",
    fr: "Bonjour",
    id: "Halo",
    ja: "こんにちは",
  };

  const greeting = greetings[language] || greetings.en;

  return {
    statusCode: 200,
    headers: { "content-type": "application/json" },
    body: JSON.stringify({
      message: `${greeting}, ${name}!`,
      timestamp: new Date().toISOString(),
    }),
  };
}
Test Event
  {
  "name": "Alice",
  "language": "id"
}
Expected Response
  {
  "statusCode": 200,
  "headers": {
    "content-type": "application/json"
  },
  "body": "{\"message\":\"Halo, Alice!\",\"timestamp\":\"2025-12-18T10:30:00.000Z\"}"
}
Try it: Create this function and test with different languages!
Import from Playground
If you’ve been experimenting in the Playground, you can import your work:

Steps:
- Work on your function in Playground first
- Click “Save to Functions” in Playground
- New Function page opens with your code pre-filled
- Configure name and resources
- Click Save to deploy
Benefit: Iterate quickly in Playground, then deploy when ready.
Troubleshooting
Issue: Function Stuck in “Creating”
Symptoms:
- State shows “Creating” for more than 30 seconds
- Never changes to “Ready”
Solutions:
- Refresh the page - Sometimes UI needs update
- Check host resources:
- Go to Hosts page
- Verify agent is online
- Check available CPU and memory
- Delete and recreate:
- Delete the stuck function
- Create a new one
Issue: Test Fails with Error
Symptoms:
- Test output shows error message
- Function doesn’t return expected response
Solutions:
Check error logs in test output:
Error: name is undefinedCommon errors:
- Syntax error: Fix code syntax
- Undefined variable: Check variable names
- JSON parse error: Ensure
bodyis a string - Timeout: Reduce processing time or increase timeout
Debug tips:
- Add
console.log()statements (Python:print()) - Test with simple payload first
- Check event structure matches your code
- Add
Example fix:
  // ❌ Wrong - body is object
return {
  statusCode: 200,
  body: { message: "Hi" }  // ERROR!
};

// ✅ Correct - body is string
return {
  statusCode: 200,
  body: JSON.stringify({ message: "Hi" })
};
Issue: Cannot Save Function
Symptoms:
- Save button disabled
- Validation errors shown
Solutions:
Check required fields:
- ✅ Name filled
- ✅ Runtime selected
- ✅ Handler filled
- ✅ Code not empty
Fix validation errors:
- Red text shows what’s wrong
- Fix each error before saving
Code must be valid:
- No syntax errors
- Handler function exists
- Proper structure
Best Practices
Code Organization
✅ Keep functions focused:
  // ✅ Good - Single responsibility
export async function handler(event) {
  return processPayment(event);
}

// ❌ Bad - Too many responsibilities
export async function handler(event) {
  // 100 lines of mixed logic...
}
Error Handling
✅ Always handle errors:
  def handler(event):
    try:
        # Your logic here
        result = process_data(event)
        return {
            "statusCode": 200,
            "body": json.dumps({"result": result})
        }
    except ValueError as e:
        return {
            "statusCode": 400,
            "body": json.dumps({"error": str(e)})
        }
    except Exception as e:
        return {
            "statusCode": 500,
            "body": json.dumps({"error": "Internal server error"})
        }
Resource Allocation
✅ Right-size your function:
- Start with minimum resources (1 vCPU, 512 MB)
- Monitor invocation times in logs
- Increase only if needed
- Don’t over-allocate (costs more)
Testing
✅ Test thoroughly before deploying:
- Test with valid input
- Test with invalid input
- Test edge cases
- Test error scenarios
Next Steps
Now that you’ve created a function:
- Manage Functions - Invoke, update, and delete functions
- View Logs - Debug and monitor function executions
- Playground - Experiment with new ideas
Quick Reference
Function Structure
Python:
  def handler(event):
    # Process event (dict)
    return {
        "statusCode": 200,
        "headers": {"content-type": "application/json"},
        "body": json.dumps({"result": "..."})
    }
TypeScript:
  export async function handler(event) {
  // Process event (object)
  return {
    statusCode: 200,
    headers: { "content-type": "application/json" },
    body: JSON.stringify({ result: "..." }),
  };
}
Resource Limits
| Resource | Minimum | Maximum | Default |
|---|---|---|---|
| vCPU | 1 | 32 | 1 |
| Memory | 128 MB | 3072 MB | 512 MB |
| Timeout | 1s | 300s | 30s |
Common HTTP Status Codes
| Code | Meaning | When to Use |
|---|---|---|
| 200 | OK | Successful response |
| 400 | Bad Request | Invalid input |
| 404 | Not Found | Resource not found |
| 500 | Internal Server Error | Unexpected error |