Manage Templates
Learn how to manage your VM templates - deploy VMs from templates, edit template configurations, and delete unused templates.
Accessing Templates
Navigate to Templates Page
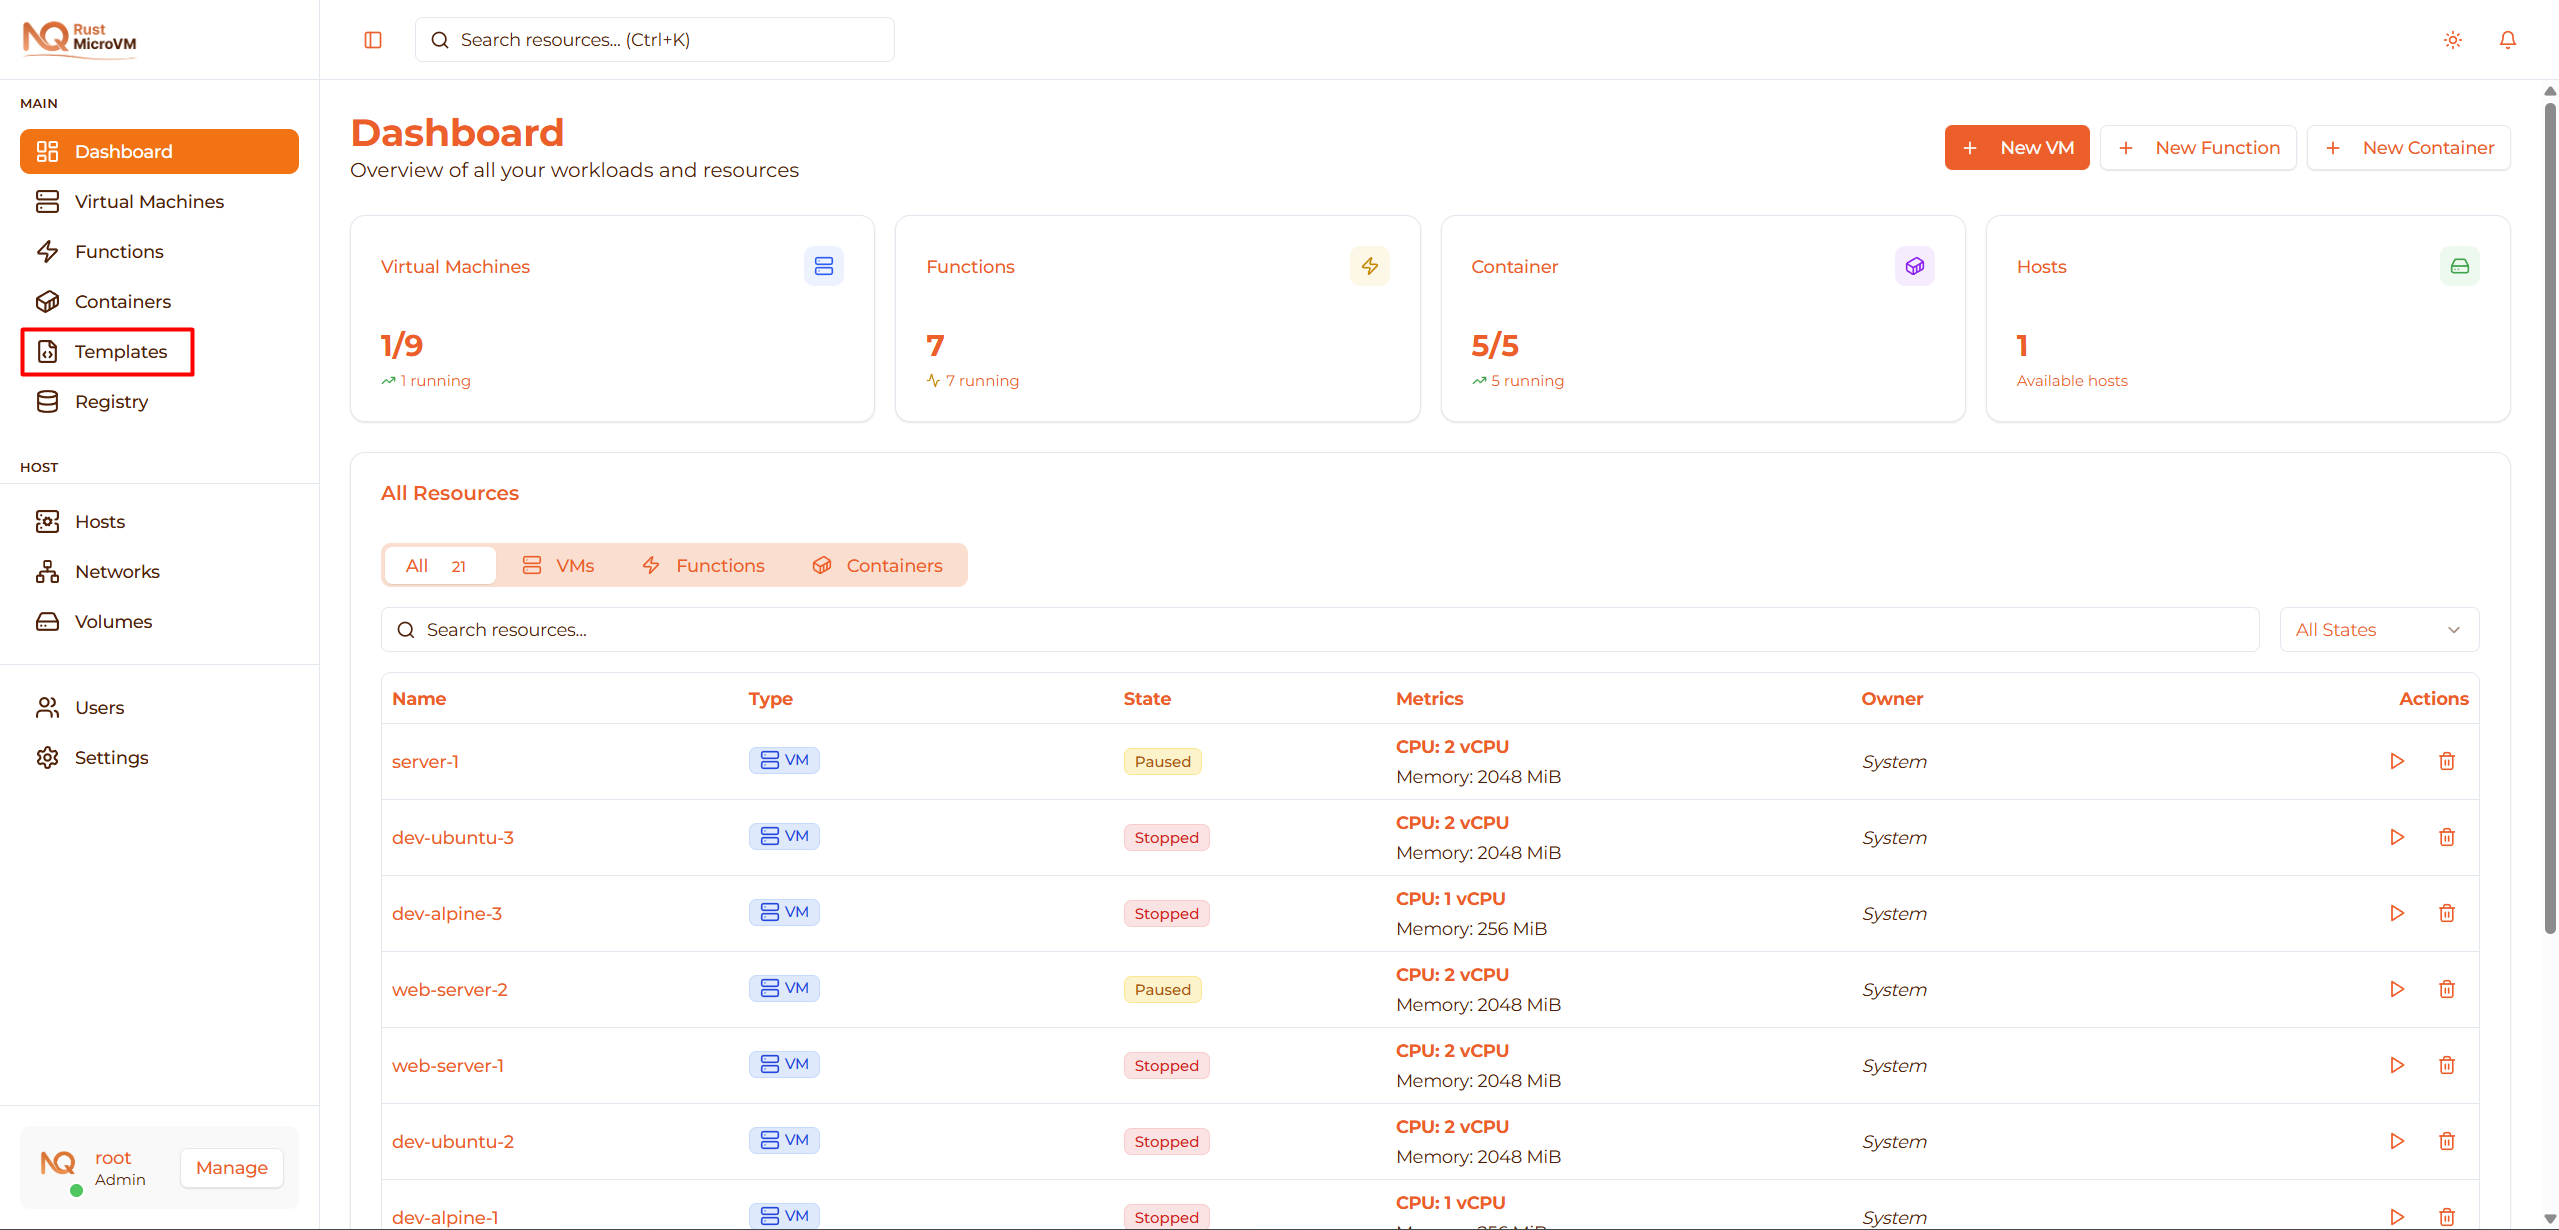
Click “Templates” in the sidebar to access the Templates page.
Templates Page Layout
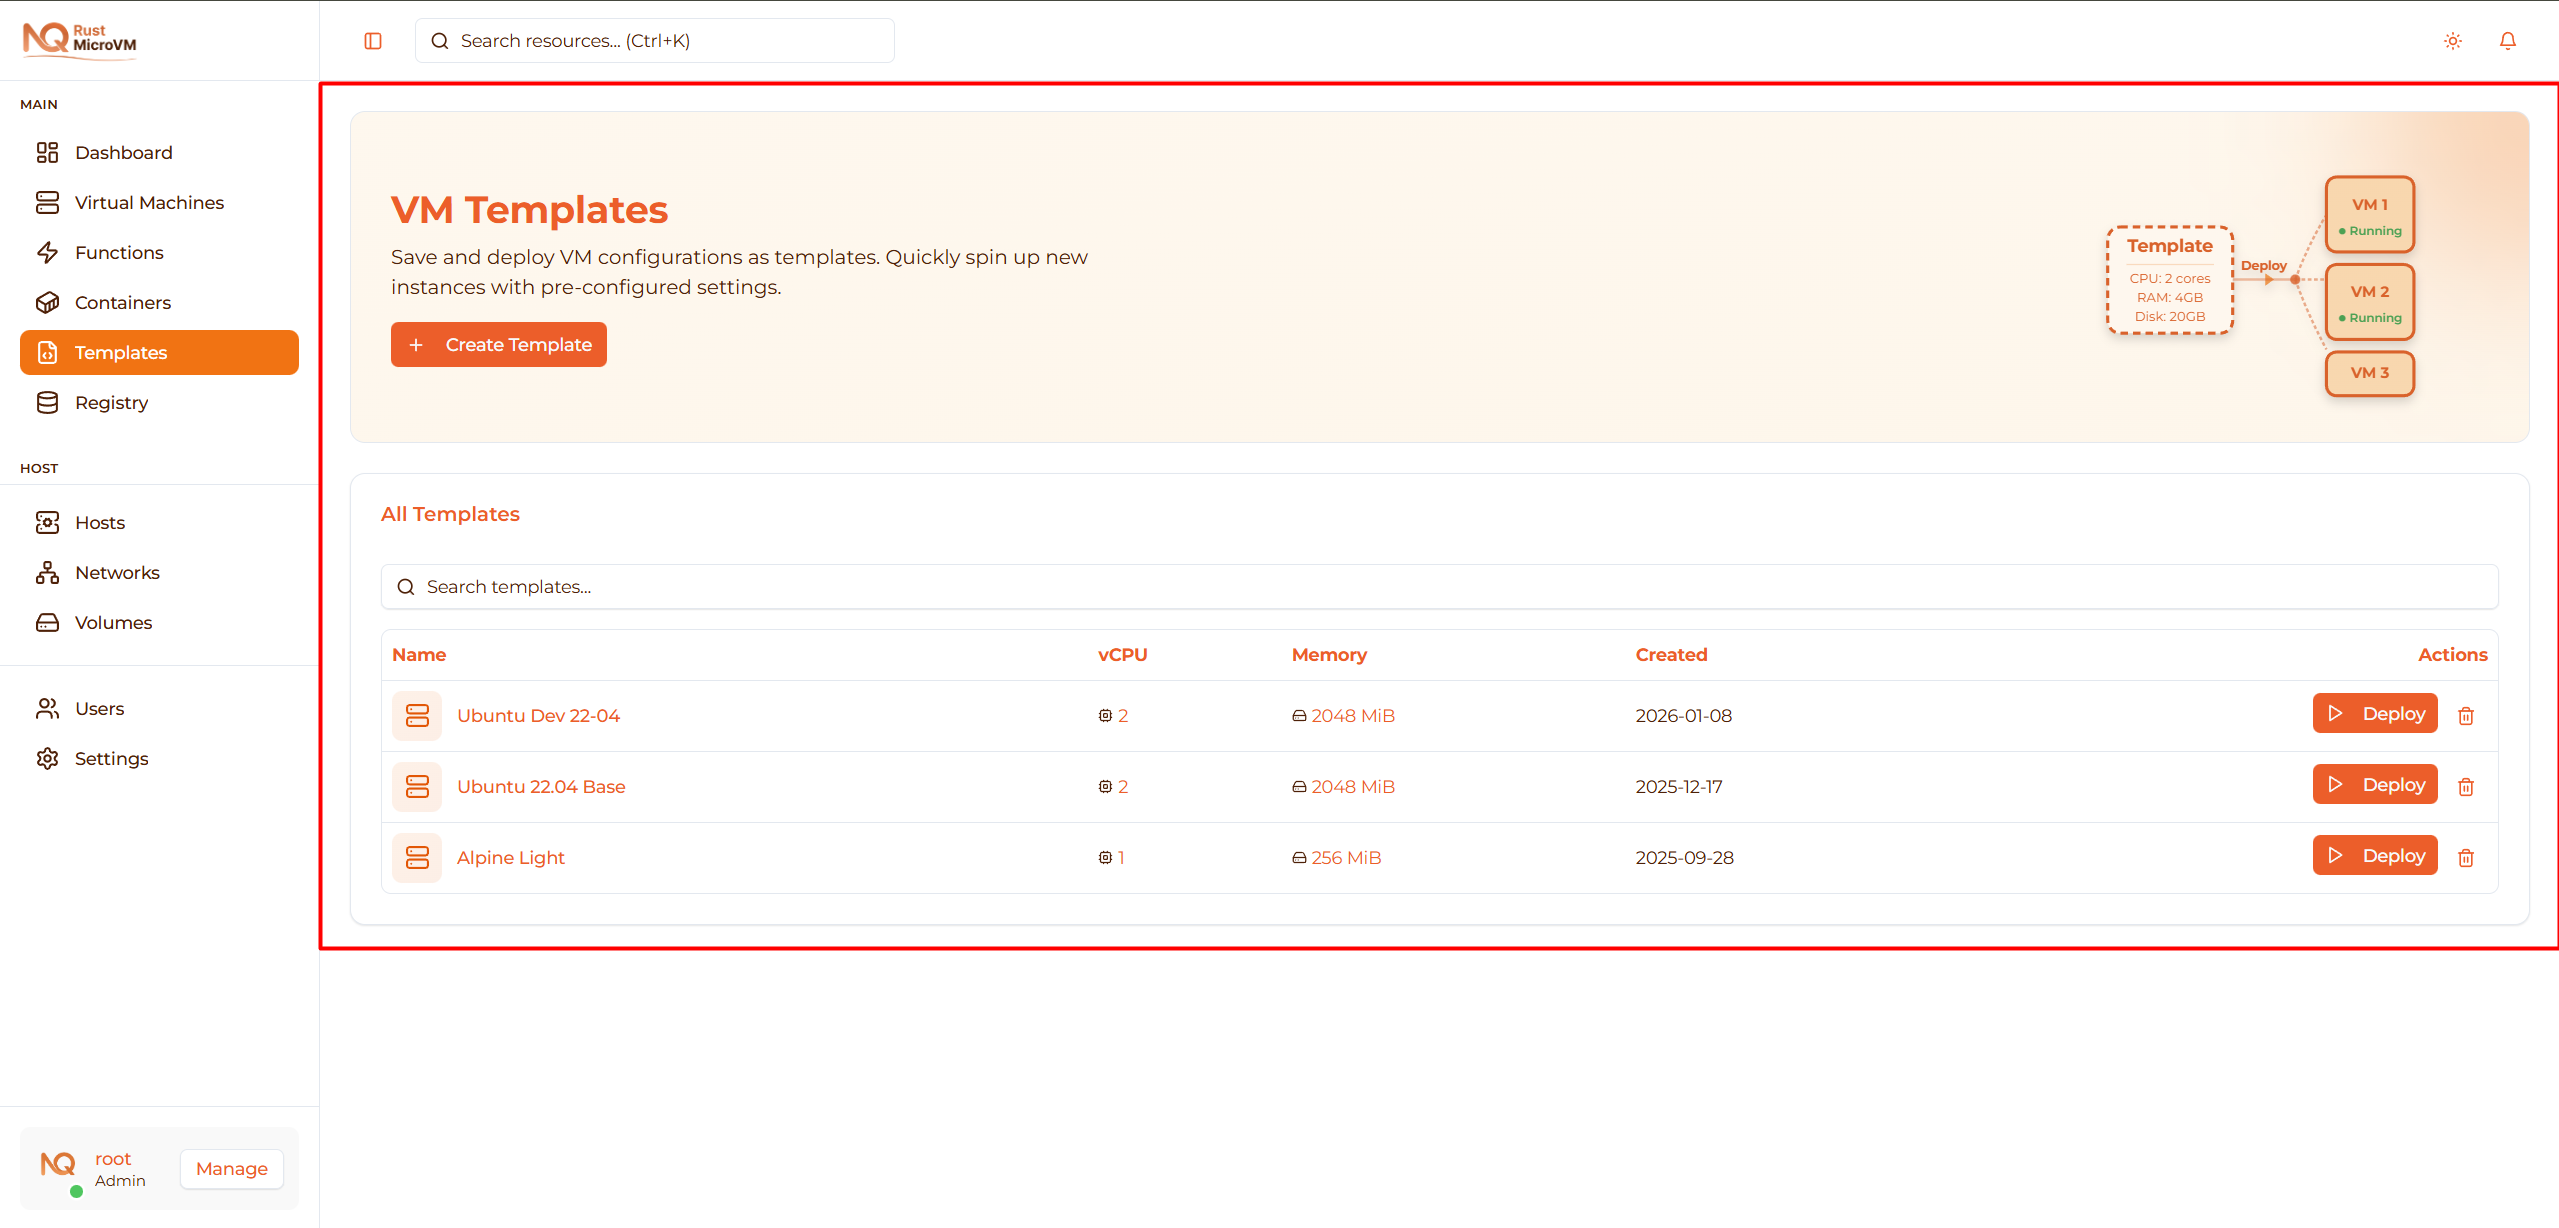
The page shows:
- Header with create button
- Template count in card header
- Template cards in grid layout
- Template details (CPU, RAM, date)
- Deploy button on each card
Template List
Template Card Information
Each template card displays:

Template details:
- Template name - at the top
- Template badge - indicates it’s a template
- vCPU count - number of virtual CPUs
- RAM (MiB) - memory allocation
- Created date - when template was created
- Deploy button - to create VMs
Example card:
  Ubuntu 22.04 Base              [Template]
  CPU:  2 vCPU
  RAM:  2048 MiB
  Created: Jan 8, 2025
                     [Deploy VM]
Browsing Templates
Grid layout:
- Templates displayed in responsive grid
- 1 column on mobile
- 2 columns on tablet
- 3 columns on desktop
Sorting:
- Currently sorted by creation date (newest first)
- Future: Sort by name, resource size, usage
Searching:
- Future feature: Search templates by name
- Future feature: Filter by resource requirements
Deploy VM from Template
Deploying a VM creates a new VM instance with the template’s configuration.
Step 1: Select Template
Find the template you want to deploy:
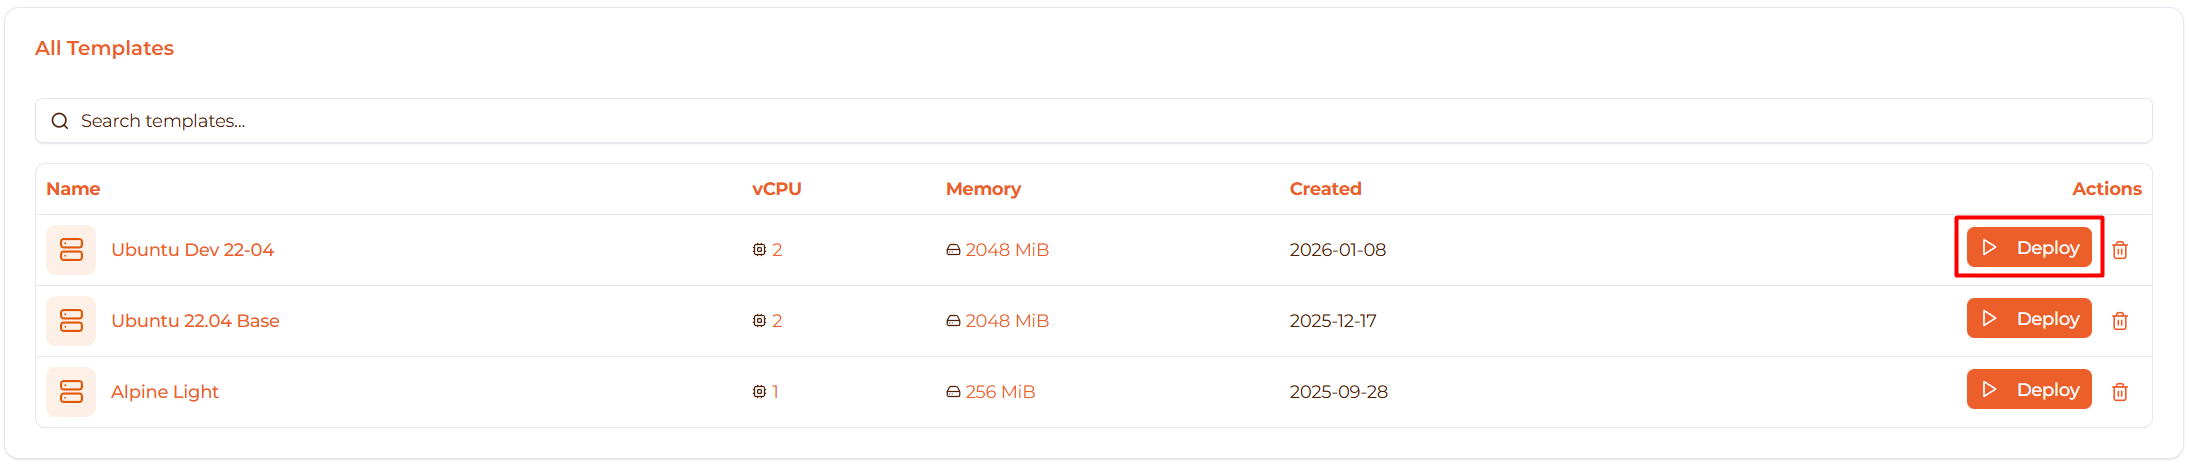
Click the “Deploy VM” button on the template card.
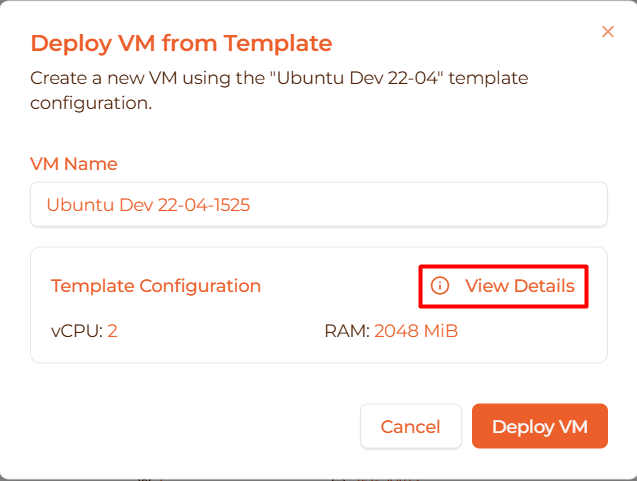
Step 2: Enter VM Name
The deploy dialog opens:
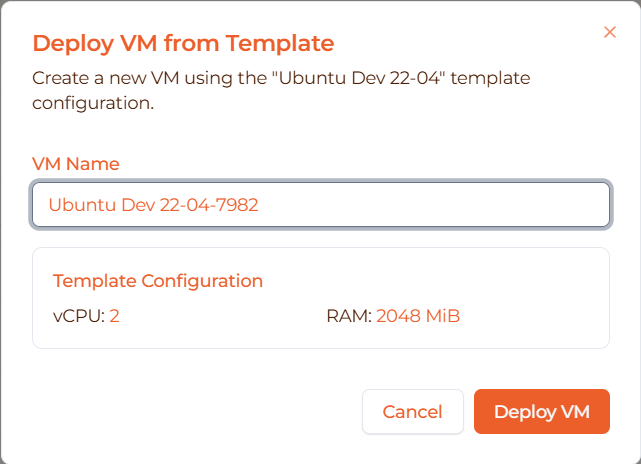
Dialog shows:
- Template name you’re deploying from
- Template configuration summary (vCPU, RAM)
- VM name input field
- Cancel and Deploy buttons
Enter a unique VM name:
- Good names:
web-server-01,dev-env-alice,test-vm-123 - Avoid: generic names like
vm1,test
Auto-generated suggestion:
- Dialog pre-fills:
{template-name}-{random-number} - Example:
Ubuntu 22.04 Base-1234 - You can edit this to anything you want
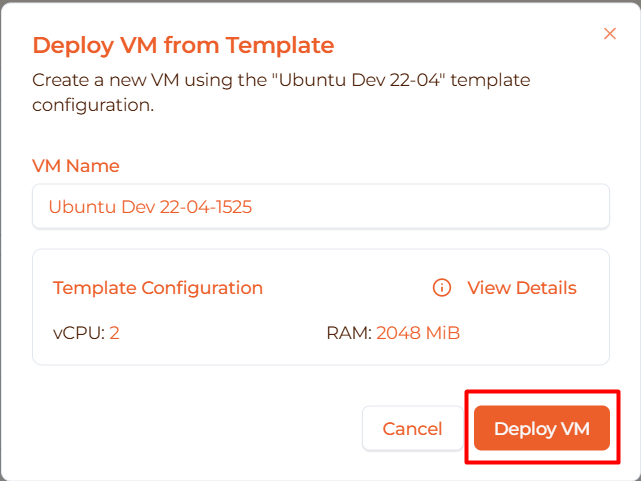
Step 3: Review Configuration
Before deploying, check the template configuration:
Verify:
- vCPU count is correct
- RAM allocation is appropriate
- You have enough host resources available
Template configuration is copied to the new VM:
- Same vCPU count
- Same memory allocation
- Same kernel image
- Same rootfs image
What’s different:
- VM gets a unique ID
- VM gets the name you specified
- VM will have its own lifecycle (independent from template)
Step 4: Deploy
Click “Deploy VM” button:
What happens:
- ✅ VM name validation
- ✅ Template configuration copied
- ✅ API call:
POST /v1/templates/{id}/instantiate - ✅ VM created in database
- ✅ VM automatically started
- ✅ Success notification shown
- ✅ Redirected to VM detail page
Deployment time: ~30-60 seconds total
- VM creation: ~5 seconds
- VM boot: ~25-55 seconds
Step 5: Verify VM
After deployment, you’re redirected to the VM detail page:
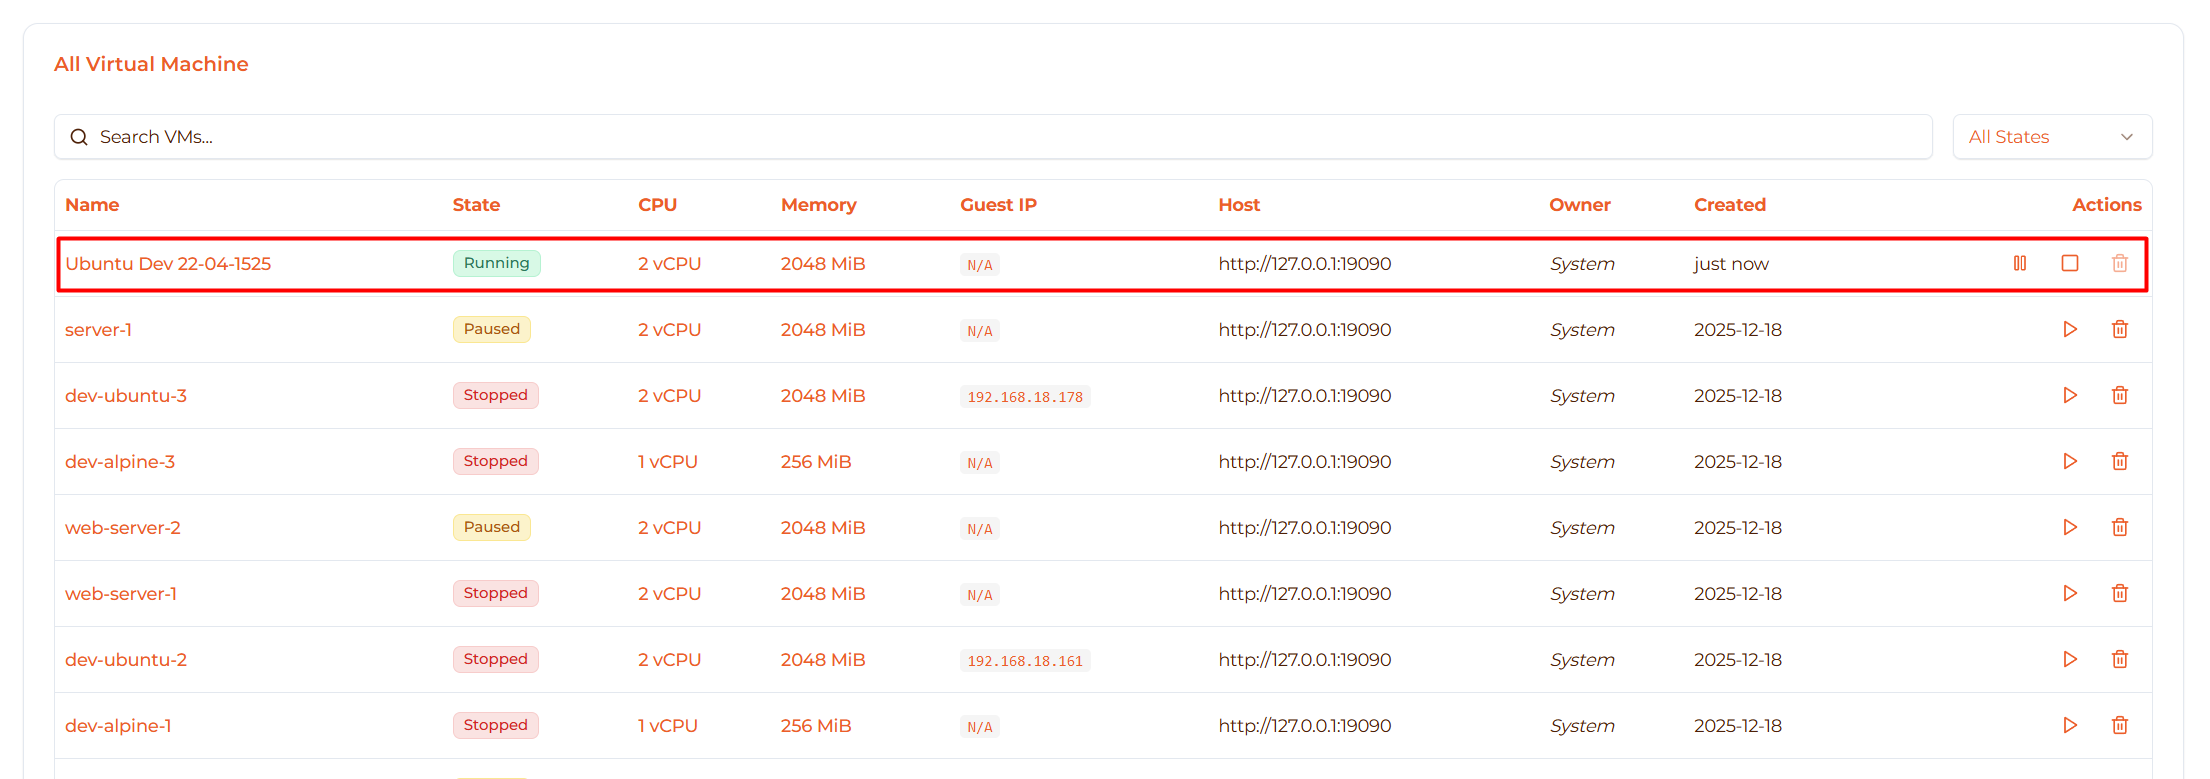
Check VM status:
- State should progress: Creating → Booting → Running
- Guest IP should appear after boot
- VM metrics should show CPU/memory usage
Access your VM:
- Open Shell tab for terminal access
- View Metrics for performance monitoring
- Check Config to see inherited template settings
Deployment Stages
Stage 1: Creating (5-10 seconds)

What’s happening:
- VM record created in database
- Firecracker VM being provisioned
- Host agent receives create request
- Kernel and rootfs images being prepared
Status badge: Yellow (Creating)
Stage 2: Booting (20-50 seconds)

What’s happening:
- Firecracker microVM starting
- Kernel loading
- Rootfs mounting
- Operating system initializing
Status badge: Gray (Booting)
Stage 3: Running (after ~30-60 seconds)

What’s happening:
- VM fully booted
- Guest agent reporting metrics
- Guest IP assigned
- VM ready for use
Status badge: Green (Running)
You can now:
- Access shell
- View metrics
- Connect via SSH (if configured)
- Deploy applications
Edit Template
Update template configuration to change future VM deployments.
When to Edit
Edit templates when:
- Resource requirements changed (need more CPU/RAM)
- Upgrading to newer kernel version
- Switching to different rootfs image
- Fixing incorrect configuration
Note: Editing template does NOT affect existing VMs created from it. Only future deployments use the new settings.
How to Edit (Future Feature)
Currently: Not available in UI (backend API ready)
Coming soon:
- Click template card to open details
- Click “Edit” button
- Modify vCPU, memory, or images
- Save changes
API available now:
  curl -X PUT http://localhost:18080/v1/templates/{id} \
  -H "Content-Type: application/json" \
  -d '{
    "name": "Ubuntu 22.04 Base Updated",
    "spec": {
      "vcpu": 4,
      "mem_mib": 4096,
      "kernel_path": "/srv/images/vmlinux-5.10.fc.bin",
      "rootfs_path": "/srv/images/ubuntu-22.04.ext4"
    }
  }'
Delete Template
Remove templates you no longer need.
When to Delete
Delete templates when:
- Template is outdated
- No longer using this configuration
- Want to clean up template list
- Made a mistake creating template
Safe to delete:
- ✅ VMs created from template continue working
- ✅ Template is removed from database
- ✅
template_idin VMs set to NULL - ✅ No data loss for deployed VMs
How to Delete (Future Feature)
Currently: Not available in UI (backend API ready)
Coming soon:
- Click template card
- Click “Delete” button
- Confirm deletion in dialog
- Template removed from list
Confirmation dialog will ask:
  Delete Template?

Are you sure you want to delete "Ubuntu 22.04 Base"?

This will:
- Remove template from the database
- NOT affect VMs created from this template
- Cannot be undone

[Cancel]  [Delete Template]
API available now:
curl -X DELETE http://localhost:18080/v1/templates/{template-id}
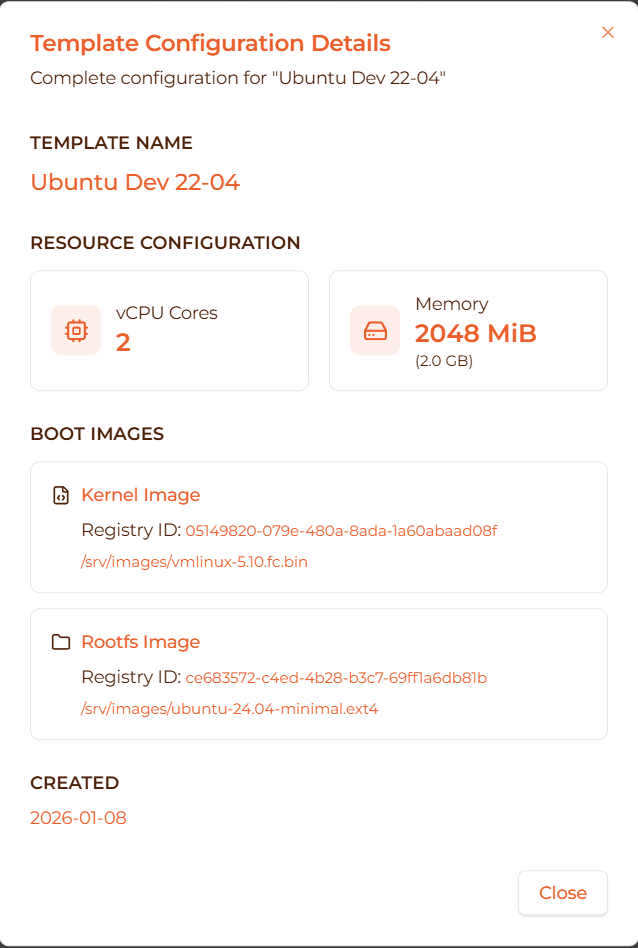
View Template Details (Future Feature)
Template Detail View
Coming soon: Click template card to see full details.
Will show:
- Template ID (UUID)
- Full name
- Complete spec:
- vCPU count
- Memory (MiB)
- Kernel image (path or ID)
- Rootfs image (path or ID)
- Created timestamp
- Updated timestamp
- Number of VMs deployed from this template
- List of VMs using this template
Template Usage Tracking
VMs from Template
Each VM tracks which template it was created from:
In VM details:
- Template ID stored in
vm.template_idfield - Can see which template was used
- Future: Link back to template
Template deletion:
- When template deleted,
vm.template_idset to NULL - VM continues working normally
- Just loses reference to template
Common Tasks
Task: Deploy Multiple VMs from Same Template
Use case: Create 3 web servers with identical config
Steps:
- Find “Web Server” template
- Click “Deploy VM”
- Name:
web-server-01 - Deploy and wait
- Return to Templates page
- Click “Deploy VM” again
- Name:
web-server-02 - Repeat for
web-server-03
Result: 3 identical VMs ready for load balancing
Task: Upgrade All Dev Environments
Scenario: New kernel version available
Steps:
- Test new kernel with manual VM first
- Verify it works correctly
- Edit “Dev Environment” template
- Update kernel path to new version
- Future deployments use new kernel
- Gradually update existing VMs
Note: Existing VMs not automatically updated
Task: Standardize Production Config
Scenario: Ensure all production VMs have same specs
Steps:
- Create “Production Standard” template
- Set: 4 vCPU, 8192 MiB RAM
- Use Ubuntu 22.04 LTS rootfs
- Deploy all new production VMs from this template
- Decommission non-standard VMs over time
Benefit: Guaranteed consistency across production
Task: Clean Up Old Templates
Scenario: Too many unused templates
Steps:
- List all templates
- Check creation date
- Check how many VMs deployed
- Delete templates with:
- Old creation dates (>6 months)
- Zero VMs deployed
- Outdated configurations
Keep: Templates actively used or needed for future
Template vs Manual VM Creation
When to Use Templates
✅ Use templates when:
- Deploying the same configuration multiple times
- Standardizing team development environments
- Quick deployment is priority
- Want to document standard configs
Benefits:
- Faster deployment (no configuration needed)
- Guaranteed consistency
- Easy to replicate
- Self-documenting infrastructure
When to Create VMs Manually
✅ Use manual creation when:
- One-off VM with unique configuration
- Experimenting with different settings
- Learning the platform
- Need custom network/storage setup
Benefits:
- Full control over every setting
- Can configure network advanced options
- Add multiple drives
- Set custom environment variables
Best Practices
Template Management
1. Naming Convention Use consistent naming:
  {OS} - {Purpose} - {Size}

Examples:
- Ubuntu 22.04 - Dev - 2vCPU
- Alpine - Test - 1vCPU
- Ubuntu 22.04 - Prod - 4vCPU
2. Regular Updates
- Review templates quarterly
- Update to latest kernel versions
- Refresh rootfs with security patches
- Remove obsolete templates
3. Documentation Keep track of:
- What software is pre-installed in rootfs
- Intended use case for each template
- Deployment count and active VMs
- Last update date
VM Deployment
1. Descriptive VM Names When deploying, use names that indicate:
- Purpose:
web-server,db-primary,cache - Environment:
dev,staging,prod - Instance number:
01,02,03
Example: prod-web-server-01
2. Resource Planning Before mass deployment:
- Check host available CPU/RAM
- Calculate total resources needed
- Leave buffer for host OS (10-20%)
Example:
- Host has 32 GB RAM
- Each VM needs 2 GB
- Deploy maximum 12-14 VMs (leave buffer)
3. Gradual Rollout For production changes:
- Deploy one VM from new template
- Test thoroughly
- If working, deploy more VMs
- Gradually migrate from old VMs
Template Organization
Create Template Categories:
Development Templates:
- Light resources
- Fast deployment priority
- Latest/experimental images OK
Staging Templates:
- Match production resources
- Same images as production
- For testing before prod
Production Templates:
- High resources
- Stable, tested images
- Well-documented
- Version controlled
Troubleshooting
Issue: VM Fails to Deploy
Symptoms:
- Click “Deploy VM”
- VM shows “Error” state
- Never reaches “Running”
Possible causes:
- Kernel file not found
- Rootfs file not found
- Insufficient host resources
- Image files corrupted
Solution:
Check template kernel path exists:
ls -lh /srv/images/vmlinux-5.10.fc.binCheck template rootfs path exists:
ls -lh /srv/images/ubuntu-22.04.ext4Check host resources:
  free -h  # Check RAM
nproc    # Check CPUs
Check manager logs for details:
journalctl -u manager -f
Issue: Can’t Find Template
Symptoms:
- Template list is empty
- Template you created is missing
Possible causes:
- Templates page not loading
- API connection issue
- Template was deleted
- Wrong environment/database
Solution:
- Refresh the page
- Check browser console for errors
- Verify manager API is running:
curl http://localhost:18080/v1/templates - Check database for template:
psql $DATABASE_URL -c "SELECT id, name FROM template;"
Issue: Deployed VM Has Wrong Configuration
Symptoms:
- VM has different CPU/RAM than expected
- VM using wrong images
Possible causes:
- Template was edited after deployment started
- Looking at wrong VM
- Database desync
Solution:
- Check VM detail page for actual config
- Compare with template configuration
- If wrong, delete VM and redeploy
- Verify template settings before deploying
Issue: Deploy Button Disabled
Symptoms:
- Can’t click “Deploy VM” button
- Button is grayed out
Possible causes:
- Host is offline
- API connection lost
- Template has invalid configuration
- UI bug
Solution:
- Check browser console for errors
- Verify manager is running
- Refresh the page
- Try deploying different template
- Check host status in Hosts page
Performance Tips
Fast Deployment
For fastest VM deployment:
- Use Alpine Linux rootfs (smaller, faster boot)
- Use minimum resources needed (1 vCPU, 512 MiB)
- Pre-load images on host
- Deploy during low host load
Alpine deployment: ~15-20 seconds Ubuntu deployment: ~30-60 seconds
Resource Optimization
Optimize host usage:
- Right-size templates (don’t over-allocate)
- Use memory limits that match workload
- Monitor actual usage and adjust templates
- Stop unused VMs
Template audit:
- Check deployed VMs actual CPU/RAM usage
- Update templates to match real needs
- Remove over-provisioned templates
Quick Reference
Template Actions
| Action | Steps | Status |
|---|---|---|
| Deploy VM | Click “Deploy VM” → Enter name → Deploy | ✅ Available |
| View details | Click template card | 🚧 Coming soon |
| Edit template | Template detail → Edit | 🚧 UI coming soon (API ready) |
| Delete template | Template detail → Delete | 🚧 UI coming soon (API ready) |
| Check usage | Template detail → VMs tab | 🚧 Coming soon |
Keyboard Shortcuts
| Action | Shortcut |
|---|---|
| Deploy VM | Click Deploy button |
| Close dialog | Esc |
| Submit form | Enter |
| Navigate templates | Arrow keys (future) |
Next Steps
- Create Template - Create more templates
- Templates Overview - Learn about templates
- VM Management - Manage deployed VMs
- VM Monitoring - Monitor VM performance
API Reference
For advanced users and automation:
List templates:
GET /v1/templates
Get template details:
GET /v1/templates/{id}
Deploy VM from template:
  POST /v1/templates/{id}/instantiate
Body: {"name": "my-vm-name"}
Update template:
  PUT /v1/templates/{id}
Body: {"name": "...", "spec": {...}}
Delete template:
DELETE /v1/templates/{id}
See full API docs at /api-docs/openapi.yaml