Manage VMs
Learn how to manage the lifecycle of your virtual machines through the web interface.
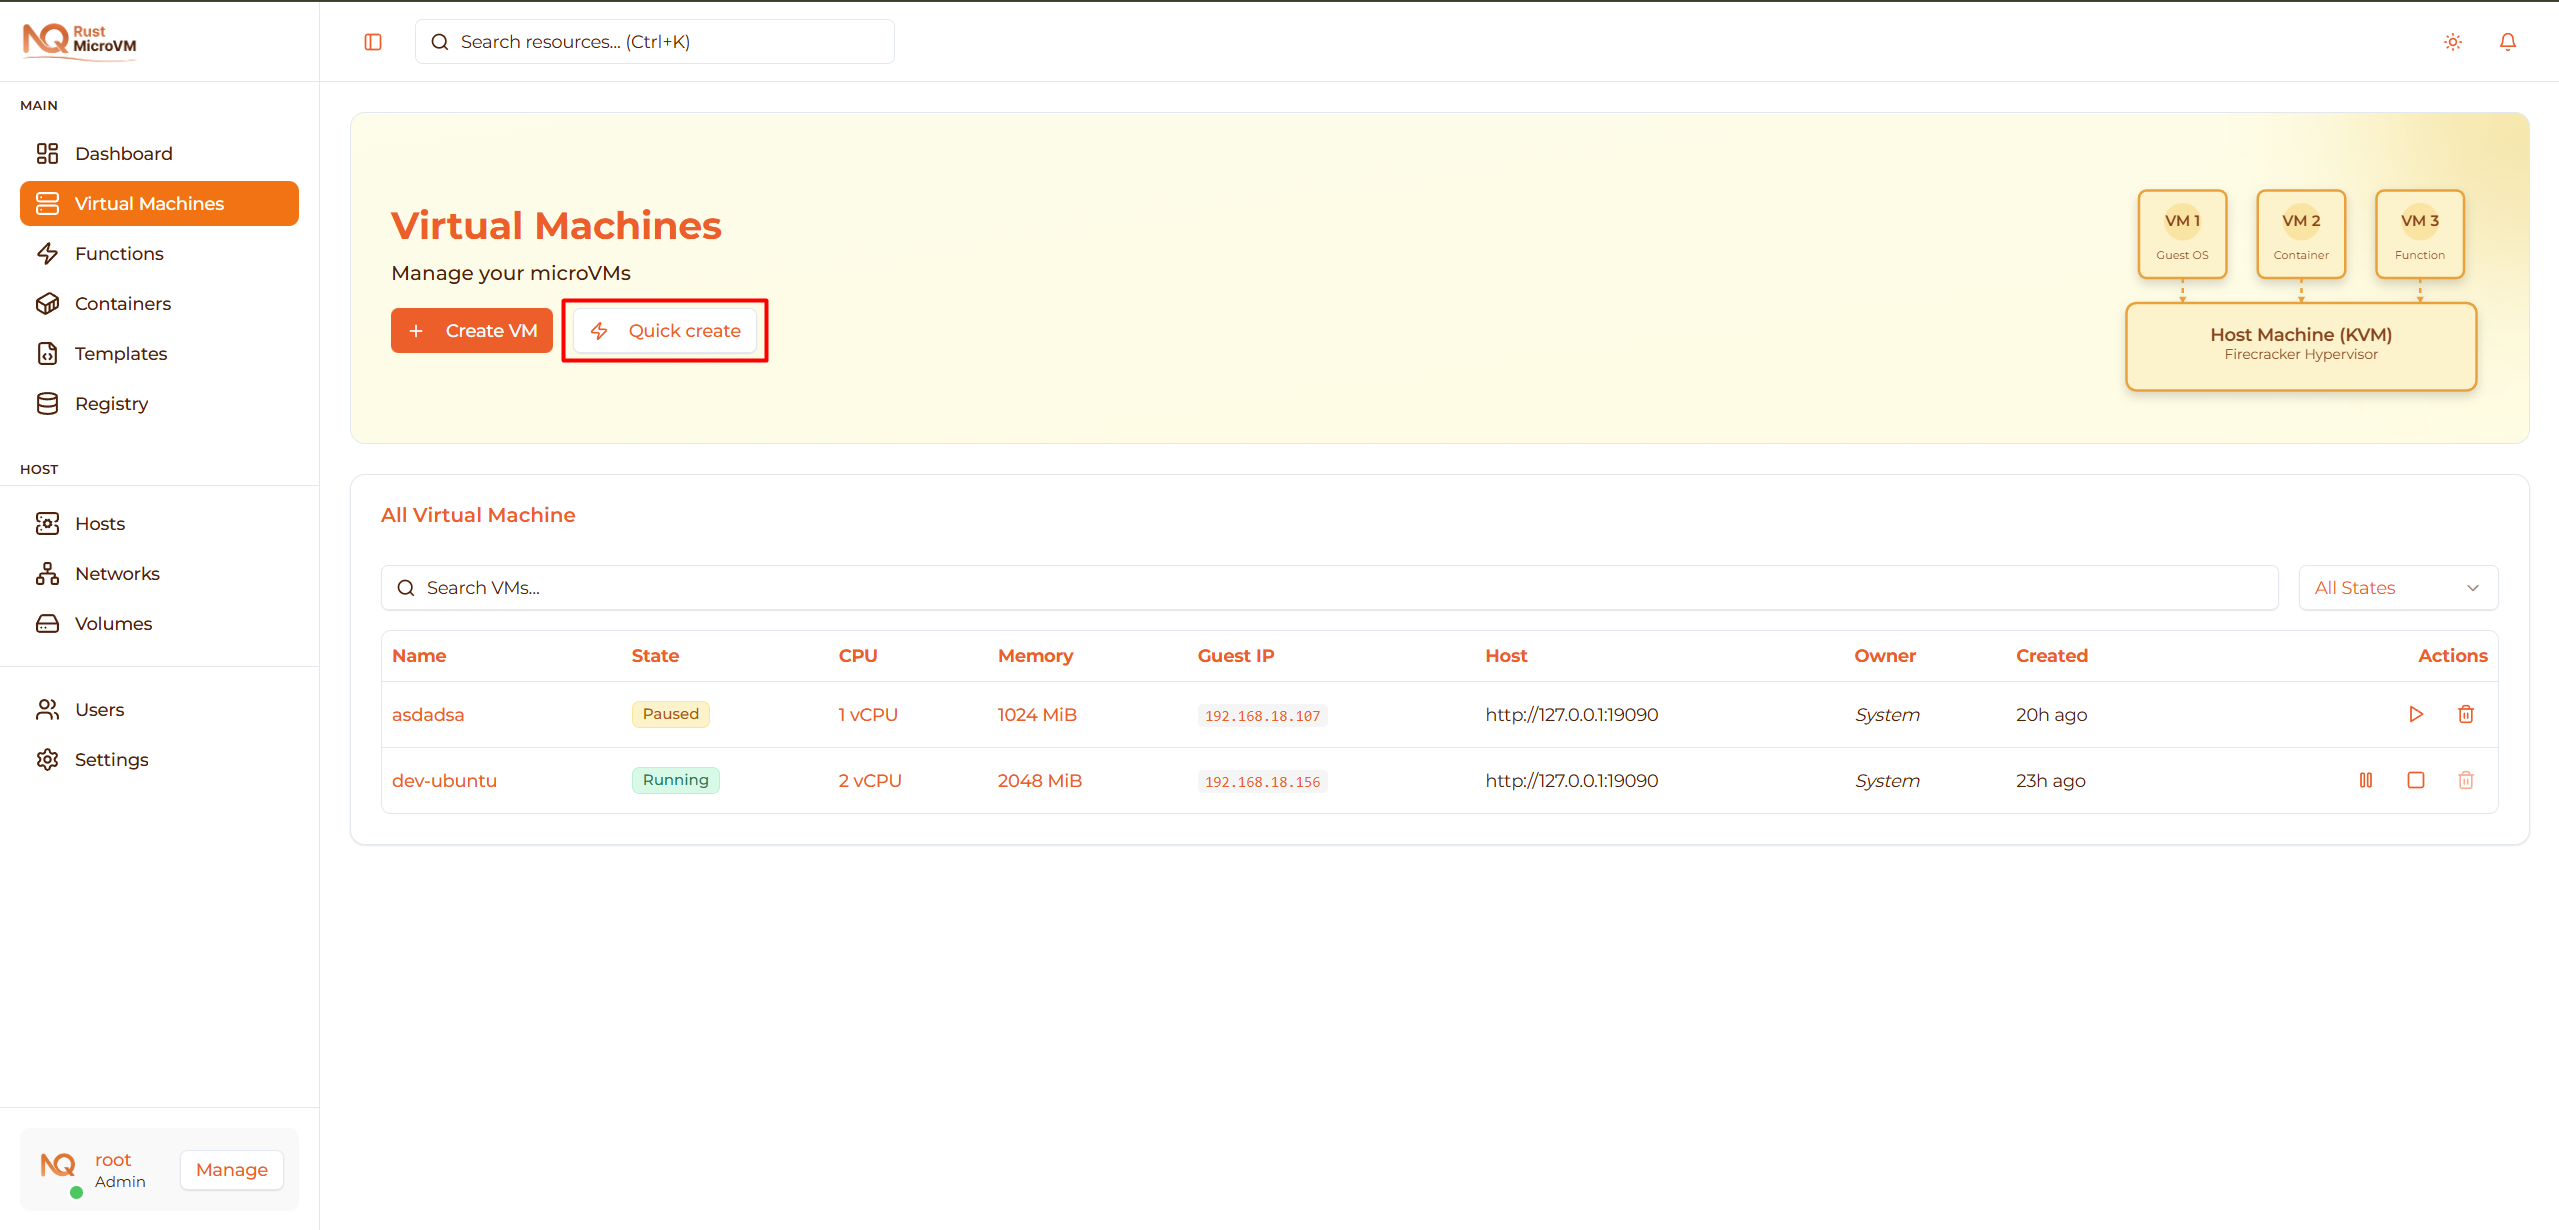
Accessing VM Management
Navigate to Virtual Machines page from the sidebar to see all your VMs:
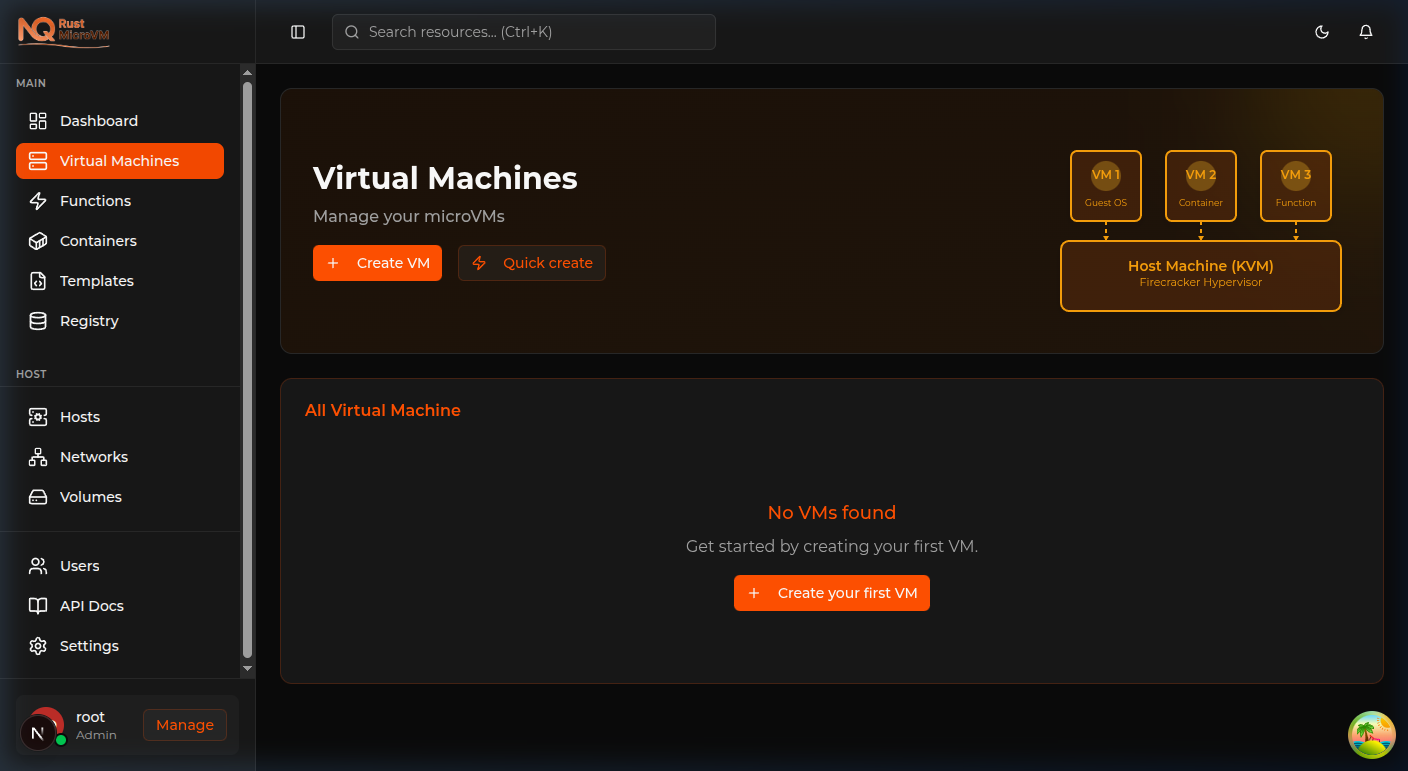
The VMs page provides:
- Search bar - Find VMs by name or ID
- State filter - Filter by All States, Running, Stopped, or Paused
- VM table - List of all VMs with details and actions
- Quick create - Create VM from template (see below)
VM Lifecycle States
A VM can be in one of several states:
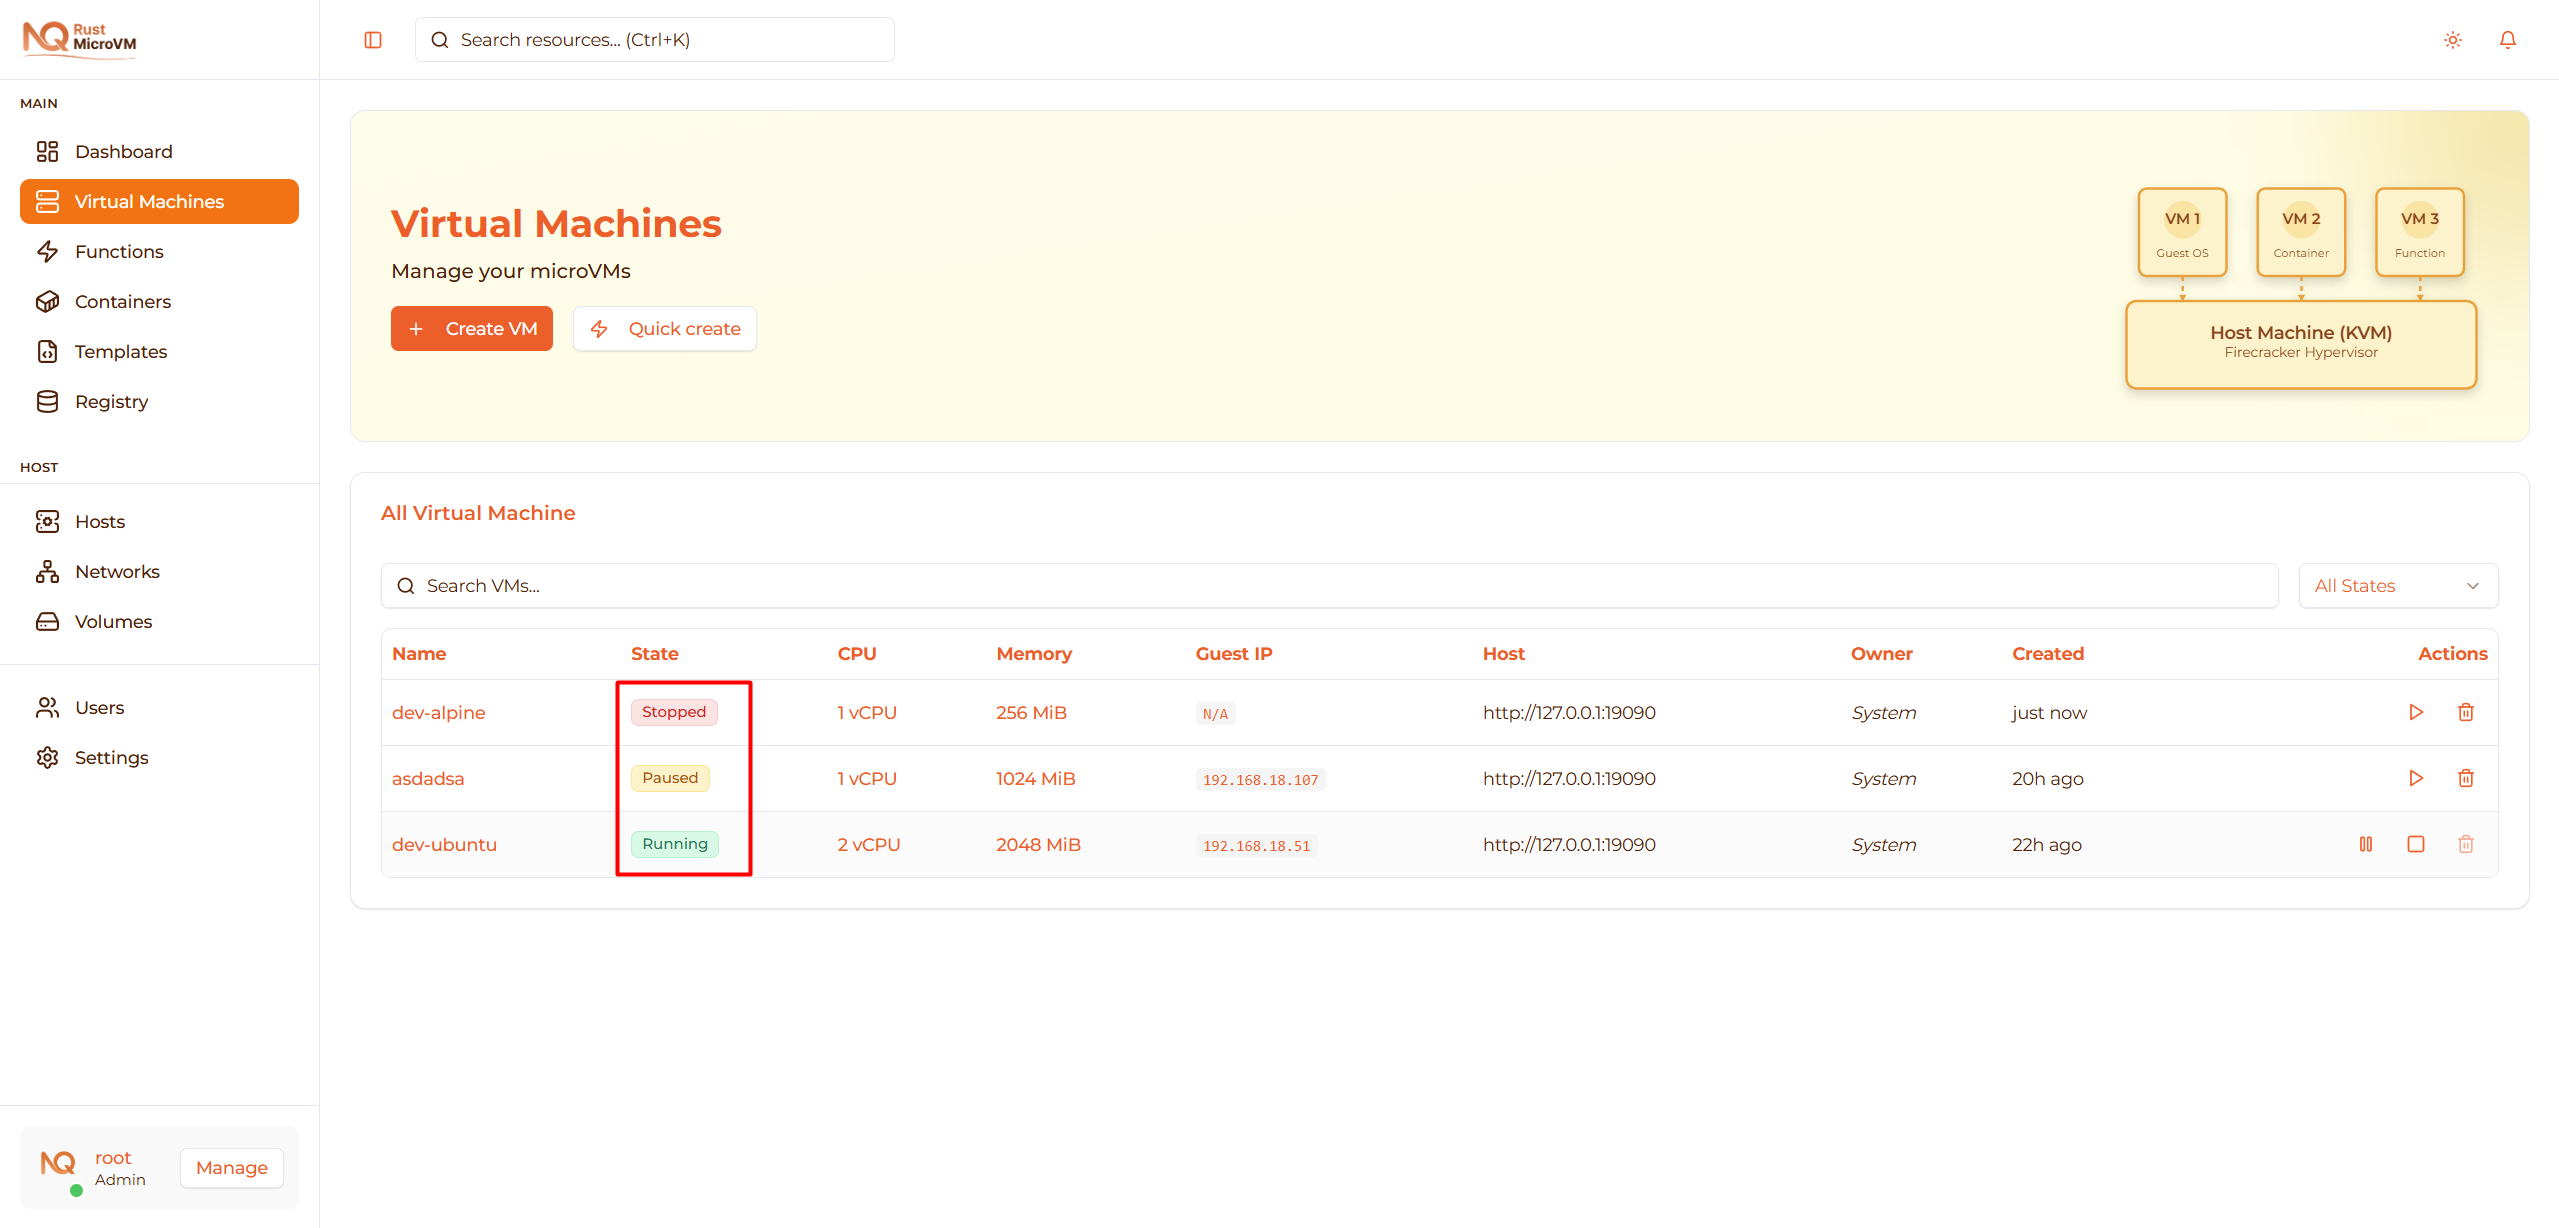
| State | Description | Actions Available |
|---|---|---|
| Stopped | VM is created but not running | Start, Delete |
| Running | VM is active and using resources | Stop, Pause |
| Paused | VM is frozen in memory | Resume, Delete |
State transitions:
- Stopped → Start → Running
- Running → Stop → Stopped
- Running → Pause → Paused
- Paused → Resume → Running
- Paused → Delete → (Removed)
- Stopped → Delete → (Removed)
Note: You cannot delete a running VM - you must stop or pause it first.
Starting a VM
Start from VMs List Page
When a VM is in Stopped state, you can start it directly from the VM table:
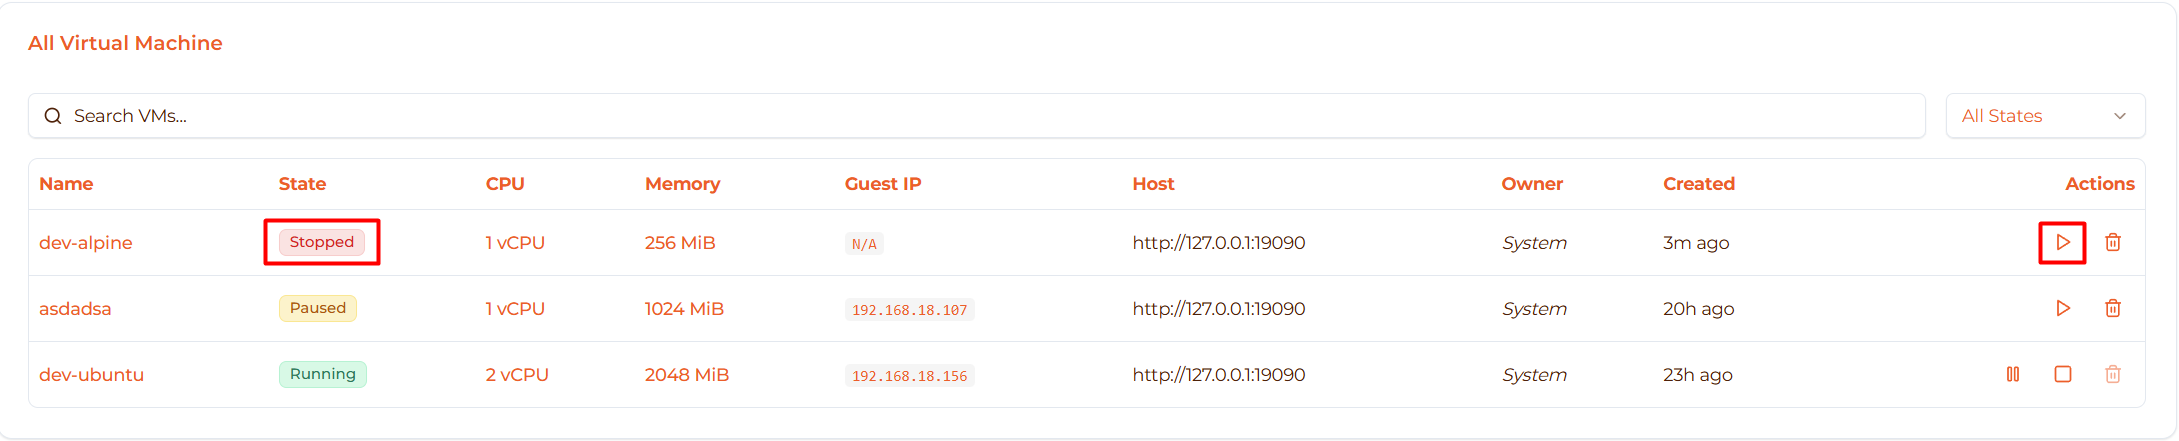
Steps:
- Go to Virtual Machines page
- Find your stopped VM (red “Stopped” badge)
- In the Actions column, click the Start button (▶ Play icon)
The VM state will change from “Stopped” to “Running” within 1-2 seconds.
What Happens
Behind the scenes, the system will:
- ✓ Allocate resources on the host
- ✓ Boot the kernel
- ✓ Initialize the operating system
- ✓ Configure network interface (assigns IP via DHCP)
- ✓ Start all services
Time: Usually completes in 1-2 seconds
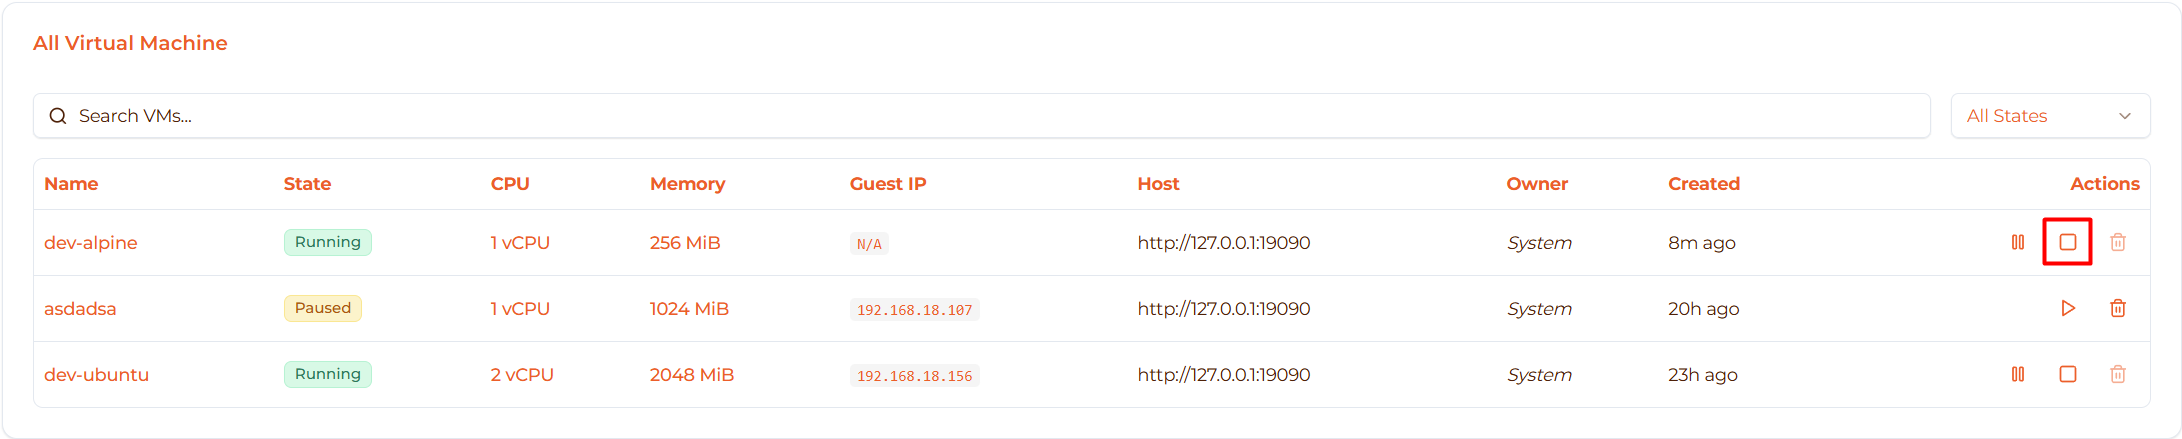
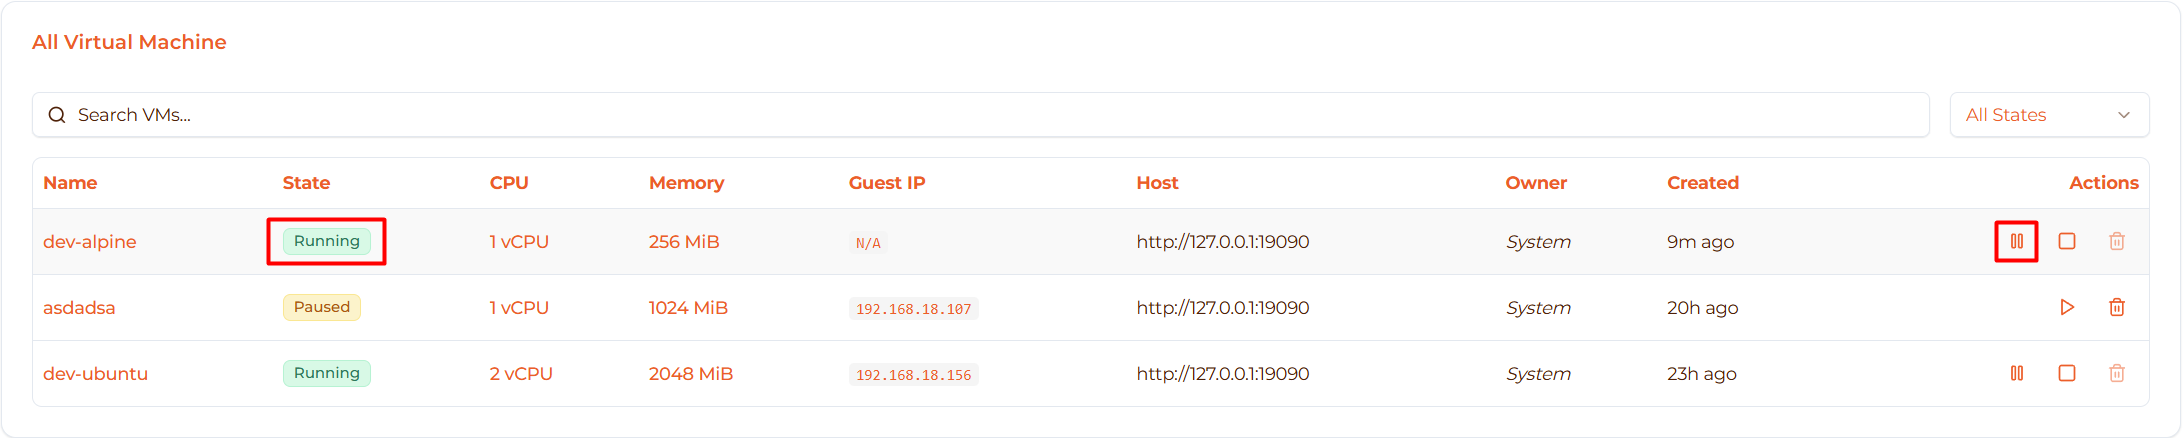
Verify VM Started
After starting, check the VM status:
![]()
You should see:
- Status badge: Running (green)
- Guest IP column shows assigned IP address
- CPU column shows usage percentage
- Memory column shows usage percentage
Next: Click the VM name to access the detail page for console, metrics, and more.
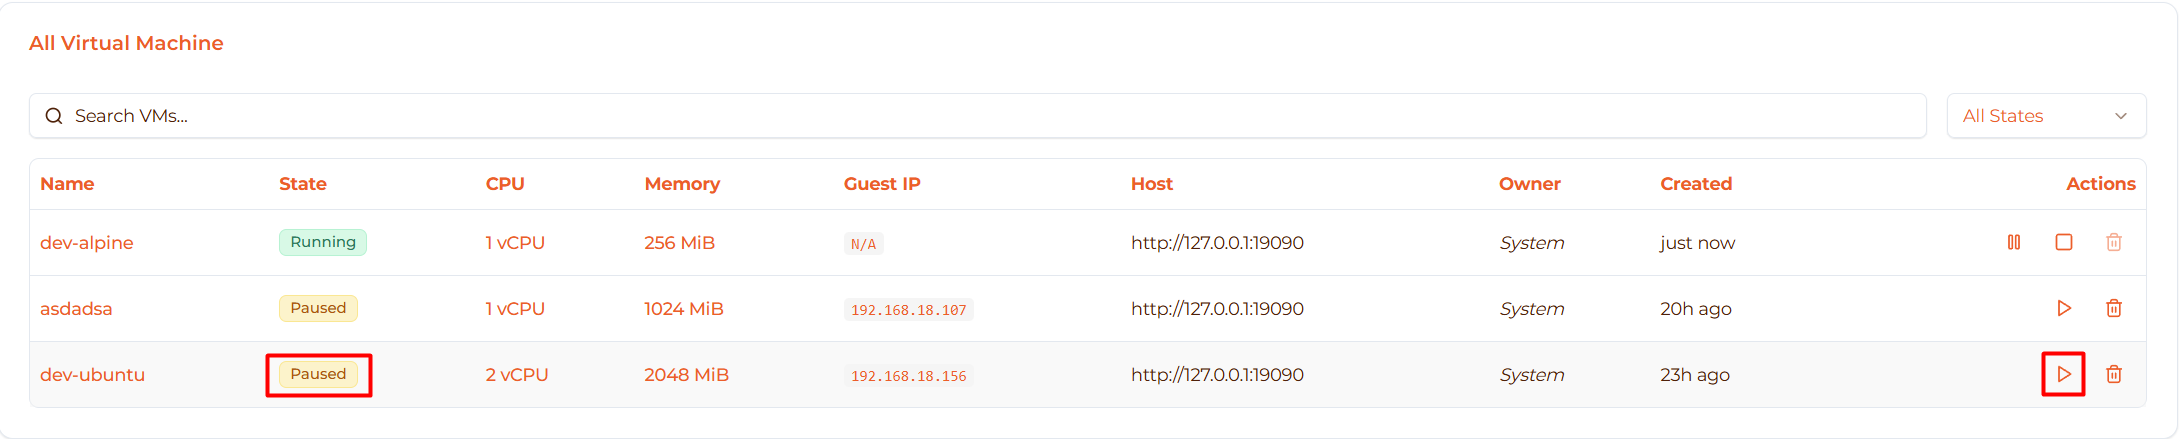
Stopping a VM
Stop a Running VM
⚠️ Warning: Stopping a VM is like pulling the power plug - any unsaved work will be lost!
From the VMs list page:
Steps:
- Locate your running VM (green “Running” badge)
- In the Actions column, you’ll see two buttons:
- Pause button (❚❚ icon) - freezes VM
- Stop button (◼ Square icon) - stops VM
- Click the Stop button
The VM will immediately stop and change to “Stopped” state.
Safe Stop (Recommended)
Best practice: Shutdown the OS gracefully before stopping:
- Click the VM name to open VM detail page
- Go to Terminal tab
- Login to the VM console
- Run shutdown command:
  # For Alpine/Debian/Ubuntu
shutdown now

# Or
poweroff
- Wait 5-10 seconds for graceful shutdown
- Return to VMs list and click Stop if needed
This ensures:
- All processes exit cleanly
- Filesystems are properly unmounted
- Data is saved to disk
- No corruption risks
What Happens
When you click Stop, the system will:
- ✓ Force terminate all VM processes
- ✓ Release network interface
- ✓ Deallocate CPU resources
- ✓ Keep memory snapshot for quick restart
- ✓ Change state to Stopped
Time: Usually instant (< 1 second)
![]()
When to Stop a VM
✅ Stop when:
- VM not needed for extended period
- Performing maintenance or updates
- Saving CPU resources
- Troubleshooting issues
- Preparing to delete
⚠️ Avoid stopping when:
- Production services are running
- Long-running tasks in progress (backups, builds, etc.)
- Other services/VMs depend on this one
Pausing a VM
Pause a Running VM
Pausing freezes the VM in its current state - useful for:
- Temporarily freeing CPU resources
- Debugging (pause to inspect state)
- Quick resume later without reboot
From the VMs list page:
Steps:
- Locate your running VM (green “Running” badge)
- In the Actions column, click the Pause button (❚❚ icon)
The VM will instantly freeze and change to “Paused” state.
What Happens
When you pause a VM:
- ✓ All processes freeze instantly
- ✓ Current state saved to memory
- ✓ CPU resources freed (0% CPU usage)
- ✓ Memory remains allocated
- ✓ Network connection suspended
- ✓ State changes to Paused
Time: Instant (< 100ms)
![]()
Important: A paused VM still uses memory but not CPU!
When to Pause
✅ Pause when:
- Need to temporarily free CPU for other VMs
- Debugging or troubleshooting (inspect frozen state)
- Quick break (resume within hours)
- Testing pause/resume functionality
⚠️ Don’t pause for:
- Long periods (use Stop instead to free memory)
- Production VMs (may cause timeout issues)
- Network-sensitive applications
Resuming a VM
Resume from Paused State
From the VMs list page:
Steps:
- Find your paused VM (orange “Paused” badge)
- In the Actions column, click the Resume button (▶ Play icon)
The VM will instantly resume execution.
What Happens
When you resume a VM:
- ✓ Process execution restores
- ✓ VM continues from exact paused point
- ✓ CPU usage resumes
- ✓ Network connection re-established
- ✓ State changes to Running
Time: Instant (< 100ms)
![]()
Note: The VM continues exactly where it left off - no reboot, no data loss, applications continue running!
Pause vs Stop Comparison
| Operation | Resume Time | State Preserved | Memory Used | CPU Used | Use Case |
|---|---|---|---|---|---|
| Pause | ~100ms | ✅ Yes (exact) | ✅ Yes | ❌ No | Short break, debugging |
| Stop | ~2 seconds | ❌ No (reboot) | ❌ No | ❌ No | Long break, free all resources |
Decision Guide:
- Need CPU now, may resume soon → Use Pause
- Won’t need VM for hours/days → Use Stop
- Want to free all resources → Use Stop
- Debugging/inspection → Use Pause
Deleting a VM
⚠️ Warning: Deletion is permanent and cannot be undone!
Important: Running VMs Cannot Be Deleted
You cannot delete a running VM. The delete button will be disabled with a tooltip:

“Cannot delete running VM. Stop the VM first.”
You must either:
- Stop the VM first, OR
- Pause the VM first
Then the delete button becomes available.
Before Deleting
⚠️ Recommended: Create a snapshot first:
- Go to VM detail page → Snapshots tab
- Click Create Snapshot
- Wait for snapshot to complete
- Now you can safely delete (snapshot can restore VM later)
See Backup & Snapshot guide.
Check these before deleting:
- ✅ Data backed up or not needed
- ✅ No other services depend on this VM
- ✅ No active connections
- ✅ Snapshot created (if you may need to restore)
Delete a VM
From the VMs list page:
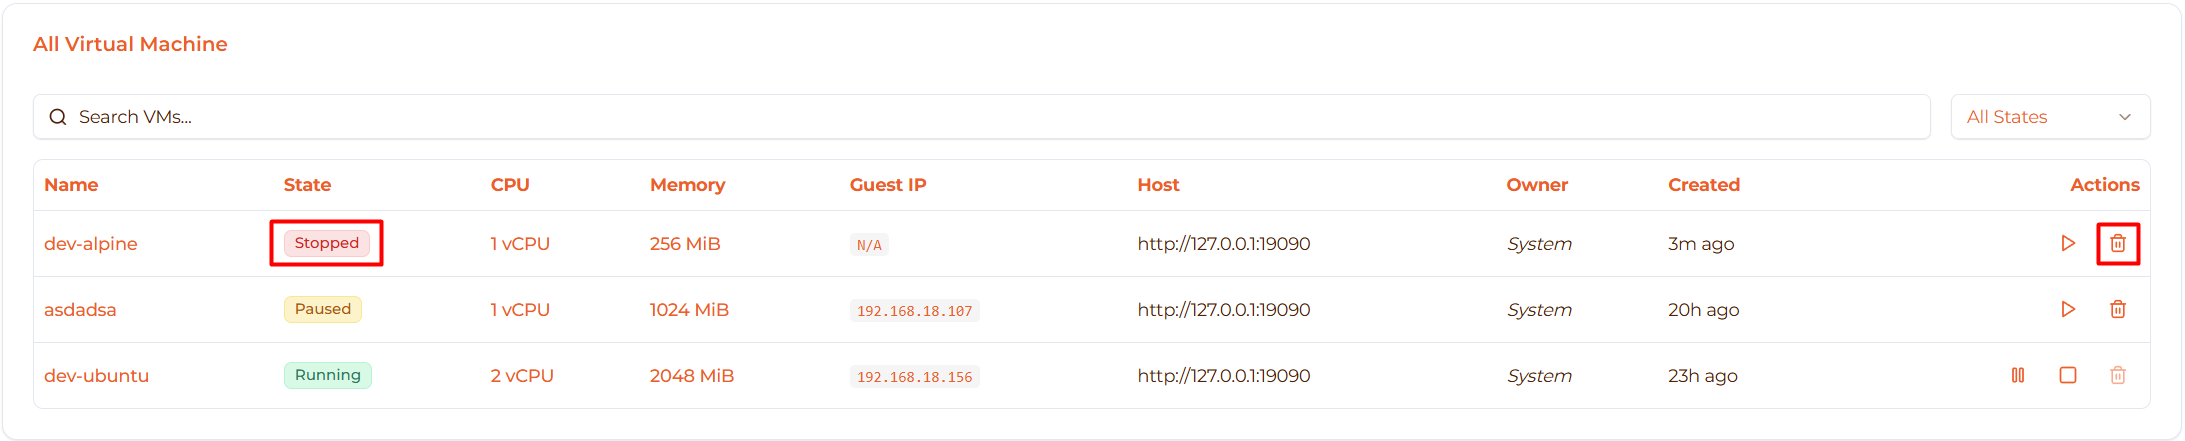
Steps:
- Stop or pause the VM (delete button won’t work on running VMs)
- In the Actions column, click the Delete button (🗑️ Trash icon)
- A confirmation dialog will appear:

- Click Delete to confirm
The VM will be permanently removed.
What Gets Deleted
When you delete a VM:
- ✅ VM configuration - All settings removed
- ✅ Runtime state - Process state cleared
- ✅ Network configuration - TAP device released
- ⚠️ Rootfs volume - Deleted if not shared with other VMs
- ❌ Snapshots - Preserved (can still restore from them)
- ❌ Images in registry - Preserved (kernel/rootfs still available)
Time: Usually instant (< 1 second)
Success Notification
After deletion, you’ll see a success message:
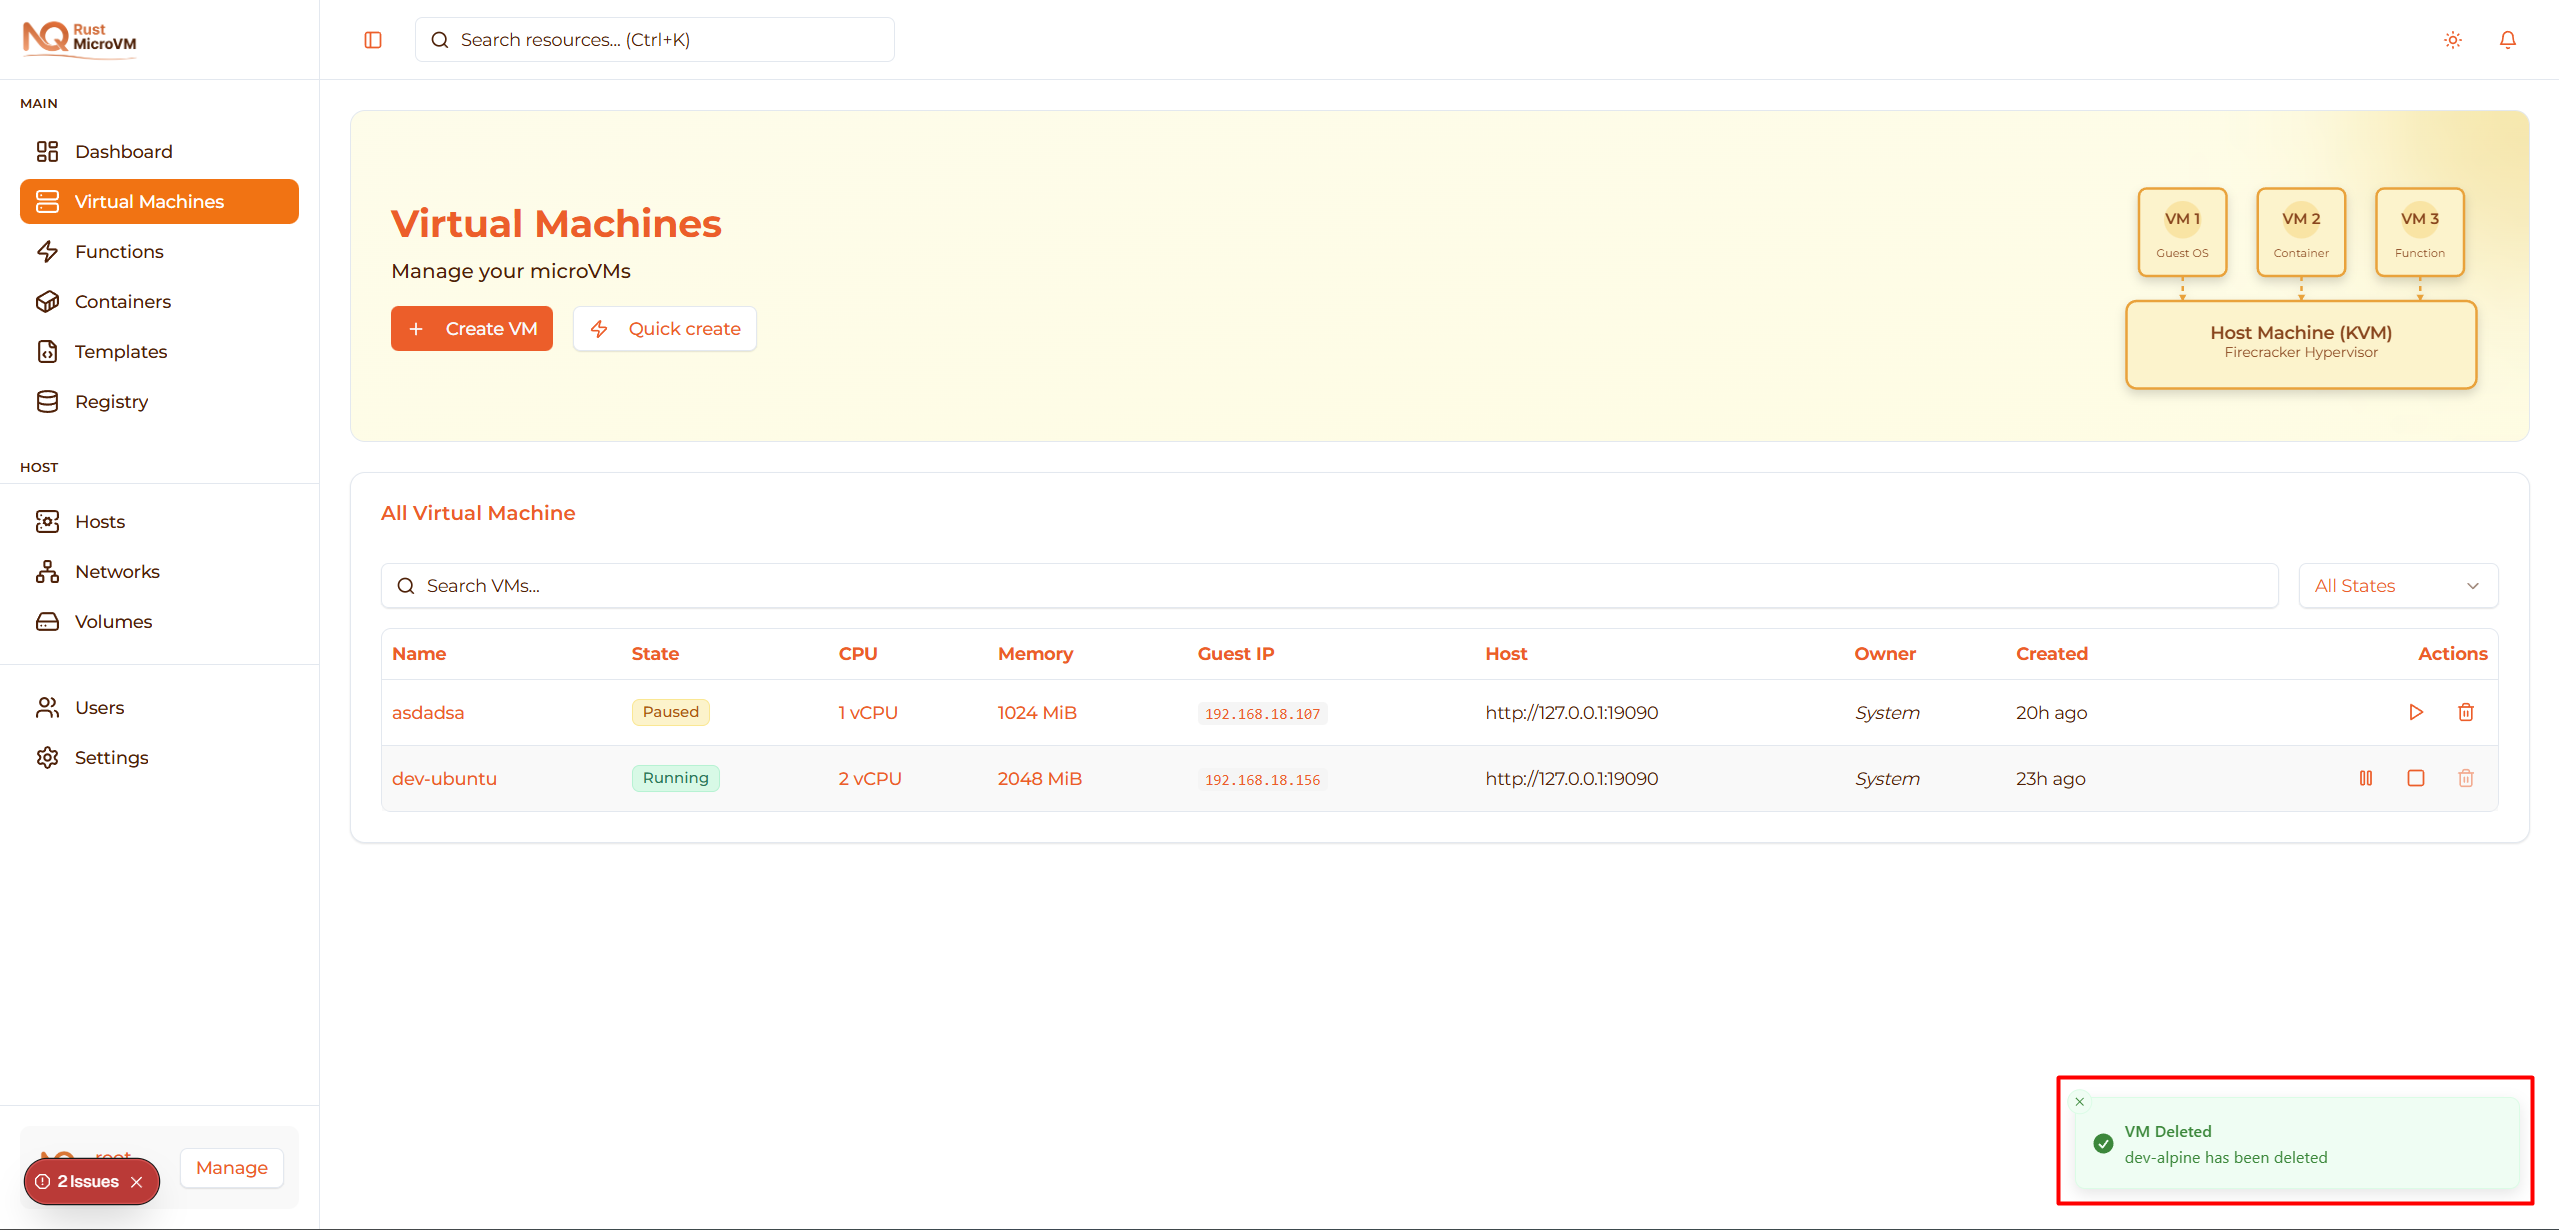
“VM Deleted - [VM name] has been deleted”
The VM will be removed from the VMs list.
Recovery After Deletion
If you created a snapshot before deleting:
- Go to Snapshots page (sidebar)
- Find your VM’s snapshot
- Click Restore to create a new VM from the snapshot
- The VM will be recreated with the same state as when snapshot was taken
Note: You cannot restore a deleted VM unless you created a snapshot first!
Quick Create from Template
Instead of using the full wizard, you can quickly create VMs from templates:
Steps:
- On the Virtual Machines page, click Quick create button
- A dialog will open showing available templates:
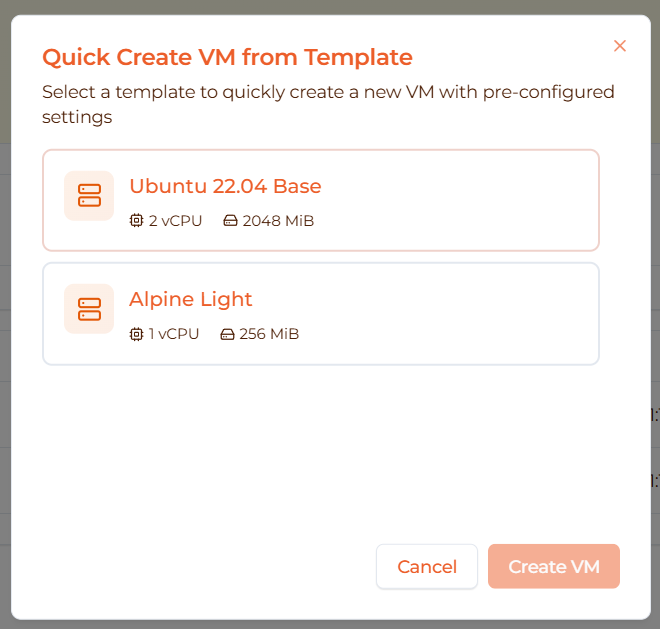
- Select a template by clicking on it (shows checkmark when selected)
- Enter a VM name in the input field
- Click Create VM
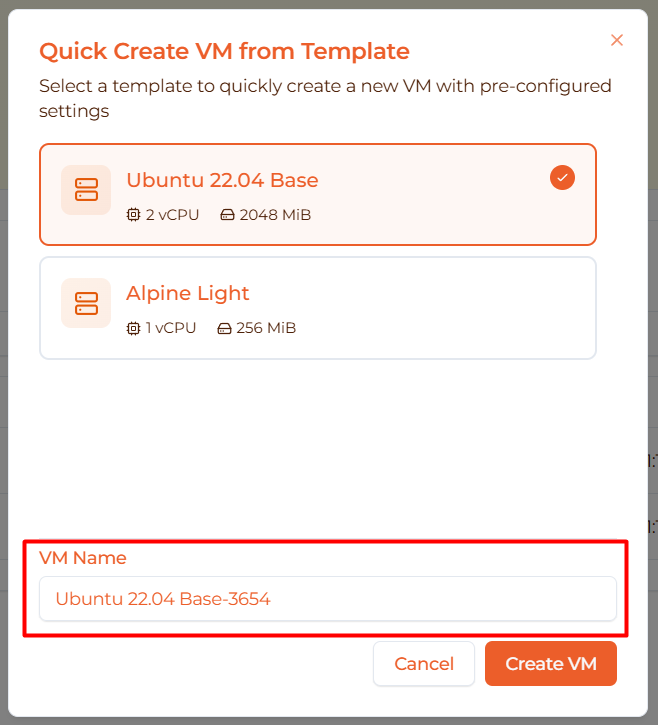
The VM will be created instantly with all settings from the template!
Benefits:
- ⚡ Much faster than full wizard
- ✅ Pre-configured settings (CPU, memory, images)
- ✅ Consistent configuration across VMs
- ✅ Perfect for creating multiple similar VMs
Use cases:
- Create dev environments for team members
- Spin up test VMs quickly
- Deploy standardized configurations
- Rapid prototyping
See VM Templates for creating and managing templates.
Filtering and Searching VMs
Search by Name or ID
Use the search bar to quickly find VMs:

- Type VM name (e.g., “web-server”)
- Or type VM ID
- Results filter instantly as you type
- Search is case-insensitive
Filter by State
Use the state filter dropdown to show only specific VM states:

Options:
- All States - Show all VMs (default)
- Running - Only running VMs
- Stopped - Only stopped VMs
- Paused - Only paused VMs
Tip: Combine search and filter for precise results (e.g., search “prod” + filter “Running”)
VM Table Information
The VMs table shows detailed information for each VM:
Columns Explained
- Name - VM name (click to open detail page)
- State - Current status with colored badge
- CPU - vCPU count and current usage %
- Memory - Allocated MiB and current usage %
- Guest IP - IP address assigned to VM (via DHCP)
- Host - Which host/agent is running this VM
- Owner - Who created the VM:
- “You” (green) - VM you created
- “Other User” - Another user’s VM
- “System” - System-created VM
- Created - Relative time (e.g., “2 hours ago”)
- Actions - Action buttons (Start, Stop, Pause, Resume, Delete)
Pagination
If you have more than 10 VMs, use pagination at the bottom:
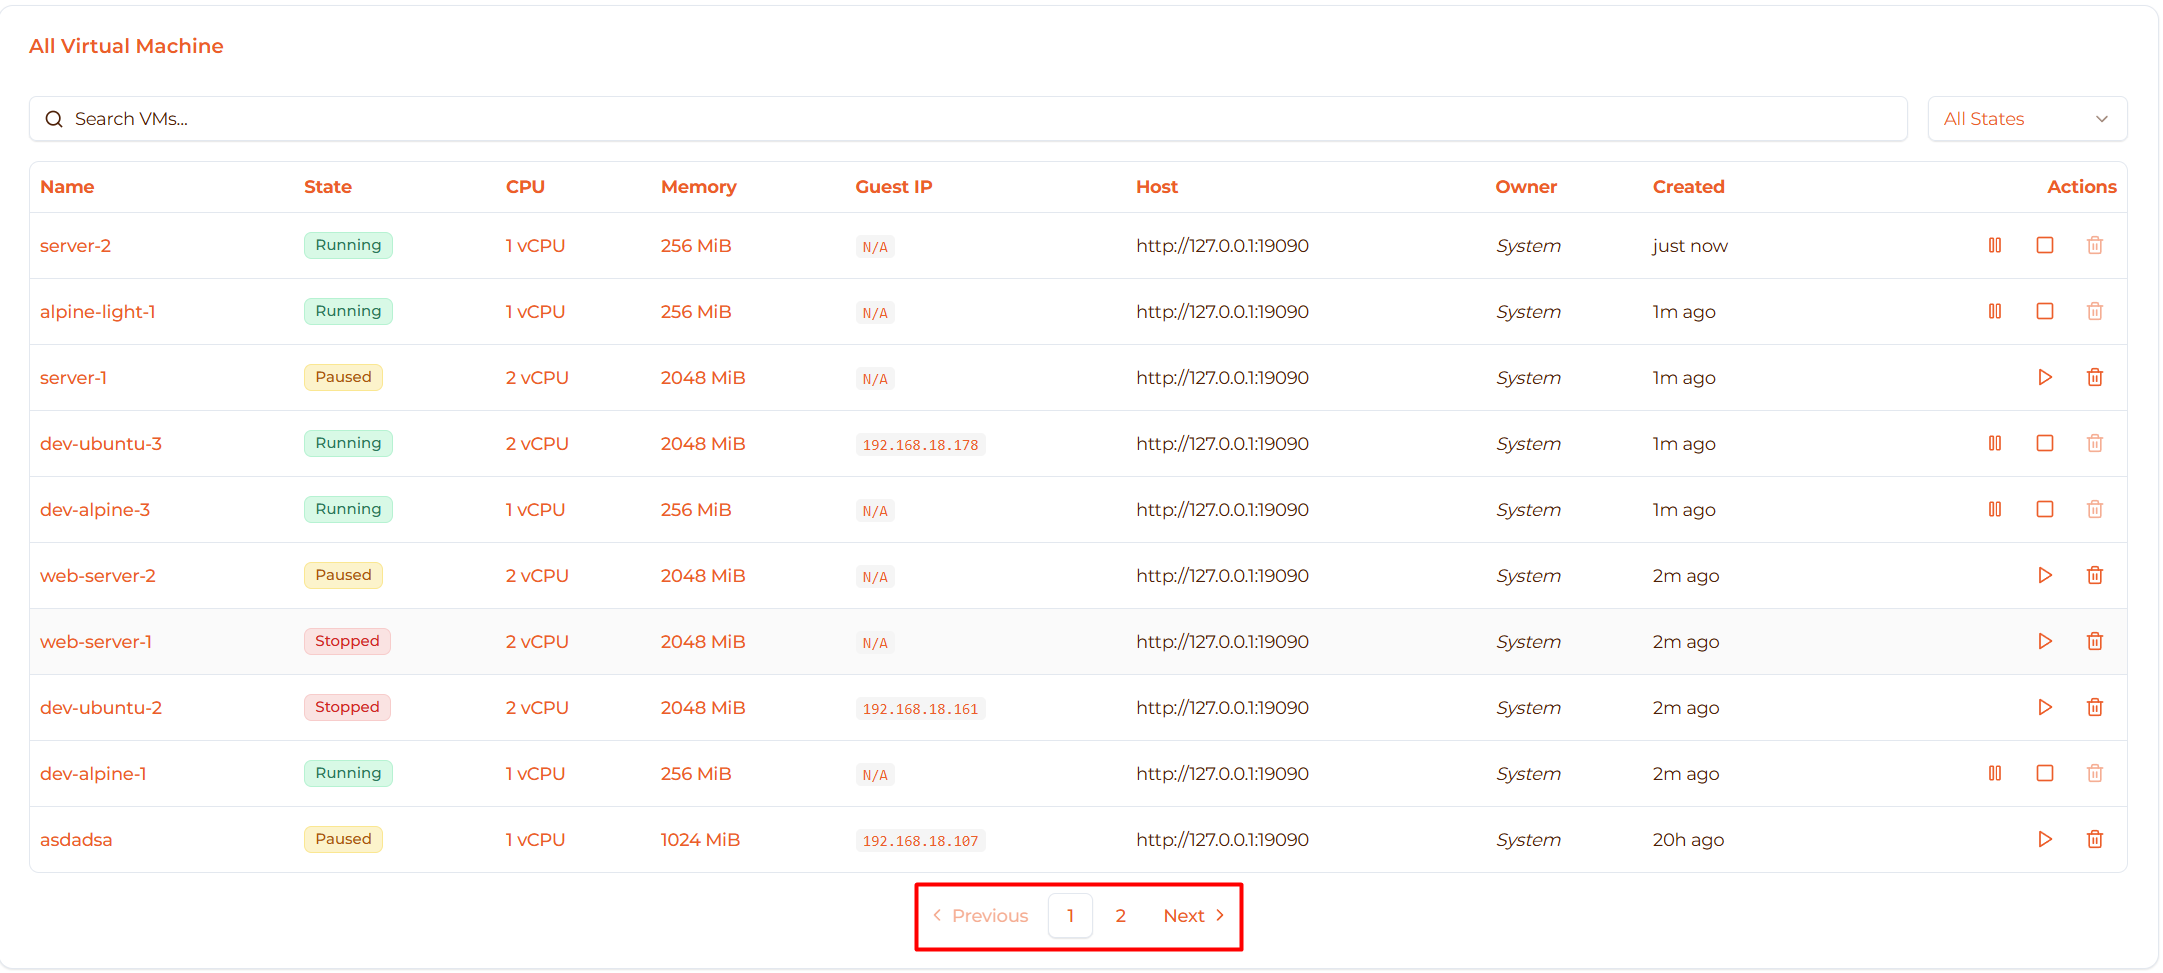
- 10 VMs per page
- Click page numbers to navigate
- Use Previous/Next arrows
Troubleshooting
Issue: Can’t Start VM
Symptoms:
- Start button doesn’t respond
- VM stuck in transitioning state
- Error notification appears
Solutions:
Check host resources:
- Go to Hosts page (sidebar)
- Verify host has available CPU and memory
- If host is overloaded, stop other VMs first
Verify images exist:
- Go to Registry → Images
- Check kernel and rootfs images are present
- Re-upload if missing
Check agent status:
- Go to Hosts page
- Verify agent is Online (green)
- If offline, contact administrator
Try deleting and recreating:
- Delete the problematic VM
- Create a new one with same settings
Issue: Delete Button is Disabled
Symptoms:
- Delete button is greyed out
- Tooltip says “Cannot delete running VM”
Solution:
This is expected behavior - you cannot delete a running VM.
- Click the Stop button first
- Wait for state to change to “Stopped”
- Now the Delete button will be enabled
- Click Delete to remove the VM
Why this restriction?
- Prevents accidental deletion of active services
- Ensures graceful shutdown
- Protects data integrity
Issue: VM Won’t Stop
Symptoms:
- Clicked Stop but VM still shows “Running”
- No state change after 30 seconds
Solutions:
Refresh the page (Ctrl+R or F5)
- Sometimes the UI needs to refresh state
Wait and retry:
- Wait 60 seconds
- Click Stop again
Graceful shutdown first:
- Click VM name → Terminal tab
- Login to console
- Run:
shutdown now - Wait 10 seconds, then click Stop
Check VM detail page:
- Open VM detail page
- Check if there are errors displayed
- Try stopping from there
Issue: Paused VM Can’t Resume
Symptoms:
- Resume button doesn’t work
- Error message appears
Solutions:
Refresh browser:
- Press F5 or Ctrl+R
- Try Resume again
Stop and start instead:
- Click Stop button (yes, you can stop a paused VM)
- Wait for “Stopped” state
- Click Start
Check browser console:
- Press F12 to open DevTools
- Go to Console tab
- Look for error messages
- Share with administrator if errors found
Last resort - Delete and restore:
- If you have a snapshot, delete the VM
- Restore from snapshot
Best Practices
Starting VMs
✅ Do:
- Start VMs only when actually needed (save resources)
- Use Quick create from templates for consistency
- Verify host has enough resources before starting multiple VMs
- Check agent is Online on Hosts page first
- Use search/filter to quickly find the VM you need
⚠️ Avoid:
- Starting all VMs at once (may overwhelm host)
- Starting VMs on offline/failed hosts
Stopping VMs
✅ Do:
- Graceful shutdown first (SSH in and run
shutdown now) - Wait 5-10 seconds after graceful shutdown before clicking Stop
- Stop VMs when not in use to free resources
- Create snapshot before stopping critical VMs
- Stop test/dev VMs after work hours
⚠️ Avoid:
- Force stopping without graceful shutdown (risk of data corruption)
- Stopping production VMs during business hours
- Stopping VMs with active connections
- Stopping VMs running long-running tasks (backups, builds)
Pausing VMs
✅ Do:
- Use pause for temporary resource freeing (hours, not days)
- Pause for debugging or troubleshooting
- Resume within reasonable timeframe
- Use when you need CPU but not memory
⚠️ Avoid:
- Pausing for extended periods (use Stop instead to free memory)
- Pausing production VMs (may cause timeout/connection issues)
- Pausing network-sensitive applications
- Forgetting to resume (wasted memory)
Deleting VMs
✅ Do:
- ALWAYS create snapshot before deleting (can restore later)
- Stop or pause the VM first (can’t delete running VMs)
- Verify data is backed up elsewhere
- Check no other services/VMs depend on it
- Document why you’re deleting (in team notes)
- Double-check you’re deleting the right VM
⚠️ Avoid:
- Deleting without snapshots (permanent!)
- Deleting shared service VMs
- Deleting production VMs without team approval
- Clicking Delete on wrong VM (check name carefully!)
Resource Management
✅ Best practices:
- Monitor regularly: Check Hosts page for resource usage
- Stop unused VMs: Don’t leave test VMs running overnight
- Use filters: Filter by “Running” to see what’s consuming resources
- Clean up regularly: Delete old test/temp VMs
- Use templates: Quick create for standardized resource allocation
- Right-size VMs: Don’t over-allocate CPU/memory
Weekly cleanup checklist:
- Filter VMs by “Running”
- Stop any unused dev/test VMs
- Delete old temporary VMs (after creating snapshots)
- Check Hosts page for resource usage trends
Search and Organization
✅ Tips:
- Naming convention: Use
<env>-<purpose>-<number>(e.g.,dev-web-01,prod-api-02) - Use search: Quickly find VMs by typing name
- Filter by state: View only Running/Stopped/Paused VMs
- Owner column: Easily see which VMs are yours
- Pagination: Use page numbers for large VM lists
Example naming scheme:
  dev-alice-ubuntu      (developer's personal VM)
test-backend-api      (testing environment)
staging-database      (staging DB server)
prod-web-01          (production web server #1)
prod-web-02          (production web server #2)
Quick Reference
VM State Actions Summary
| Current State | Available Actions | Click to… |
|---|---|---|
| Stopped | ▶ Start, 🗑️ Delete | Start: Run VM Delete: Remove permanently |
| Running | ❚❚ Pause, ◼ Stop | Pause: Freeze instantly Stop: Shutdown VM |
| Paused | ▶ Resume, 🗑️ Delete | Resume: Continue execution Delete: Remove |
Common Workflows
Daily work:
- Morning: Start your dev VM
- Work: Use Terminal tab for access
- Evening: Stop your dev VM
Testing:
- Quick create VM from test template
- Run tests
- Stop VM
- Delete VM after confirming results
Production deployment:
- Create snapshot of current prod VM
- Stop prod VM
- Create new VM with updated config
- Test new VM
- Switch traffic to new VM
- Keep old VM snapshot for rollback
Next Steps
Now that you know how to manage VMs, explore:
- Access VM - Connect via terminal and SSH
- Monitoring - View performance metrics and logs
- Backup & Snapshot - Protect your VMs with snapshots
- Create VM - Create VMs using the wizard